How to Plant, Grow, and Care For Haworthia Succulents
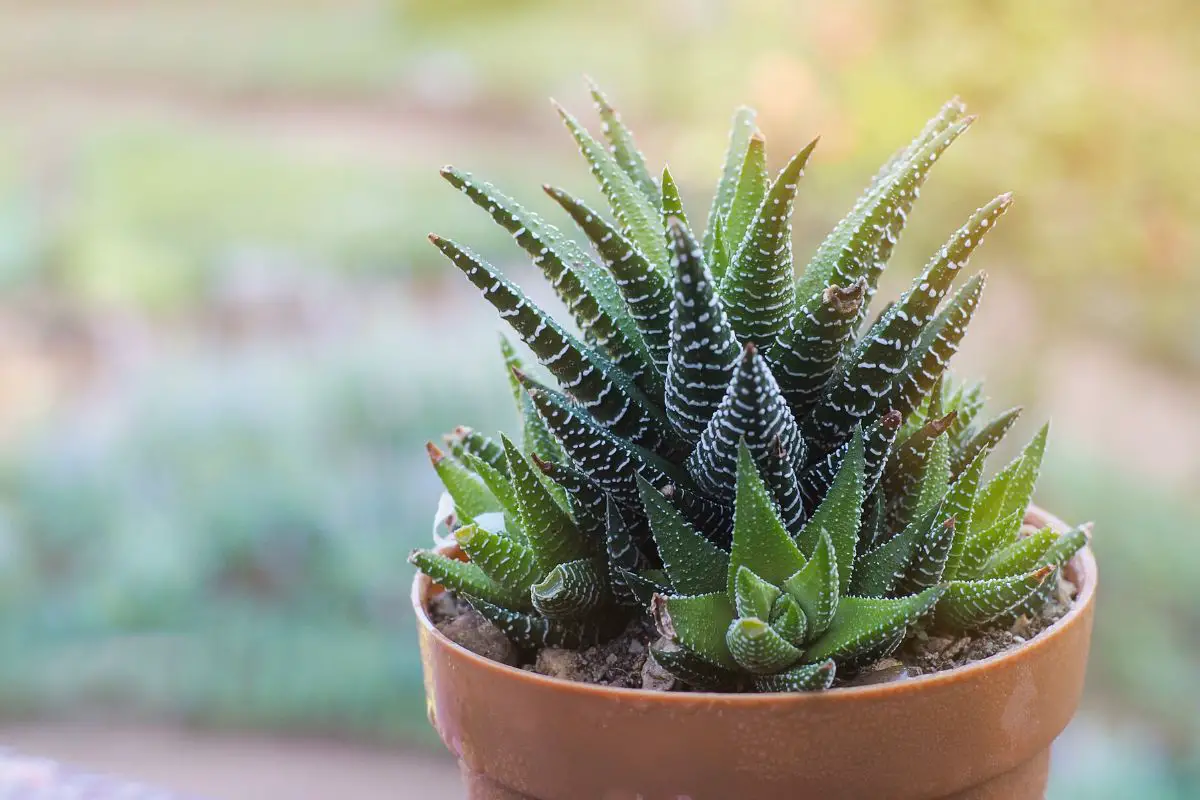
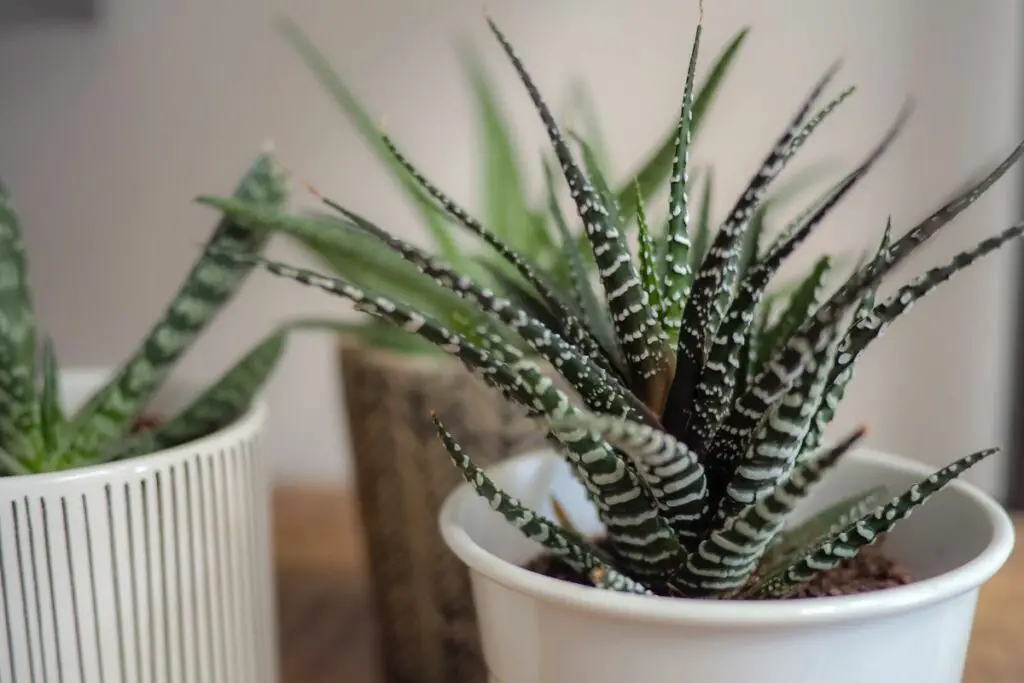
Haworthias are exquisite houseplants because of their unusual appearance. Some have aloe-like foliage with white stripes or bumps while others have rounded succulent leaves with rosette formation. They’re also popular for indoor gardeners because of their low-maintenance needs.
To grow haworthias, you need a bright spot in your home where they can receive four hours of direct sunlight daily. They need moderate moisture and loose, fast-draining soil which consists of 60-70% coarse sand and perlite or pumice.
In the rest of the article, I’ll explore everything you need to know to ensure the plant thrives in your home environment. I’ll also share tips on how to propagate haworthias and address common problems.
Quick Guide
| Common Name(s) | Haworthia, zebra cactus, zebra plant, pearl, star window, and cushion aloe |
| Botanical Name | Haworthia spp. |
| Family | Asphodelaceae |
| Plant Type | Succulent |
| Native Area | South Africa |
| Height & Spread | 2-8 inches (5-20 cm) tall and 2-6 inches (5-15 cm) wide |
| Bloom Time | Late spring, summer, or early autumn |
| Flower Structure | Raceme |
| Color | The foliage is green or reddish brown with a translucent streak or top. Some have white bumps or streaks. The flowers can be white, purple, yellow, or green (depending on the species). |
| Sun Exposure | Full sun (6 hours of direct sunlight) Partial shade (2-6 hours of direct sunlight) |
| Soil Type | Loose, fast-draining Rich in coarse sand and perlite/pumice |
| Soil pH | 6.0-7.0 |
| Watering | Moderate Allow the upper half of the potting mix to dry between watering sessions |
| Pests, Diseases, Common Problems | Mealybugs Root rot Frost damage |
| Toxicity | Non-toxic |
| Required Maintenance | Low |
Haworthia Succulents: An Overview
Haworthias come from the arid regions of South Africa and are quite drought-tolerant due to their succulent leaves. They primarily grow in sandy soil, but many can be found growing on rocky cliffs.
They’re not as tolerant to intense sunlight and extreme heat as other succulents. Their short stature—reaching only up to 8 inches (20 cm) tall—allows them to receive shade from taller plants or structures like rocks.
Anatomy
There are numerous species of haworthias with varying appearances.
Leaves
All haworthias have thick, succulent leaves, which store moisture and keep the plant hydrated even during periods of drought.
They’re divided into three groups based on appearance:
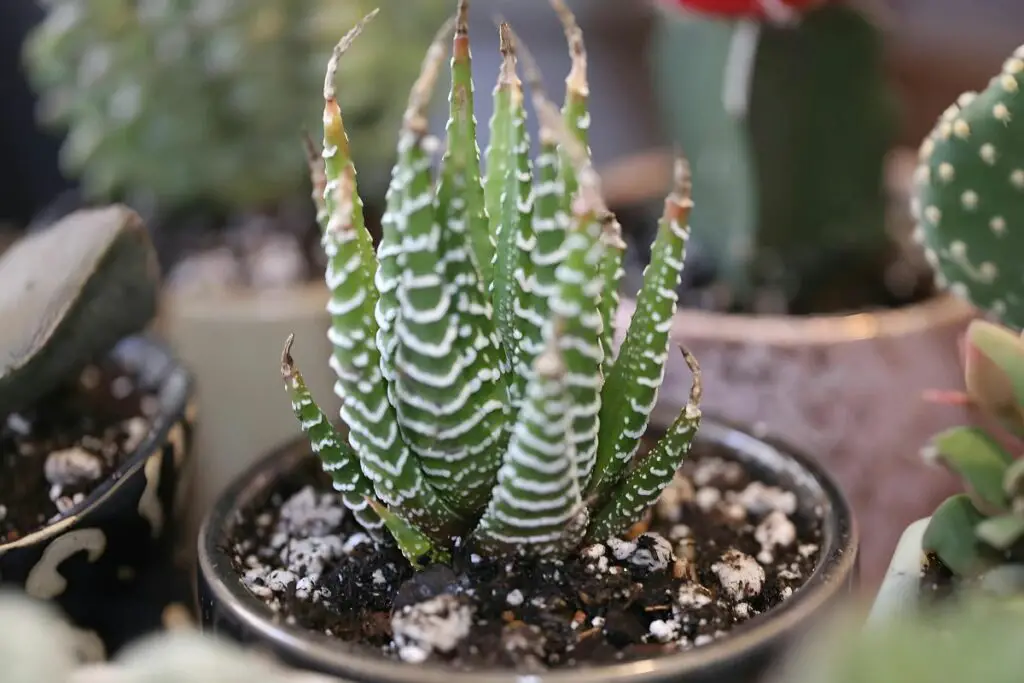
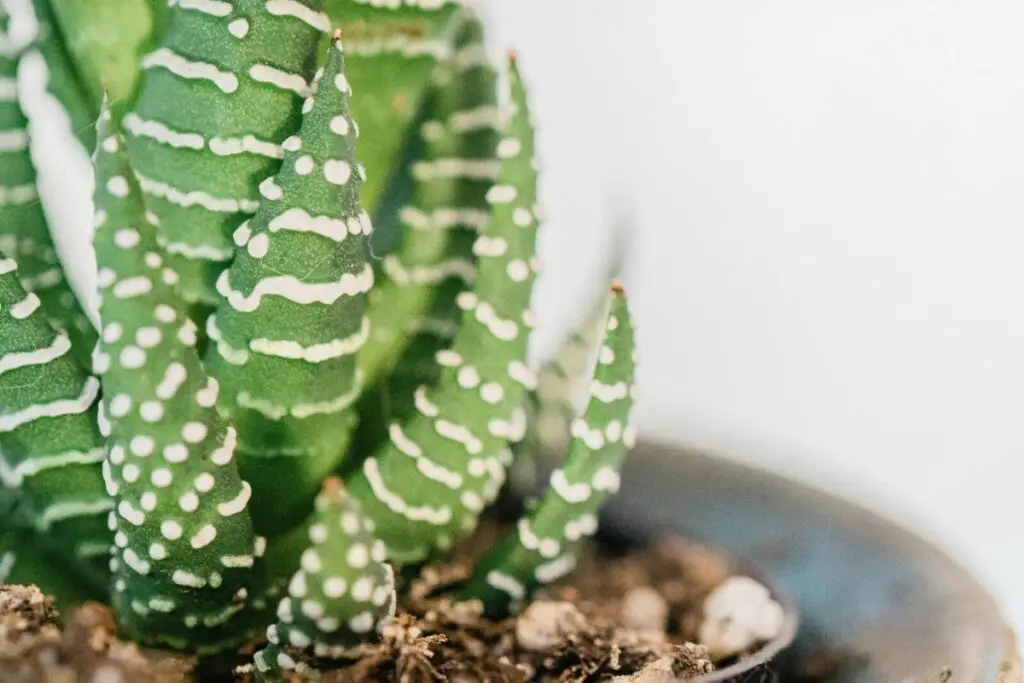
- Aloe-like: Haworthiopsis species (i.e., zebra plants) used to belong to the Haworthia genus but reclassified into a separate genus because of rough leaves. The long, aloe-like leaves form a rosette pattern from the base and keep growing more leaves in the middle until the plant gets taller.
- Retused: Short, plump, triangular leaves whose top smoothens to an outward curve and terminates in a short, pointed tip. The top is translucent with whitish venation. The translucent part is called the epidermal window, through which light energy enters. The leaves also grow in a rosette pattern. Common examples are H. retusa and H. cooperi.
- Truncated: The leaves terminate in a flat, translucent top. They grow right next to each other in a fan-like pattern, such as in the case of H. truncata.
Roots
Most haworthia species have shallow (sometimes fleshy) roots that allow them to soak up the moisture close to the surface because of scarce rainfalls in their native habitat.
H. retusa may have a larger and deeper root system in proportion to the shoot size, so they may require deeper pots than other species.
For rosette-growing species, the roots converge in the central crown and new leaves grow at the center.
Some roots with leaf nodes growing close to the surface may produce leaves in a separate rosette formation. This will then become the offset or pup that grows at the base of the plant.
Flowers
In general, haworthia flowers are borne on long stalks up to 12 inches (30 cm) tall in the middle of the plant. Each stalk has a raceme flower formation with 3-5 tubular flowers that can vary in color: white, purple, yellow, or green.
These flowers only come out when the plant grows in suitable environmental conditions, such as the following:
- Around 4 hours of direct morning sunlight
- Enough phosphorus in the soil
- Temperatures between 65 and 80 °F (18 and 27 °C); higher temperatures will cause the flower buds to terminate
- Average humidity (30-50%)
- Adequate moisture
Reproduction
In the wild, haworthias reproduce through offsets or seeds.
The flowers typically bloom in spring in regions where rain is abundant in winter. In areas with summer rains, the plants become active in summer and bloom during the hot season until early fall.
They’re less likely to bloom indoors, so they’ll mainly spread through offsets, albeit more slowly than in their native environment.
Dormancy
Winter-growing haworthias lose their roots and become dormant in summer when it gets too hot and dry. On the other hand, most parts of South Africa are frost-free, so the plants don’t enter dormancy in winter.
Similarly, haworthias don’t enter dormancy when kept in stable conditions indoors—although they may grow even more slowly.
Benefits as Houseplants
Harworthias have become popular among home gardeners in the U.S. as they:
- Don’t require frequent watering
- Have lower light requirements than cacti and most succulents
- Remain small and compact for a long time
- Have low fertilizer needs
- Have attractive foliage (which can greatly vary in appearance depending on the species)
- Are non-toxic, making them ideal for homes with curious pets and young children
Popular Varieties
Based on the benefits discussed above, you may be interested in getting yourself a haworthia. However, note that haworthia is a diverse genus of succulents with 70 species and over a hundred varieties.
Here’s a brief guide on the varieties popular for indoor cultivation:
| Species | Physical Traits |
| H. retusa (Star cactus, cushion aloe) | Very compact, typically 1-4 inches (2.5-10 cm) tall and wide The leaves are short, plump, and triangular with pointed tips (retused). Color ranges from light to dark green or reddish green (i.e., H. retusa var. turgida) White flower |
| H. truncata (Horse teeth) | One of the shortest species, reaching only an inch (2.5 cm) tall and about 8 inches (20 cm) wide. Grayish green leaves are short and truncated The leaves don’t form a rosette pattern unlike the other species. White flower |
| H. cooperi (Cooper’s haworthia) | Mature size is typically 4 inches (10 cm) tall and wide Light green leaves are plump, short, and triangular with short bristles along the margin White or green flower |
| H. cymbiformis (Window haworthia) | Reaches up to 6 inches (15 cm) tall and 8 inches (20 cm) wide Light green leaves are triangular and boat-shaped White flower |
| H. bayeri | Typically 3 inches (7.6 cm) tall and about 6 inches (15 cm) wide at maturity Olive green or reddish green leaves with white veins on the retused, translucent top Rarely produces offsets; often propagated through leaf cuttings or seeds Yellow flower |
| Haworthiopsis attenuate Zebra plant | Aloe-like leaves 4-12 inches (10-30 cm) tall and 6-24 inches (15-60 cm) wide Dark green, pointed leaves with white bumps that give them a rough texture Light purple flower |
| Haworthiopsis fasciata Fasciated haworthia | Also has aloe-like leaves Can reach up to 16 inches (40 cm) tall and about 6-12 inches (15-30 cm) wide Long, pointed leaves with white bumps that are connected to each other, forming bands Leaf color can vary from orange, green, red, or bronze White or purple flowers |
| H. obtusa | Can grow 3-6 inches (7.6-15 cm) tall and wide Rounded light green leaves with dark green streaks and translucent top (epidermal window) White or pinkish flowers |
Selecting Your Plant
If you want a touch of nature on your windowsill, bedside table, or desktop, haworthias are an excellent choice. Due to their popularity, they’re relatively easy to find in gardening stores or specialty succulent shops. These resilient plants don’t have many issues.
Still, here are some tips to make the most of your purchase:
- Find plants that match your space. If you want short and stout plants that can fit in a 4-5-inch (10-13 cm) pot, choose the rounded varieties, such as H. retusa, H. obtusa, or H. cooperi. If you want taller, aloe-like plants, go for the Haworthiopsis relatives, such as the zebra plant.
- Choose plants without brown leaves because it indicates stress. Numerous factors can cause discoloration to haworthias, and you wouldn’t want to guess and treat the issue as soon as you get the plant. It’s always best to choose a healthy plant.
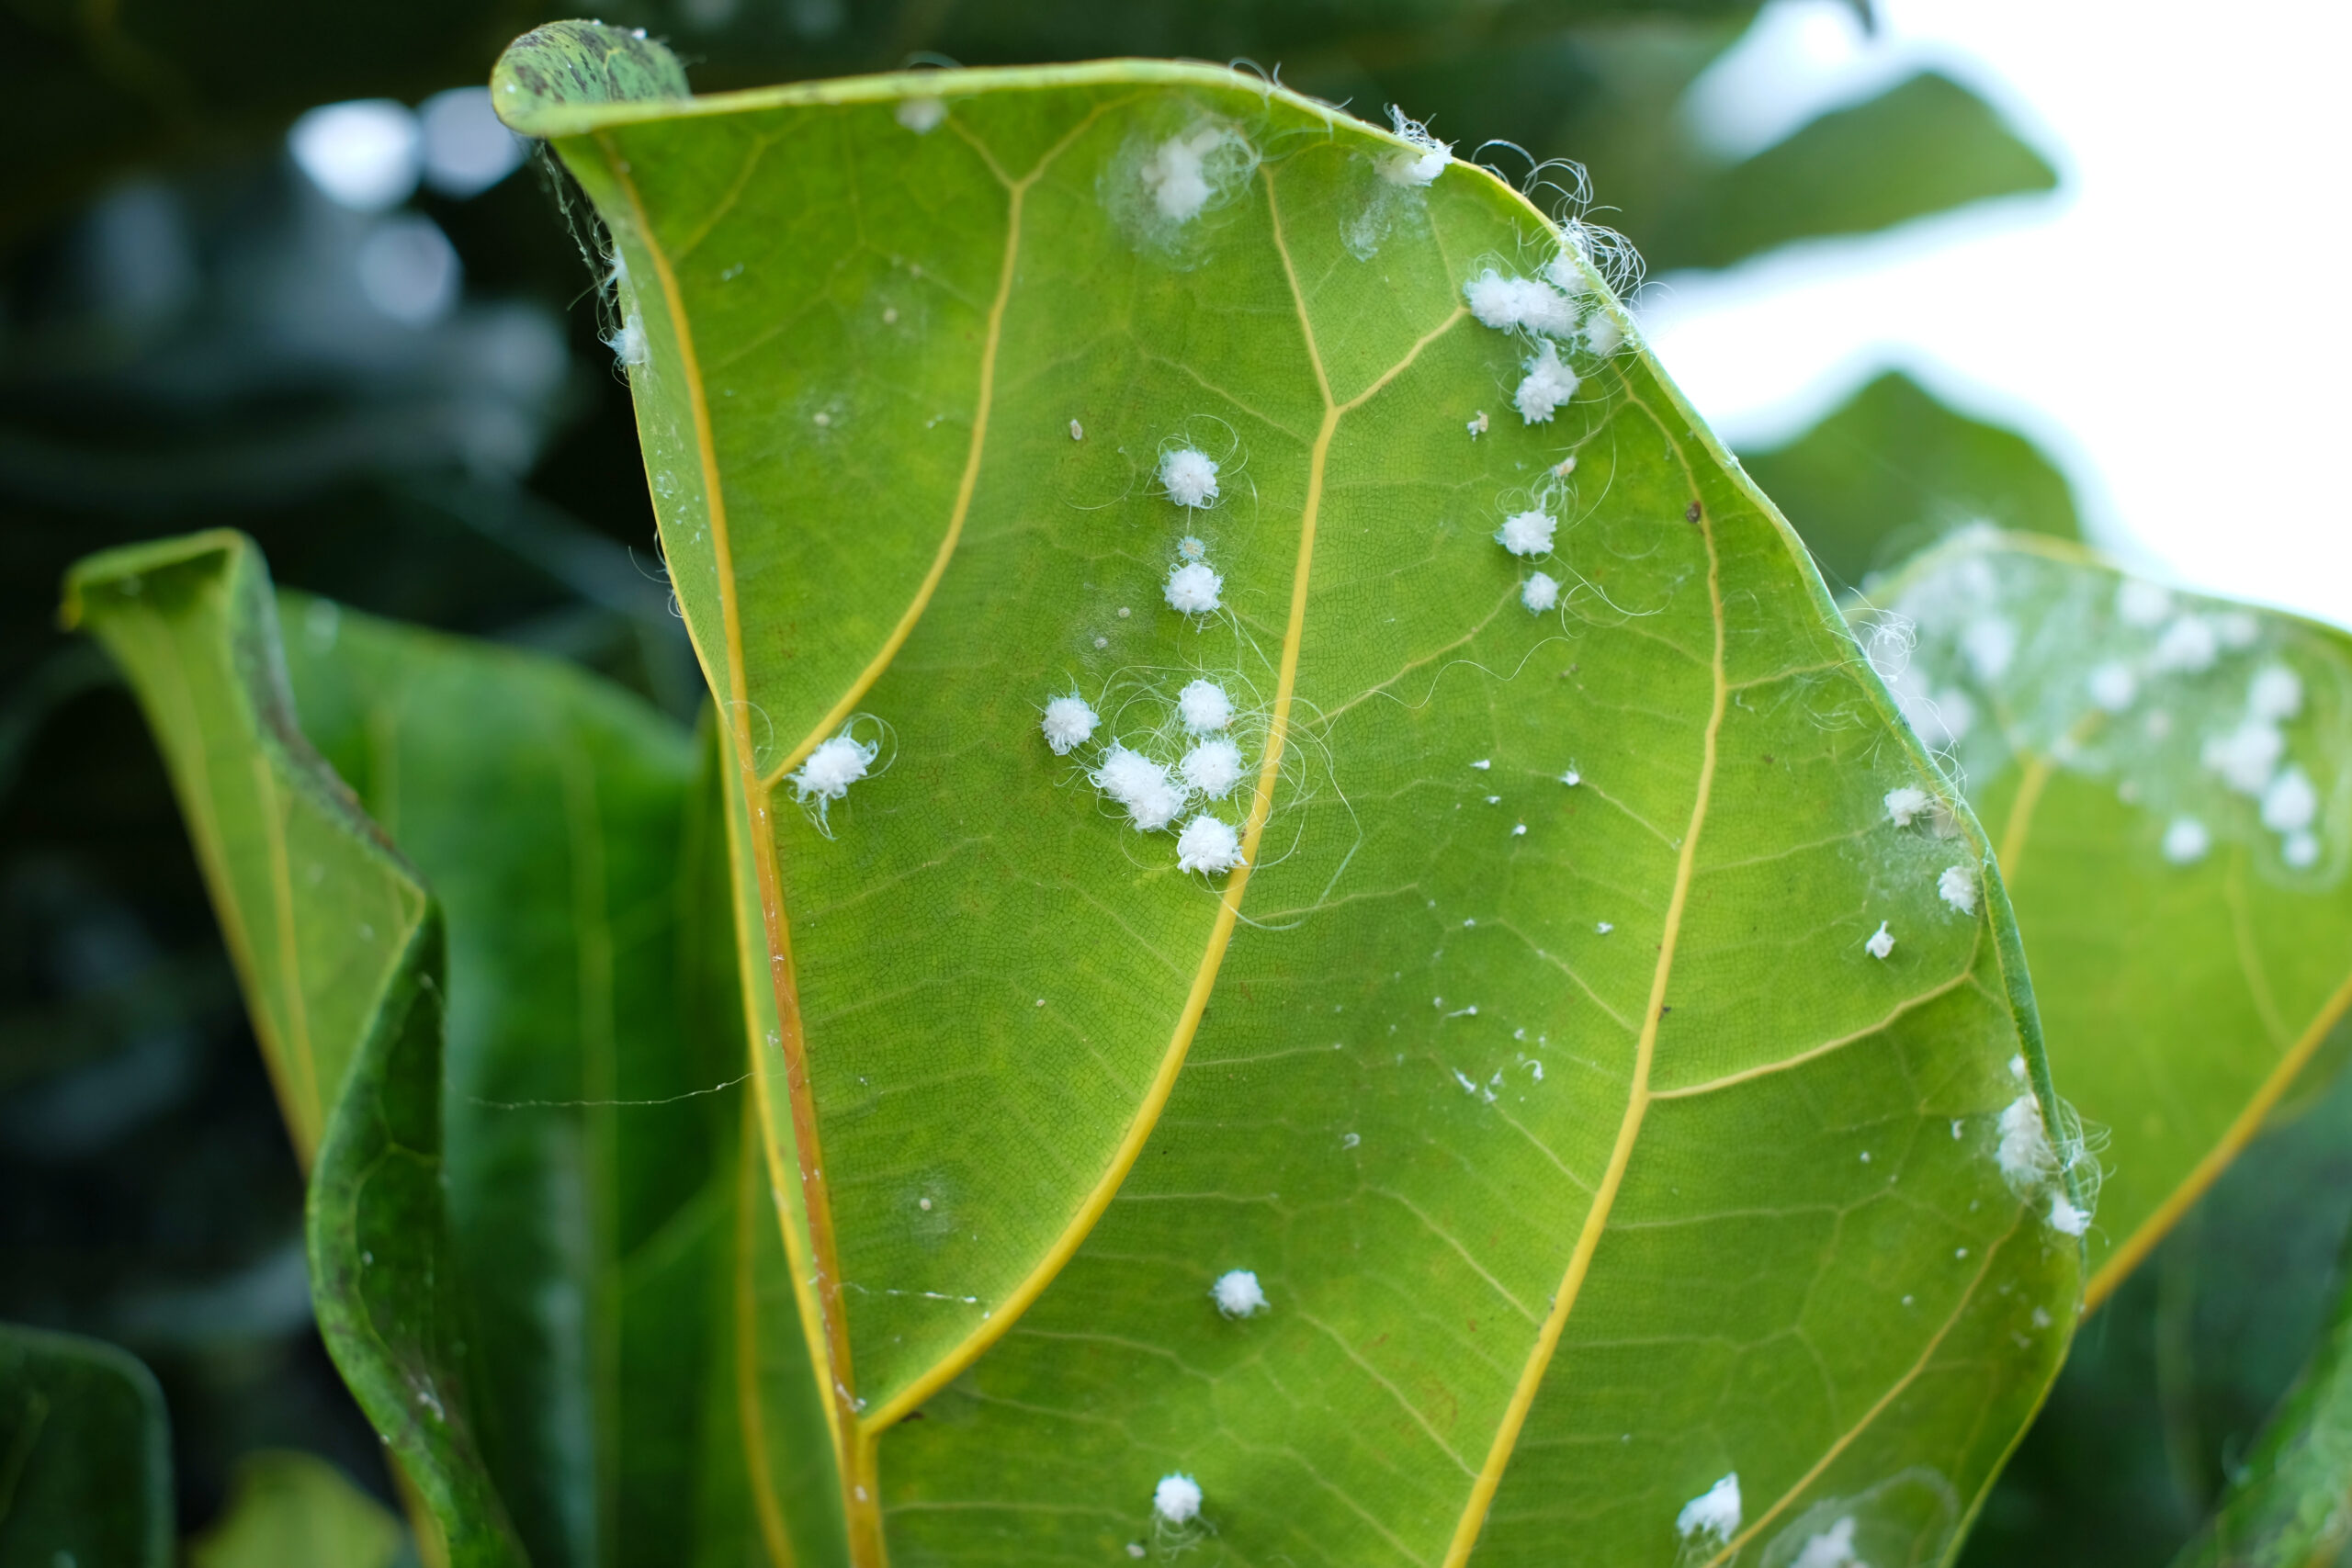
- Avoid plants with pests. Haworthias seldom have pest issues because they’re usually kept dry. Still, watch out for mealybugs, which are white, cottony crawlers that hide between the succulent leaves.
- Look for plants with offsets. If you’re lucky, you might come across nursery plants with offsets. It’s like getting multiple plants in one because you can transplant the offset in its own pot the following year.
After getting your haworthia and bringing it home, keep it isolated from your other houseplants for up to 8 weeks. This is necessary to ensure that you’re not bringing home pests or diseases into your indoor garden.
Keep it in a bright room with up to 6 hours of direct morning light. If you have west- or south-facing windows, keep the plant away from direct sunlight.

Initial Planting
Haworthias are slow-growing plants. They can stay in their nursery pot for a year after purchase. The following spring, you can transplant them into a pot that matches your home interior.
Choosing the Right Pot
Most haworthias have shallow roots except for a few species like H. retusa and some hybrids, which develop fleshy roots.
For shallow-rooted species, prepare a new pot that’s only an inch (2.5 cm) deeper and up to 2 inches (5 cm) wider than the original pot. Go for a pot that’s 2-3 inches (5-7.6 cm) deeper if your plant has fleshy roots.
You can use plastic, ceramic, or terracotta pots. Just ensure they have adequate drainage holes.
Young plants grow slowly and can sit in the same pot for 2-3 years. Mature plants grow even more slowly, but they need some lateral space to produce offsets or pups.
Preparing the Soil Mix
You can use a standard succulent mix for your haworthia. If you want a homemade mix, my go-to recipe is equal parts coarse sand, perlite/pumice, and standard potting soil. This mixture is well-draining but holds enough moisture for the roots to absorb.
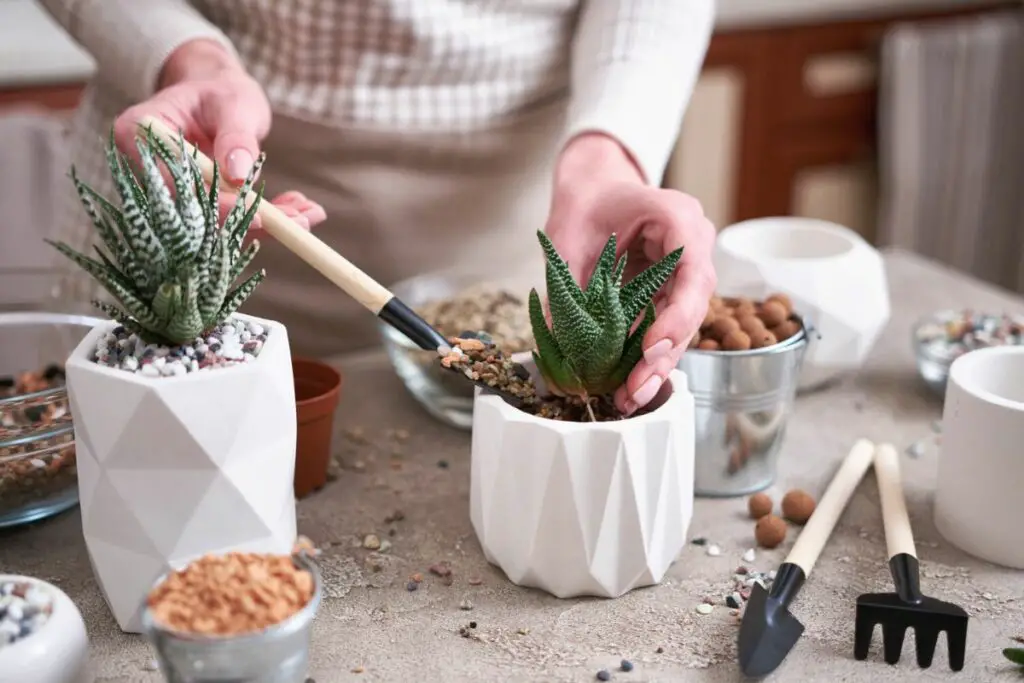
Step-by-Step Planting Guide
The best time to plant or transplant haworthia is in early to mid-spring.
Here’s how to transplant them into a new pot:
- Water the haworthia 1-2 days before transplanting it to the new pot.
- Fill the bottom inch (2.5 cm) of the new pot with fresh and moist soil mix.
- Hold the plant by the crown and gently wiggle it out of the soil. The fluffy succulent soil will make it easy to pull out your plant.
- Place the plant into the new pot and fill the space with more soil until it covers the base of the plant.
- Tamp down the soil until the surface and the plant’s crown are about a half inch (1.3 cm) below the rim of the pot. Don’t bury any foliage in the soil.
- Place the plant in a bright, warm spot.
- Wait a full week before watering your plant deeply.
Optimal Growing Conditions
Although haworthias are sturdy and may survive in suboptimal conditions for a while, keeping them in a poor environment for extended periods can stress them. The foliage may wrinkle, turn yellow or brown, or fall off.
As slow-growers, they will take a long time to recover from stress. That’s why it’s best to prepare a proper environment for optimum health and growth.
Location and Light Requirements
Haworthias can tolerate lower light levels than other succulents. They prefer a bright and sunny spot next to an east-facing windowsill. If you have a west or south-facing window, keep your plant up to 8 feet (2.4 m) away because they don’t like to sit in full afternoon sun.
You can also keep them outdoors on the porch or balcony if you have a frost-free climate (i.e., USDA zones 9-11). Wait until temperatures remain well above 65 °F (18 °C) and the nights don’t fall below 50 °F (10 °C). Acclimate them to outdoor conditions by moving them to a roofed area for an hour, gradually increasing the duration by one hour daily for a week.
Haworthias can remain outdoors even when temperatures reach 100 °F (38 °C) as long as they’re well-watered and shaded from intense sunlight. Move them back indoors when nighttime temperatures are expected to fall below 50 °F (10 °C).
If you have sandy soil, you can grow them in the ground along with other succulents. Just make sure they receive enough water and shade from the intense midday or afternoon sun.
Temperature
Haworthias thrive between 65 and 90 °F (18 and 32 °C). Keep them away from drafty windows, doors, or vents, where temperatures fluctuate significantly throughout the day. Avoid temperatures below 40 °F (4 °C) because your plant will likely suffer frost damage, such as browning foliage.
Humidity
The humidity in their home environment can sometimes be as low as 25%. Usual indoor levels between 30 and 50% using HVAC systems are comfortable for humans and haworthias alike.
Avoid placing them in bathrooms or kitchens where humidity levels fluctuate drastically. High humidity will slow down evaporation and transpiration. Without adjusting your watering schedule accordingly, your plant might become overwatered.
Watering
Haworthias may enter dormancy in their native environment if the winter or summer is dry. However, those that grow in regions where rain is distributed throughout the year don’t enter dormancy. Instead, they enter a period of slower growth after dispersing the seeds.
In your home environment, regular watering and stable environmental conditions may keep them active all year round.
Regardless of the growing season, haworthias store moisture in their succulent leaves, allowing them to go a few weeks without water. You’ll know that your plant needs water when the leaves appear wrinkly.
Follow these watering tips to keep your plant healthy:
- Check the soil 5-7 days after watering by poking a finger or wooden chopstick into it.
- Confirm if the upper half of the soil mix is dry and water the plant if it is.
- Avoid wetting the foliage or spilling water in the narrow space between the leaves.
Incorrect watering practices can lead to the following issues:
Underwatering
Letting the soil go bone dry for extended periods will make it susceptible to becoming hydrophobic because of its high sand content.
When this happens, the soil will repel water and the haworthia’s shallow roots won’t be able to access moisture. The water will just flow through the cracks in the dry soil or along the sides of the pot and exit the drainage holes without rehydrating the plant. This will leave your plant underwatered.
Common signs of underwatered haworthias are:
- Wrinkled leaves
- Yellow leaves
- Brown and crisp leaves
- Roots falling off
Overwatering
Watering your plant too frequently keeps the soil constantly wet; overwatered haworthias will have:
- Browning leaves
- Water-soaked, shriveling, and squishy leaves
- Dying and falling of foliage on the plant parts close to the soil
Due to the small size of the root system, overwatered haworthias quickly develop root rot that can quickly spread to the plant’s crown and short stem.
Fertilizing and Nutrient Requirements
Haworthias don’t need frequent fertilization because they grow slowly.
They grow actively from late winter to late spring or early spring until summer, depending on the species. Due to the numerous species and hybrids and mixed information about their origins, it can be challenging to determine their actual growing season.
Either way, it’s safe to apply fertilizers in early spring.
Here are some tips to fertilize your haworthias properly:
- Avoid fertilizing your plant immediately after repotting or transplanting. Wait until the following spring to replenish the soil nutrients.
- Young plants only need a single application of slow-release 3-1-2 fertilizer in spring.
- If you want your mature plant to flower, use a slow-release 5-10-10 fertilizer in early spring.
- If your potting soil has plenty of organic matter and you don’t need/want your plant to bloom, you may even get away with skipping fertilizers until the next repotting.
If the potting mix lacks organic matter and you haven’t fertilized your haworthia in the previous year, it may show the following signs of nutrient deficiency:
- Paler or yellowing leaves can indicate lack of nitrogen
- Lack of flowers, especially if your plant usually blooms every year, can indicate lack of phosphorus or potassium.
Conversely, over-fertilization will lead to:
- Yellowing leaves
- Wrinkled leaves (excess fertilizer salts can dehydrate the roots)
- Weak and overextended leaves
- Necrotic spots on the leaves due to fertilizer burn
Pruning and Maintenance
You don’t need to prune haworthias regularly. You may need to pluck off browning leaves occasionally or remove the fallen leaves.
Here are some tips for proper pruning:
- Remove old, dried leaves at the bottom by wiggling them sideways. If they don’t come off readily, you can use a sterile knife to make small cuts on either side of each leaf.
- If your Haworthiopsis plant is growing too tall, you can cut the top with a sterile knife or long scissors. Position the blade at the same angle as the leaves and cut in a circle to remove the top. New growth will occur in the scar. Meanwhile, you can propagate the entire stem cutting or the individual leaves.
In addition to occasional pruning, you can maintain the appearance and health of your haworthia by dusting it at least once a month.
You can use a dry and clean piece of cloth to wipe the retused top of round-shaped haworthia leaves. Use a soft oil brush to remove the dust in the narrow space between the leaves.
Propagation Techniques
There are three ways to propagate haworthias at home: through offsets, cuttings, or seeds. Each method has its own pros and cons and recommended steps.
Dividing Offsets and Repotting
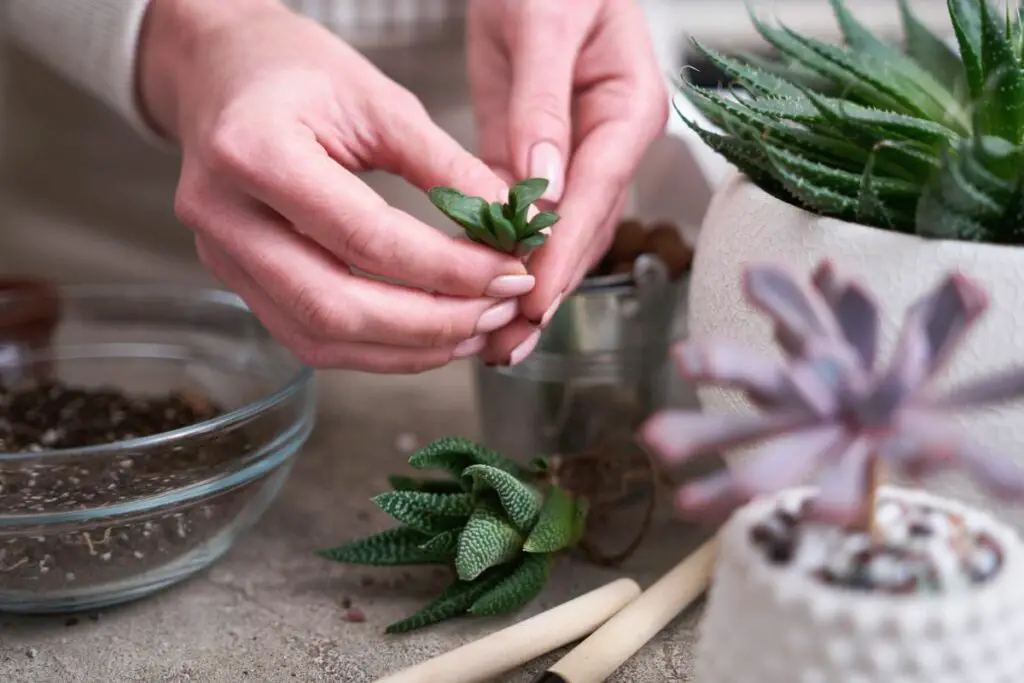
The easiest method of propagation is separating the offsets or pups from the mother plant. These miniature plants already have roots and can thrive on their own. Just ensure they’re a third of the size of the mother plant or over an inch (2.5 cm) in diameter.
The only downside of this method is that it can take years before haworthias mature enough to produce offsets and a few more years for the offsets to be ready for separation.
If your plant has large enough pups, you can separate them following these steps:
- Wait until early spring when the plant shows signs of new growth.
- Water the plant deeply 1-2 days before dividing.
- Prepare your standard haworthia potting mix in a 2-inch (5 cm) pot. Alternatively, you can use two parts perlite or pumice and one part coco peat.
- Moisten the potting mix a day before planting.
- Carefully wiggle the pup away from the mother plant. They have small roots that will easily pull away from the main plant.
- Keep the mother plant in the same pot.
- Poke a hole into the soil mix in the smaller pot with your finger and place the pup in.
- Secure the plant by tamping down the soil, ensuring that the foliage is well above the soil level.
- Water the plant as soon as the top inch (2.5 cm) of the soil is dry.
Collecting and Rooting Cuttings
If your plant is too young or stressed to produce offsets, you can propagate it through leaf cuttings. Haworthiopsis species can be propagated through stem cuttings because they grow taller.
These options are also beneficial if the plant shows early signs of root rot and more than half of the root system is damaged. You can propagate the remaining healthy leaves or sections at the top of the plant because the main stem and roots might not survive the rot.
Pro tip: Ideally, you should use this propagation method in spring. However, if the plant has root rot, you can do this anytime during the year. Rot can spread and kill the plant quickly and you won’t have time to wait until next spring.
Water the plant 2-3 days before the procedure. A well-hydrated cutting will endure the long rooting process, which usually takes 2-4 months.
It can even take up to 6 months if you try to root the cutting outside of the plant’s growing season. As long as the cutting doesn’t rot or dry out, you can wait patiently until it forms roots.
Here’s a guide on the proper collection method:
| Leaf Cuttings | Stem Cuttings |
| 1. Unpot the plant and inspect the outermost leaves. 2. Choose plump leaves without signs of discoloration. 3. Use a sterile knife to make a small (0.08 in or 2 mm) incision on the stem and wiggle the leaf to separate it. Ensure the leaf has no wounds. | 1. Use a sterile knife or long scissors to cut through the stem in the middle of the plant. 2. Hold the blade at the same angle as the leaves and cut around the stem. 3. Wiggle the stem cutting and pull it upward. 4. Inspect the cutting. It should be reddish brown. |
After collecting your cuttings, let them sit on a paper plate or in a cardboard box in a cool, dry room for up to a week until you see a callus on the cut end.
Plant them following these steps:
- Prepare a 2-3-inch (5-7.6 cm) pot to root the cuttings. You can use a larger (but shallow) container to root multiple leaves.
- Prepare a potting mix with two parts perlite and one part coco peat. Moisten it a day before planting.
- Bury the cuttings half an inch (1.3 cm) into the soil. For multiple leaf cuttings, space them an inch (2.5 cm) apart.
- Water the soil as soon as the top inch (2.5 cm) is dry. Be careful not to dislodge the cuttings.
Seed Propagation
This propagation technique is seldom used because of the following drawbacks:
- Haworthias rarely bloom indoors. And even if they do, you’ll need at least two plants blooming at the same time because their flowers are not self-fertile.
- There are also no pollinators with long proboscis indoors. You will need to hand-pollinate the plant using a long bristle to collect and drop pollen into the long, funnel-shaped flower.
- Seeds and seedlings have higher demands than offsets and cuttings.
If you succeed in pollinating the plant, you must sow the seeds within 6 months of harvest using these steps:
- Prepare a shallow container (2 inches or 5 cm deep) with drainage holes.
- Fill the container with an inch (2.5 cm) of soil mix containing equal parts perlite, compost, and coco peat.
- Sprinkle the seeds over the potting mix.
- Sprinke a fine layer of soil over the seeds.
- Gently spray water into the soil to moisten it evenly without dislodging the seeds.
- Cover the container with plastic or a humidity dome.
- Keep the setup in a warm room with bright, indirect light.
- If there’s less condensation on the plastic cover, check the soil surface. If it feels dry, spray enough water to moisten it evenly.
- Cover the setup again after 2 hours.
The seeds will germinate within 1-2 weeks and you can remove the cover.
Repotting Tips
Even without the offsets, it’s important to repot haworthias for the following reasons:
- To refresh the nutrient-depleted soil
- To provide enough space for new growth
Once they outgrow their pots, a haworthia will begin showing signs of stress from being rootbound or a lack of nutrients.
Here are some signs:
- Roots poking out of the drainage holes or above the soil surface
- No signs of growth even during the growing season
- Lack of flowers from a usually prolific plant
Follow these steps for repotting:
- Water the plant a day or two before repotting.
- Prepare your standard haworthia potting mix and moisten it.
- Choose a pot 2 inches (5 cm) wider and an inch (2.5 cm) deeper than the old pot. Use a pot 2-3 inches (5-7.6 cm) deeper if the plant has deep, fleshy roots.
- Fill the bottom 1-2 inches (2.5-5 cm) of the pot with moist potting mix.
- Slide the plant out of the pot.
- Remove the soil with your hands and inspect the roots for signs of decay (i.e., black, mushy).
- Use sterile shears to snip the dried or decayed root sections. Limit pruning to a third of the root system.
- Place the plant in the new pot and fill the gaps with fresh soil.
- Firm the soil around the base of the plant to keep it steady.
- Return the plant to its usual spot.
- Wait until the upper half of the soil is dry before watering deeply.
Pest and Disease Management
Haworthias are resistant to most pests and diseases affecting other houseplants because they like drier soil. You may only need to look out for mealybugs and root rot.
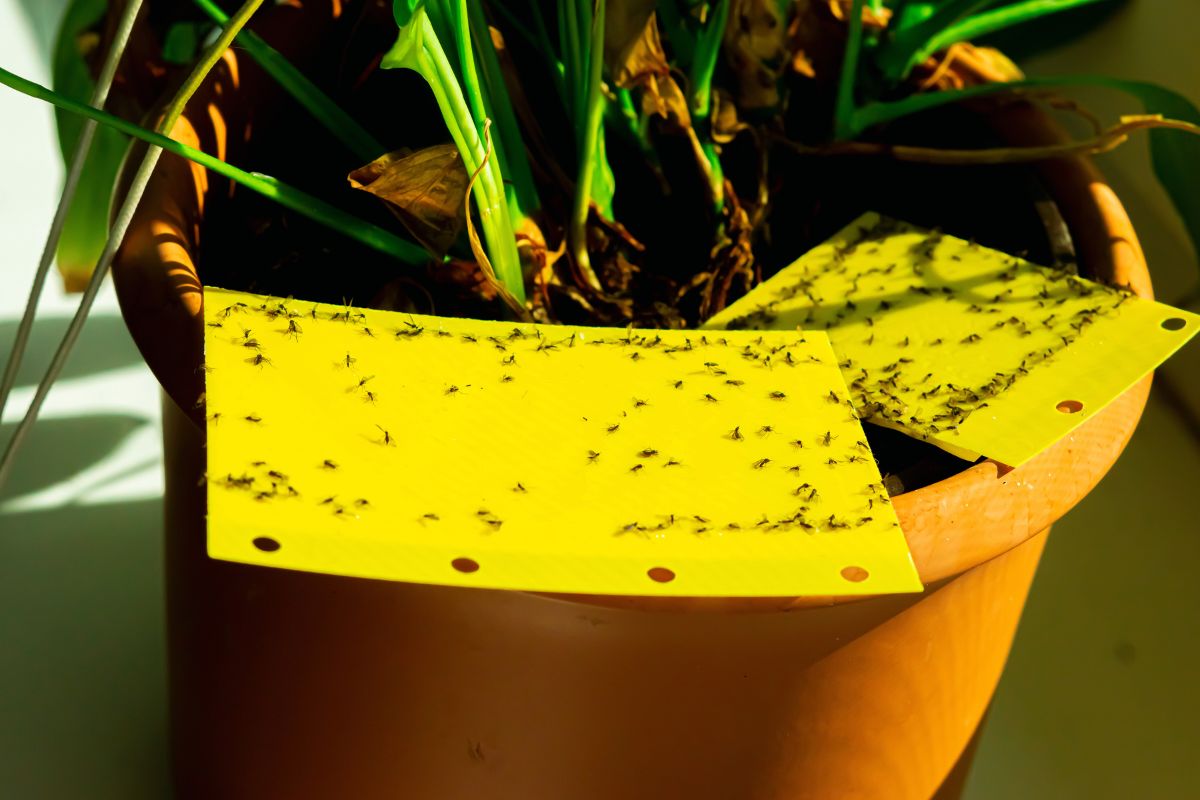
Fungus gnats may appear if your plant is overwatered and the soil surface remains wet for extended periods.
Mealybugs
Mealybugs are pests with white, cottony wax coverings on their body, making them easy to spot. They may hide behind or between leaves and suck on the plant’s sap.
They’re relatively easy to manage using these two methods:
- Manually remove them using tweezers or cotton swabs and drop them in a cup of soapy water.
- Moisten the cotton swab with 70% rubbing alcohol and dab the crawlers with it. Once they drop dead, you can pick them up using the tweezers and dispose of them.
Fungus Gnats
Fungus gnats are winged insects and one of the most common pests among houseplants. They look like mosquitoes with a black body and transparent wings and legs.
While adults don’t harm plants directly, they hover above plants to lay their eggs in constantly wet soil. Once the eggs hatch, they release larvae that feed on the plant’s roots.
The symptoms overlap with overwatering and root rot. Your plant will more likely succumb to root rot than a fungus gnat larvae attack.
Root Rot
Overwatering and poor soil drainage are the main culprits of root rot in haworthia plants. Their shallow and fragile roots will rot under these conditions. The disease can spread quickly and kill your small plant within a week if left untreated.
If the crown of the plant is still firm and only less than half of the roots are damaged, you can still save the plant.
Here’s how:
- Unpot the plant.
- Prune the damaged root sections with sterile shears.
- Rinse the old soil off the remaining roots.
- Soak the roots in 1% hydrogen peroxide solution for 10 minutes.
- Wipe with a clean towel and air-dry for 30 minutes.
- Transplant in fresh potting soil.
In severe cases, the plant’s base and the outermost leaves will feel mushy. To save your plant, you can collect the remaining healthy leaves and root them. Choose leaves from the top or middle that don’t have signs of discoloration or rot.
When to Call a Professional
You don’t need professional help when dealing with mealybugs or fungus gnats on tiny plants like haworthia. However, if you have a large indoor garden collection and severe pest infestation, you may need to contact a professional.
They will need to move your plants outdoors to use chemical pesticides and treat the infestation more thoroughly.
Troubleshooting Common Problems
Here are some common problems you may encounter when growing haworthias:
Legginess
Although they can tolerate lower light levels than other succulents, haworthias can’t grow optimally in dim areas like, for example, a ZZ plant can.
Haworthias will show the following symptoms due to insufficient light:
- Retused or truncated leaves will become longer and lean toward the light, and your plant will lose its characteristic rounded appearance.
- The leaves at the center will look yellow or pale.
- The taller zebra plant will stretch toward the light and look unsightly.
You can fix the issue by propagating the remaining leaves with the proper shape. On the other hand, you may cut the stem of zebra plants at the point of leaning.
Move your plant closer to the window and rotate the pot by 90-180° every time you water the plant. Alternatively, you can place a 40-watt full-spectrum grow light 6-12 inches (15-30 cm) directly above your plant and keep it on for 10-12 hours a day.
Sunburn
Haworthia plants are used to receiving shade from nearby taller structures in their home environment. Exposing them to direct sunlight, especially during hot and dry weather, can quickly dry out their leaves.
You’ll know your plant is suffering from sunburn if the section exposed to the sun has scorched or browned leaf edges.
You can fix this using the following tips:
- Move your plant about 5 feet (1.5 m) away from the window.
- Hang a sheer curtain by the window.
- Rotate your plant regularly.
- Inspect the soil moisture more frequently during hot weather and water your plant more frequently.
Cold Damage
In cold regions, haworthias may need to move closer to the window to receive brighter light in winter. However, open windows can bring in cold wind that can damage the plant.
Freezing temperatures can cause the moisture inside the succulent leaves to freeze. And once they thaw, they damage the structure of the leaves.
Prevent this issue by keeping your plant away from drafty windows and doorways during cold weather. You can also keep them under grow lights to supplement their light needs until the brighter and warmer spring season comes.
Display and Companion Plants
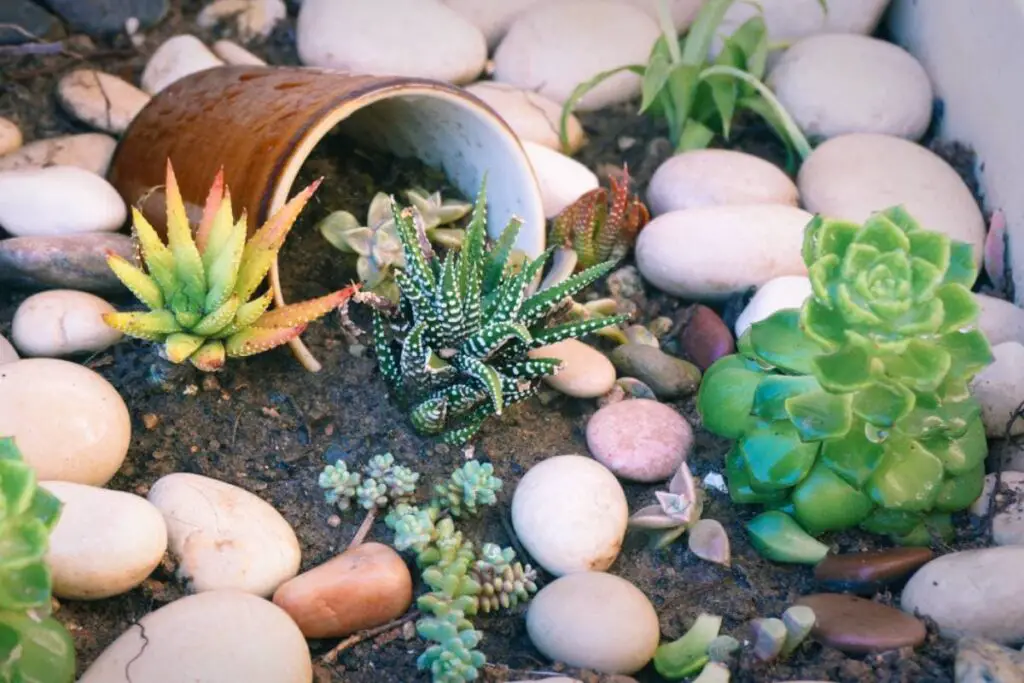
You can grow haworthias along with other succulents in your indoor garden. They share similar care and environmental requirements, making it easier to tend to all of them at once.
Some excellent companions include:
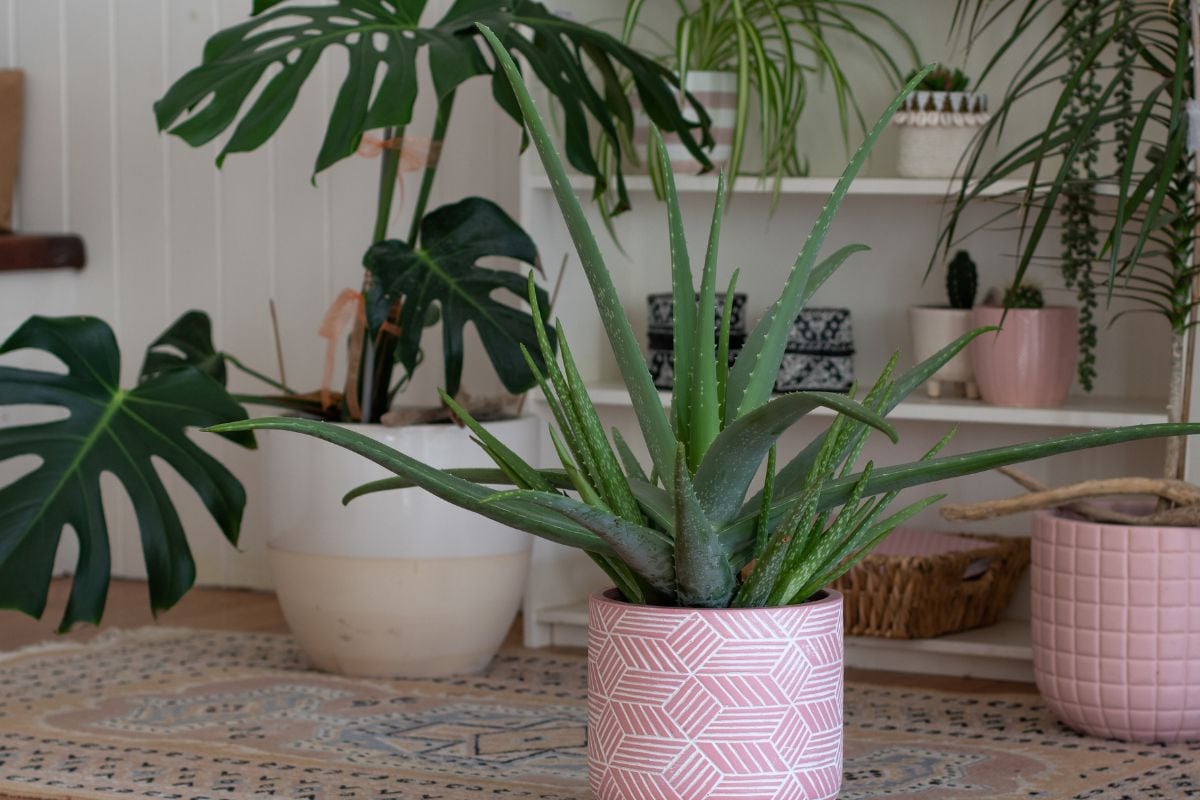
- Aloe vera: They’re taller than most haworthias (except for Haworthiopsis species) and can provide shade during the hottest part of the day.
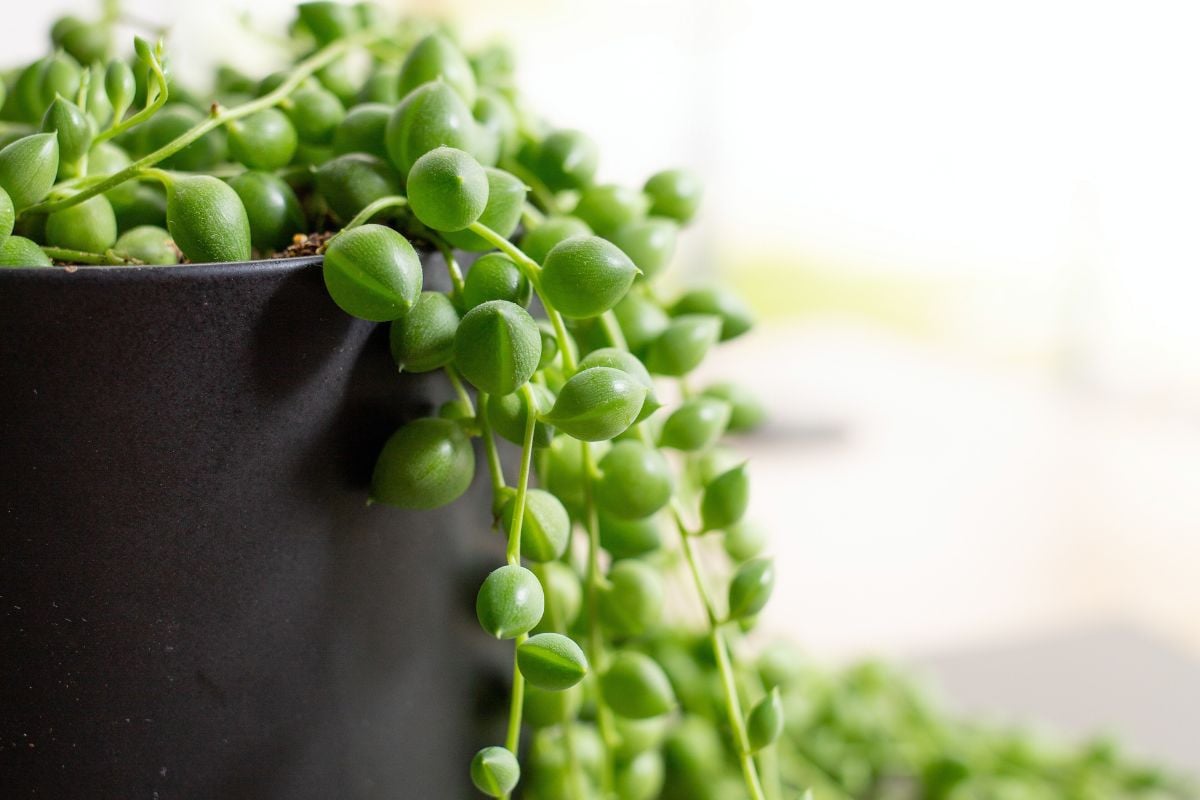
- String of pearls: They can sit on a wall shelf above haworthias and the hanging foliage can serve as a curtain for the smaller plants.
- Kalanchoe: These flowering succulents also like partial shade and their showy blooms can provide a bright contrast to your haworthia’s less attractive flowers.
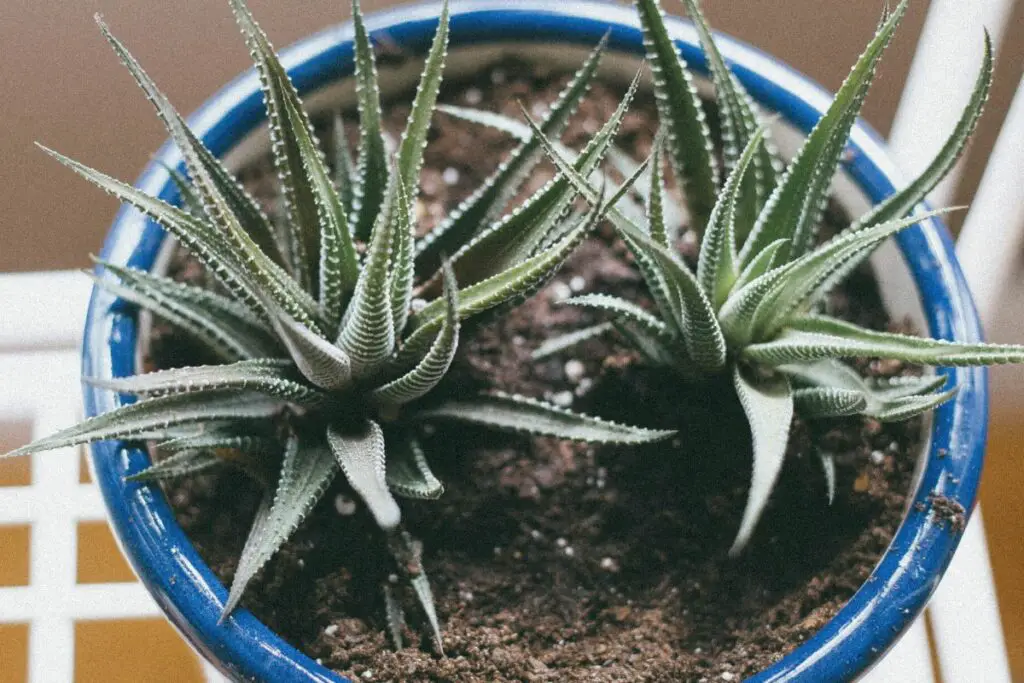
You can also grow haworthias in a mixed succulent container or box. It’s best to group together different haworthia varieties in the same container instead of mixing them with other succulents.
This is because they:
- Have lower lighting needs
- Require shallow pots
- Have shallow roots that might not be able to compete with deeply rooted succulents for moisture
When planting multiple haworthias in one container, keep the following in mind:
- Position the shorter species on the outer sides and the taller ones in the middle.
- Keep them an inch (2.5 cm) apart.
- Rotate the container by 90-180° weekly.
You can also create a mixed haworthia terrarium if your home is dry or you’re unable to water your plants often.
Here’s how:
- Choose a glass container without a lid. You can use a bowl, cylinder, or square case.
- Opt for a container at least 6 inches (15 cm) deep. A 6-inch (15 cm) wide container can accommodate 2-3 small plants about 1-2 inches (2.5-5 cm) tall and wide.
- Fill the bottom inch (2.5 cm) with pebbles. Since the container doesn’t have a drainage hole, the excess moisture will sit in this layer.
- Lay a coffee filter above the pebbles.
- Spread up to 3 inches (7.6 cm) of your standard haworthia mix over the coffee filter.
- Plant and firm the haworthias in place. Remember to keep the taller ones in the middle.
- Spray the corners of the glass with water until you see some droplets falling to the bottom layer. Don’t fill the bottom layer with water.
- As the soil dries, the moisture in the pebbled layer will evaporate and move upward, slowly moistening the soil and keeping your plant hydrated. This allows you to water your plant less frequently.
- Place the plant in bright, indirect light and rotate weekly. Alternatively, you can place them under grow lights.
- Mist the container again only when the upper 2 inches (5 cm) of the soil is dry and there’s no more water pooling in the pebbled layer.
- Repot the plants after 2 years in separate pots or a mixed succulent container for optimum health.
As haworthias mature, their roots become thicker and can spread wide. The condition in the terrarium may force them to push their roots into the pebbled layer. This may lead to overwatering problems.
Final Thoughts
Haworthias are perfect plants for beginner gardeners because they’re compact and easy to care for. You can also collect multiple varieties for a diverse look in your low-maintenance indoor garden.
The good news is that you don’t have to purchase expensive plants. You can ask a friend or fellow plant collector for some leaf cuttings and you can increase your plant collection conveniently.
Please leave a comment if you have questions about general haworthia plant care.