How to Plant, Grow, and Care for Aloe Vera
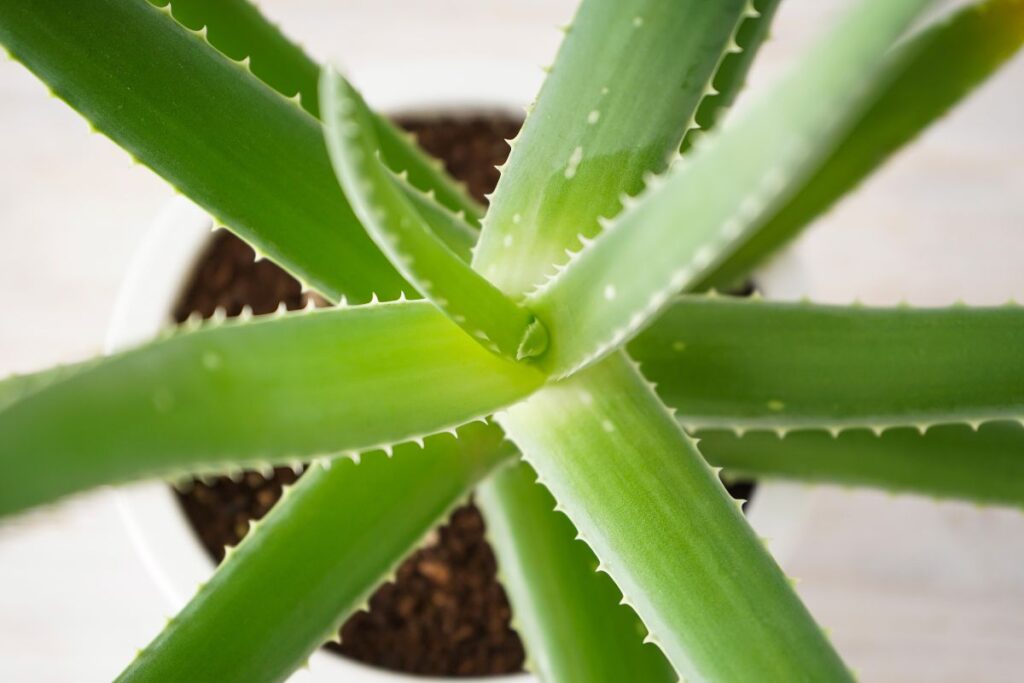
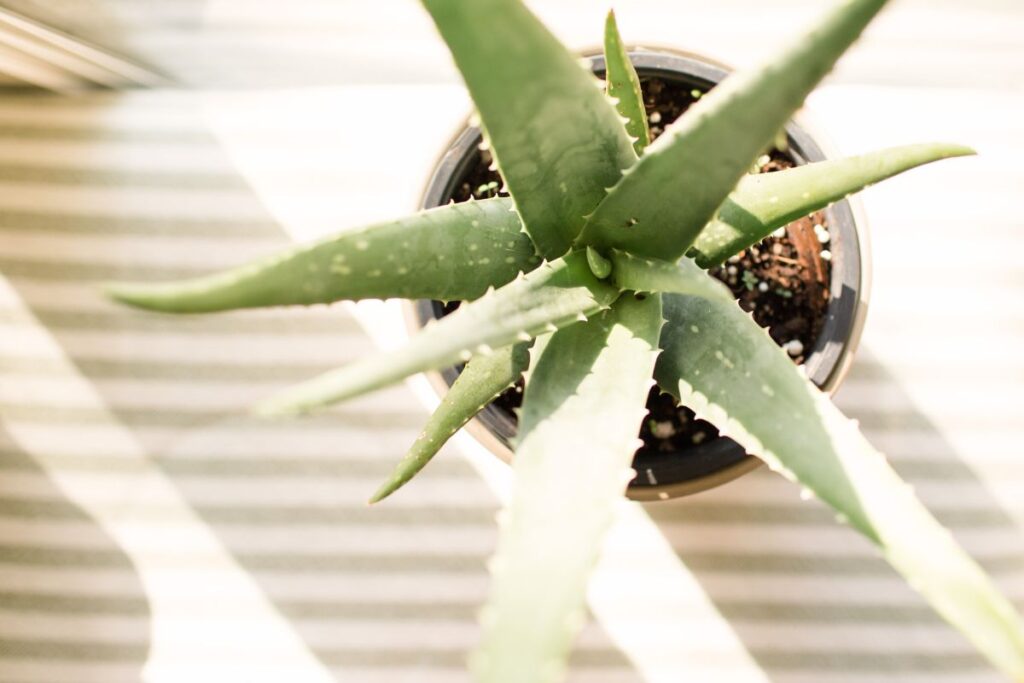
Aloe vera (Aloe vera, formerly Aloe barbadensis Miller) is one of the most widely grown succulents worldwide for both ornamental and medicinal use. Famous for the remarkably thick, spiky leaves growing in a rosette pattern, aloe vera is also easy to care for.
Aloe vera is popular among indoor gardeners because it:
- Is highly drought-tolerant, requiring water only once every 2-3 weeks in spring and summer. The plant can survive 4-6 weeks between watering sessions during winter.
- Thrives in 4-6 hours of direct morning sun from a sunny east or south-facing window. Aloe vera plants will also grow well in moderate indoor lighting with 8-12 hours of bright indirect light from a south-facing window daily.
- Tolerates regular indoor temperatures (65-85 °F or 18-29 °C) and humidity (30-50%). Avoid temperatures below 55 °F (13 °C) as aloe vera plants are not frost-tolerant and can develop mushy or rotten leaves.
- Is easy to propagate through pups or offshoots. They may also be propagated through stem or leaf cuttings.
- Can stay in the same pot for 2-3 years before repotting. You can also divide and repot the plant every 3-5 years if kept in bright indirect light indoors.
- Has minimal fertilization needs. Aloe vera plants will grow happily if you top the soil with a handful of high-quality compost in spring or apply a thin layer of 10-10-10 granular fertilizer only once every 1-2 years (spring or summer).
- Has medicinal properties in the gel found within the leaves. The raw gel can be rubbed directly onto the skin to soothe mild burns. The gel may also be processed and used for skin and scalp care. However, dermatitis or skin irritation may occur in sensitive individuals, so it’s best to test on a small area first and speak with a healthcare professional if you’re unsure.
This comprehensive guide will cover the care and environmental requirements of aloe vera for optimal growth and health in an indoor garden. I’ll also discuss the anatomical and medicinal qualities of true aloe and related species.

Quick Guide
| Common Name(s) | Aloe vera, True aloe, Burn plant, Medicinal aloe |
| Botanical Name | Aloe vera (formerly Aloe barbadensis Miller) |
| Family | Asphodelaceae |
| Plant Type | Succulent |
| Native Area | Dry areas of Africa, the Middle East, and Asia |
| Height & Spread | Up to 2-3 feet (0.6-0.9 m) tall and 1.5 feet (0.45 m) wide |
| Bloom Time | Summer |
| Flower Structure | Raceme |
| Color | Yellow to orange |
| Sun Exposure | Full sun (at least 8 hours) outdoors High intensity: 4-6 hours of direct morning sun from an east or south-facing window (recommended indoors) Moderate intensity: At least 12 hours of bright indirect light from a south-facing window |
| Soil Type | Loose, fast-draining Cactus or succulent mix |
| Soil pH | 6.0-7.0 |
| Watering | Spring and summer: Every 2-3 weeks Fall and winter: Every 4-6 weeks |
| Pests, Diseases, Problems | Mealybugs, scale insects, spider mites, aphids Root rot, rust, bacterial and fungal leaf spot |
| Toxicity | True aloe is non-toxic on the skin but may cause gastrointestinal discomfort (i.e., cramps, diarrhea) when ingested. |
| Required Maintenance | Low water High light intensity Division and repotting every 2-3 years |
Aloe Vera: An Overview
Aloes are members of a large family of succulents under the family Asphodelaceae. Despite their prickly leaves, aloes are not cacti, which belong to different families of succulents.
There are roughly 500 known aloe species and hybrids, but Aloe vera, or burn plant, is the most extensively studied due to its ancient reputation as a treatment for burns and constipation.
Aloe vera was also regarded as the ‘Plant of Immortality’ by ancient Egyptians because of its healing ability and resilience to survive arid environmental conditions.
At present, aloe vera is cultivated indoors for home remedies or commercially for use in modern medicine and cosmetics.
Note: Aloe vera is the official botanical and common name of the burn plant. In Latin nomenclature, which is commonly used in naming plants, ‘vera’ means ‘true’, aptly referring to Aloe vera as the ‘true aloe’.
Many sources also use Aloe barbadensis Miller, which is the former botanical name of Aloe vera. Both scientific names refer to the same plant and can be used interchangeably.
Origin and Natural Habitat
Aloe vera is native to the hot, arid regions of Africa, the Middle East, and Asia, where it thrives in the following natural conditions:
- Low humidity (around 30%) almost all year round
- Full sun (at least 8 hours of direct sunlight daily)
- Scarce, shallow rain
- Sandy, nutrient-poor soil
The resilient nature of aloe veras made them easy to cultivate outside their native environment. They can grow as outdoor perennials in tropical and subtropical regions, often becoming invasive as they outcompete native plants due to their low-nutrient and low-moisture requirements.
Aloe veras have also proven to adapt to indoor conditions readily, and their commercial value reached the U.S. in the 1920s through plant trade.
Anatomy
An aloe vera’s resilience is a result of its fascinating anatomy:
- Leaves: Fleshy, spear-like leaves with serrated edges and a gel-filled core. Each leaf has three layers: the rind, the latex (yellow, bitter, and toxic), and the gel. The rind is coated with a whitish film of waxy cuticle to prevent rapid moisture loss. The gel is 99% water and provides aloe veras high tolerance to hot, dry conditions.
- Roots: Shallow, fibrous root system adapted to well-draining, dry soils.
- Short Stem: The stem of a young aloe vera remains underground, and the plant just fans outward as new leaves grow at the center. The stem gradually gets taller over time and becomes noticeable above the soil when the plant gets older (over 5 years old).
- Rhizomes: Thick underground stems that produce tiny new plants (pups).
- Pups or Offshoots: Aloe veras have a compact rosette leaf formation that expands gradually with offshoots developing at the base. Each pup can grow into a new plant.
Flowers
Aloe vera flowers have the following growing habits and traits:
- Formation: A flower stalk up to 5 feet (1.5 m) tall grows from the center of the rosette. The stalk develops multiple branches that bear flowers in a raceme formation.
- Appearance: Tubular and yellow or orange
- Scent: Faint and pleasant
- Bloom duration: 3 weeks or so (not all flowers open at the same time)
In nature (warm climate), the flowers come out anytime with brief resting periods of around a month or so in between.
I know some large-scale commercial growers who intentionally grow aloe veras in greenhouses or frost-free outdoor farms so they can harvest immature flowers that contain bioactive compounds used in cosmetics and pharmaceuticals.
On the other hand, aloe veras hardly bloom in indoor gardens due to insufficient sunlight.
Many of my outdoor potted aloe veras started flowering when they were at least 3-4 years old. In contrast, I’ve only had two indoor potted aloe veras bloom when they were 6 and 8 years old. The flowers also didn’t come out annually.
Note: My white fox aloes mature faster than aloe veras and are prolific bloomers that produce a single flower stalk per mature plant (over 2 years old) almost every summer.
In rare cases, indoor potted aloe veras may bloom if they:
- Are at least 3 or 4 years old. Aloe veras typically mature at around 4 years old.
- Receive a total of at least 12 daylight hours (4-6 hours of bright, direct sunlight followed by up to 8 hours of bright indirect light daily).
- Are watered regularly. Although drought-tolerant, aloe veras require sufficient moisture and energy to generate flowers.
- Receive stable warm temperatures (around 75 °F (24 °C) during the day and 65 °F (18 °C) at night).
Reproduction
Aloe veras naturally reproduce in two ways:
- Through offshoots: Aloe veras readily spread through underground rhizomes that produce pups or offshoots outside the base of the mother plant.
- Through seeds: Hummingbirds are the primary pollinators of aloe flowers in warmer regions of the US because their long beaks can easily get through the tubular flowers. Bees and other insects with needle-like mouthparts may also pollinate aloe flowers. As the fruits ripen and dry up, the seeds are dispersed by the birds or wind.
Growth Rate and Dormancy
Compared to other succulents, aloe veras are relatively fast-growing and may exhibit the following growth traits:
- Height: Under optimal indoor conditions, they can grow up to 12 inches (30 cm) per year and reach their mature height within 3 years.
- Leaf formation: If indoor conditions remain warm (around 75 °F or 24 °C) and bright all year round, aloe veras typically continue putting out 1-3 leaves from the center per month. Old leaves are gradually pushed outward and downward, and they naturally fade (turn thin and yellow or brown) after 6 months or so.
- Offshoot development: Offshoots (also known as pups or suckers) grow outside the base of the main rosette of the mother plant. On average, my potted aloes that receive direct sunlight put out 1-2 offshoots every 2 months or so during the warm seasons. It can take at least 3 months before they’re ready for harvest and transplanting.
- Dormancy: Aloe veras don’t enter dormancy in their native habitat. In subtropical areas with cold winters (around 50 °F or 10 °C), aloe veras may enter a semi-dormant state wherein they use less moisture and noticeably grow more slowly during the cold season.
- Lifespan: Aloe veras live around 12 years on average. Although they can live longer with adequate care, the number and quality of the new leaves will naturally decline over time. Propagating new plants from the pups produced from healthy mother plants can maintain your aloe vera collection.
Medicinal Property and Toxicity

The earliest records of aloe usage in medicine date back to 2,200 BC in Mesopotamia (modern-day Iraq). A
ncient civilizations used aloe vera to treat the following health conditions:
- Constipation: People either chewed the leaves directly or boiled them in water and consumed the juice. The latex contains anthraquinones and glycosides that have laxative effects.
- Wounds or Burns (from the sun or fire): The watery gel was rubbed against the skin to relieve pain or the burning sensation.
- Dryness: The gel was applied to the hair, scalp, or skin due to its moisturizing effects.
Today, medical technology allows for the proper extraction of aloe vera’s beneficial components for safe and effective use. When purchasing aloe products, check the label for quality certifications or U.S. FDA approval indicators.
Here are some modern uses of processed aloe vera:
- Moisturizer
- Burn treatment
- Make-up remover
- Ointment for wounds
- Dietary supplement
- Food flavoring
Warning: Although raw aloe vera gel is 99% water and generally safe for topical use, some individuals may experience dermatitis or skin irritation. For instance, I’ve used raw gel for years on mild cooking burns without any issues, but one of my friends developed itchy rashes after doing the same. If you’re trying it for the first time, test on a small area of skin first, and consult a healthcare professional if you’re unsure or have sensitive skin.
In some cases, these reactions may be due to the use of a different aloe species mislabeled as aloe vera. Not all aloe plants have medicinal qualities, and other cultivated species like Aloe ruspoliana are toxic. Always make sure you’re using true aloe vera (Aloe barbadensis miller).
Do not ingest raw aloe vera leaves.
Ingesting aloe vera leaves is dangerous as the yellowish latex beneath the leaf skin contains compounds that, when consumed in large amounts or over several days, can cause gastrointestinal problems, such as:
- Diarrhea
- Abdominal cramps
- Stomach pain
- Vomiting
- Kidney problems
- Low potassium levels
Pro Tip: Avoid using raw aloe vera to treat symptoms like cuts and burns, especially if you have a history of allergic reactions to plant sap. More importantly, do not ingest the leaves. For any medical condition, consult your physician. They may recommend a lab-formulated aloe vera product that’s proven safe for your needs.
Aloe vera leaves may also be toxic to house pets like cats and dogs.
Ingestion of the latex in the leaves can lead to:
- Vomiting
- Diarrhea
- Lethargy
Keep your plant out of reach of dogs by placing the pot on a wall shelf or counter. Since cats can easily climb, ensure your indoor garden is in a room with a door you can close to keep it inaccessible to them.
Benefits as Houseplants
Aloe veras are popular among home gardeners because of the following traits:
- Low maintenance: Aloe veras have minimal watering and fertilization needs. They also don’t require frequent repotting. Planting them in a breathable pot with drainage holes and porous substrate should keep them happy for 2-3 years.
- Medicinal qualities: The gel in the leaves can readily work as a moisturizer or burn remedy (except for individuals with sensitive skin).
- Aesthetic value: An aloe vera’s serrated, pointed leaves can add texture to plant collections. The plant’s compact size also makes placement easy. You can position them on a windowsill or a wall shelf that receives plenty of sunlight.
- Easy to propagate: A happy aloe vera will produce new pups every 2 months or so. You can separate and transplant the pups when they’re at least 4 inches (10 cm) tall.
Note: Several sources cite the 1989 NASA study claiming that Aloe vera can clear the air of formaldehyde and benzene. However, the study was conducted in an air-tight room with controlled environment and pollutant concentrations, making it unlikely for plants to perform the same air-purifying capabilities in usual indoor garden settings.
In addition, there are no additional recorded studies of aloe vera’s air-purifying capability in real-life settings, unlike other plants, such as peace lilies.
Popular Varieties
Aloe vera is arguably the most popular aloe species due to its scientifically proven medicinal qualities. Nevertheless, other aloe plants have also made their way into home gardens because of their striking foliage and hardiness.
Here are popular Aloe varieties grown in indoor gardens in the US:
| Species or Varieties | Traits | Implications |
| Aloe vera (Aloe vera or Aloe barbadensis Miller) | 2-3 feet (0.6-0.9 m) tall and 1.5 feet (0.45 m) wide Each leaf is 2-4 inches (5-10 cm) wide at the base and gradually tapers to a sharp tip. Young leaves are dark green with smooth and tiny white spots that disappear as they mature into solid pea-green leaves with serrated edges. Whitish or yellowish teeth at the margin A white, waxy layer may become visible when the plant is dry. It helps prevent rapid moisture loss. Yellow to orange flowers | Medicinal aloe Can be distinguished from other aloes based on the following distinct traits:
|
| Lace Aloe (Aloe aristata) | Dwarf-type aloe that reaches only up to 8 inches (20 cm) tall. The leaves have a distinct rosette pattern, which can expand 6-12 inches (15-30 cm) in diameter. Each leaf has serrated edges and random white bumps on the inner leaf surface. The white bumps on the outer leaf surface have a slightly more organized horizontal placement | Rarely used for burn treatment because its medicinal qualities are not as widely studied as aloe vera Commonly mistaken for zebra haworthia (Haworthiopsis attenuata), which has horizontal white bands (bumps) and non-serrated edges |
| Aloe ruspoliana | Solid pea-green leaves that grow 2-3 feet (0.6-0.9 m) tall and 2 feet (0.6 m) wide The leaves are around 2 inches (5 cm) wide at the base (narrower than aloe vera) The leaves grow on a short stem that gradually gets taller (up to 1.5 feet or 0.45 m) as new leaves sprout from the center Green teeth at the margin turn reddish in direct sunlight Red flowers | Toxic sap can cause dermatitis upon contact and severe gastrointestinal problems when ingested (i.e., vomiting, diarrhea, cramps) Sap ingestion can be fatal to small animals like cats and dogs. The sap is used in Africa to kill hyenas. Smelly sap (similar to the foul odor of rats) |
| Aloe vera ‘Chinensis’ Compact variety of Aloe vera | Grows up to 1.5 feet (0.45 m) tall and wide The leaves are pea-green and smooth with tiny white spots that don’t disappear at maturity Whitish teeth at the leaf margin Pale orange flowers | Has antioxidant properties, but cannot be consumed in raw form |
| Aloe ‘White Fox’ | Grows up to 8 inches (20 cm) tall and 12 inches (30 cm) wide The leaves are smooth with irregular white splotches taking up more space than the green. Whitish teeth at the leaf margin Reddish orange flowers | Compact and unique coloration compared to other aloes Also more likely to flower in sunny indoor spaces than other aloe species |
Selecting Your Plant
Aloe vera is readily available in both physical and online gardening stores. I recommend visiting your local nursery to inspect the plant before purchase.
Here are some tips for choosing a healthy aloe vera plant:
- Choose a plant that’s at least 6 inches (15 cm) tall with tiny new leaves sprouting at the center, indicating positive growth and established roots. Aim for 3-4 inches (7.6-10 cm) for dwarf varieties.
- When buying a larger plant (up to 12 inches or 30 cm tall), choose one with tiny pups at the base. The presence of pups shows that the plant is actively growing and in perfect condition to produce offshoots.
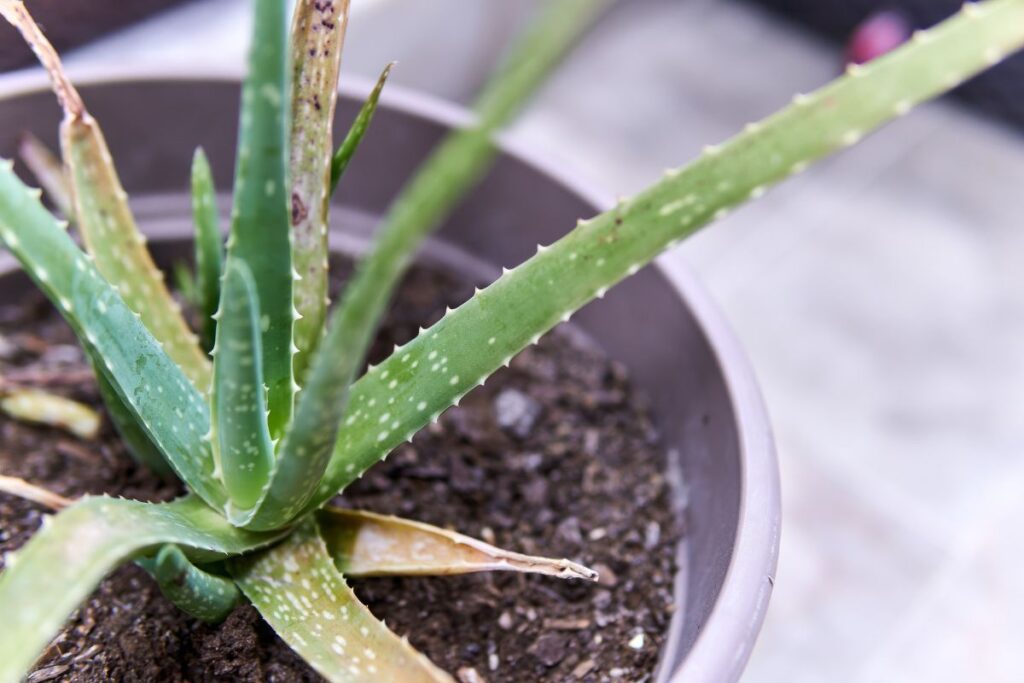
- Choose a plant with upright and plump leaves. Avoid those with thin, drooping leaves or those with black or brown spots and yellowing tips. Such symptoms indicate stress or infection.
- Touch the older, outer leaves and squeeze to test for firmness. Be mindful of the sharp edges and pointed leaf tips. Avoid plants with mushy leaves, as they’re most likely rotting inside.
- Feel the soil texture with your fingers. Crumbly soil indicates good drainage and aeration, whereas compact, wet soil is a sign of poor drainage and potential risks of root rot. You may also sniff the base of the plant for signs of rot (foul, rotten egg smell). A good, earthy smell indicates healthy soil.
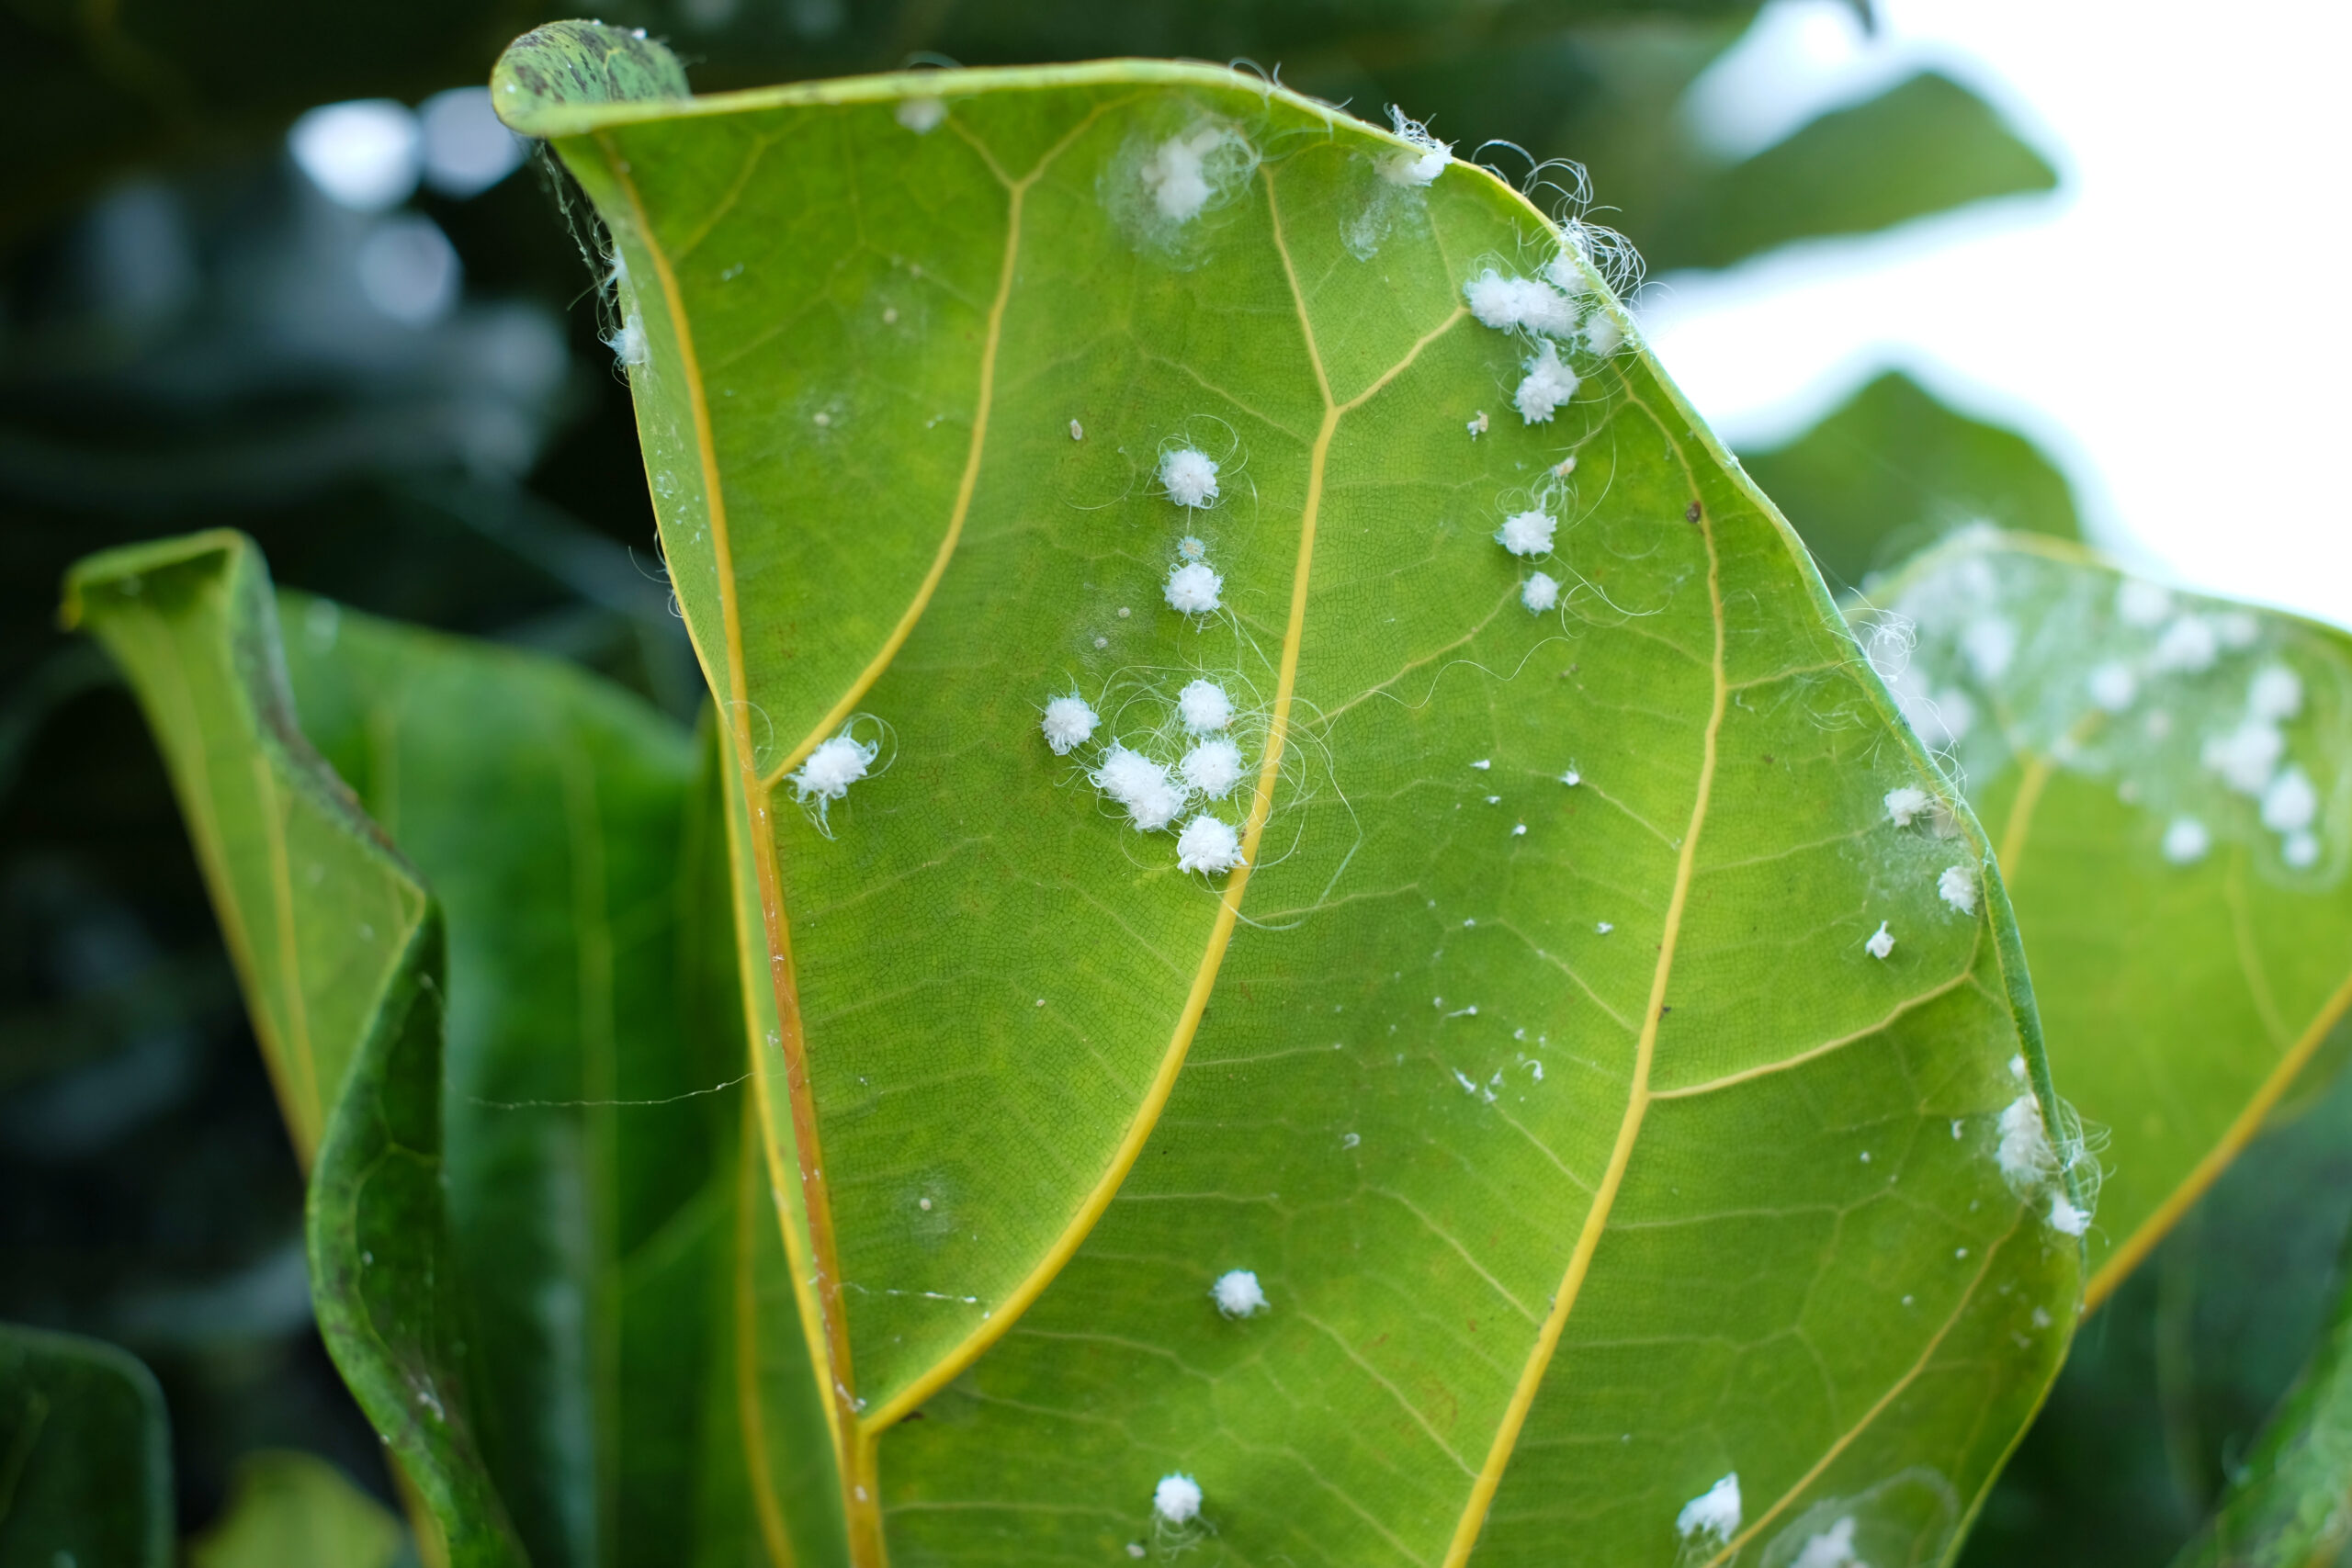
- Avoid plants with signs of pests, such as fluffy white masses (mealybugs), webbing (spider mites), and brown bumps (scale).
Pro Tip: Some gardening stores may exhibit flowering aloe veras because they’re admittedly an attractive sight. Be sure to ask the seller how old the plant is, as older, flower-bearing aloes typically have only a few years left in their lifespan.
Avoid purchasing plants older than 5 years old. If possible, ask if you can purchase pups produced from the flowering aloe vera because you can trust the plant’s flowering potential. You may also ask the growers for care and product tips to help your new plant flower successfully in the future.
Initial Planting

After purchasing your aloe vera, leave it in the same pot for a year or until the following spring. Aloe veras have fibrous roots, and they dislike being disturbed too often.
It’s crucial to inspect the texture and drainage of the potting soil carefully before purchasing the plant so you don’t have to repot right away. In addition, ensure the pot has at least an inch (2.5 cm) of space around the base of the plant to accommodate new growth.
The following spring, transplant your plant with the tips below:
Choosing the Right Pot
Aloe veras have a fleshy rhizome that grows close to the soil surface to produce new pups, whereas the fibrous roots from the rhizome spread downward and outward to anchor the plant.
With this in mind, here are some tips for choosing the right pot for aloe veras:
- Design and material: Prepare a breathable pot with drainage holes. I recommend using unglazed terracotta because its porous walls can wick excess moisture away from the root zone, preventing rot. Terracotta is also heavy and can support the weight of a mature aloe vera’s thick leaves. Avoid plastic pots, which can hold excess moisture and are too light for aloe veras with large leaves.
- Size: Ensure the pot is about 2 inches (5 cm) deeper and wider than the old pot or the root ball. Avoid using deep, oversized pots that can hold excess soil and moisture, as this increases the risk of root rot. Pro Tip: Use a pot no deeper than half of the foliage height for aesthetic balance and good root health. Limit your maximum pot depth to 12 inches (30 cm) and width to 18 inches (45 cm).
Soil Selection
Aloe plants are succulents that require porous soil for fast drainage and good aeration, as compact soil can drown the fragile roots and deprive them of oxygen. Wet and anaerobic soil conditions can also promote rapid fungal growth that can lead to root rot.
Aloe veras will thrive with any of the following soil mixes:
- High-quality cactus or succulent mix
- Equal parts compost and perlite or pumice
- Equal parts standard potting soil, coarse sand, and perlite/pumice
My go-to recipe is 1:1 compost and perlite, which also works well with my other succulents like jade plants and snake plants.
Step-by-Step Planting Guide
Follow the steps below to transplant an aloe vera properly:
- Water the plant deeply 2 days before repotting.
- Firmly hold the base of the plant and pull the root ball and soil out of the pot. You may want to wear a pair of gloves to protect your hands from the aloe’s serrated leaves.
- If the plant doesn’t readily come out of the pot, run a flat knife or spatula around the inner walls of the pot to loosen the edges of the potting soil and minimize damage to the roots.
- Inspect the soil quality and visible roots. If the soil still feels crumbly and appears dark, and the roots are firm and white, you can keep the old soil and avoid disturbing the roots.
- If the soil is pale and crusty, it’s most likely severely degraded and nutrient-deprived, and your plant will need fresh soil. The roots may also have dried-out sections that require pruning. Remove the soil as needed using your gloved fingers and prune desiccated roots (thin, brown, and crisp) using sharp, sterile shears.
- Remove a few aging, discolored leaves from the outermost part of the plant to expose the underground stem or rhizome.
- Fill the bottom 2 inches (5 cm) of the new pot with fresh soil mix, position the rhizome in the middle, and spread the roots over the soil.
- Pro Tip: Avoid burying any leaf or the plant’s crown to prevent root or crown rot. If the plant feels floppy, place 1-2 layers of tiny pebbles (½ inch or 1.3 cm in diameter) around the base of the plant over the soil surface.
- Keep the top layer of the soil (or pebbles) at least ½ inch (1.3 cm) below the pot’s rim to prevent spillage when watering your plant.
- Place the pot in the plant’s usual spot with around 4 hours of direct morning sun and moderate temperatures (65-75 °F or 18-24 °C) and humidity (30-50%).
- Wait 7-10 days before the first deep watering. Pour the water around the base of the plant and avoid wetting the center of the rosette to prevent crown rot.
Optimal Growing Conditions
Aloe veras are one of my favorite houseplants because they’re extremely forgiving and can survive with minimal attention.
Here’s a practical care guide to keep aloe veras thriving indoors:
Light Requirements

Aloe veras are sun-loving plants that won’t thrive in low-light conditions. Although they grow well in moderate indoor lighting, they prefer a few hours of direct sunlight daily for optimal growth and appearance.
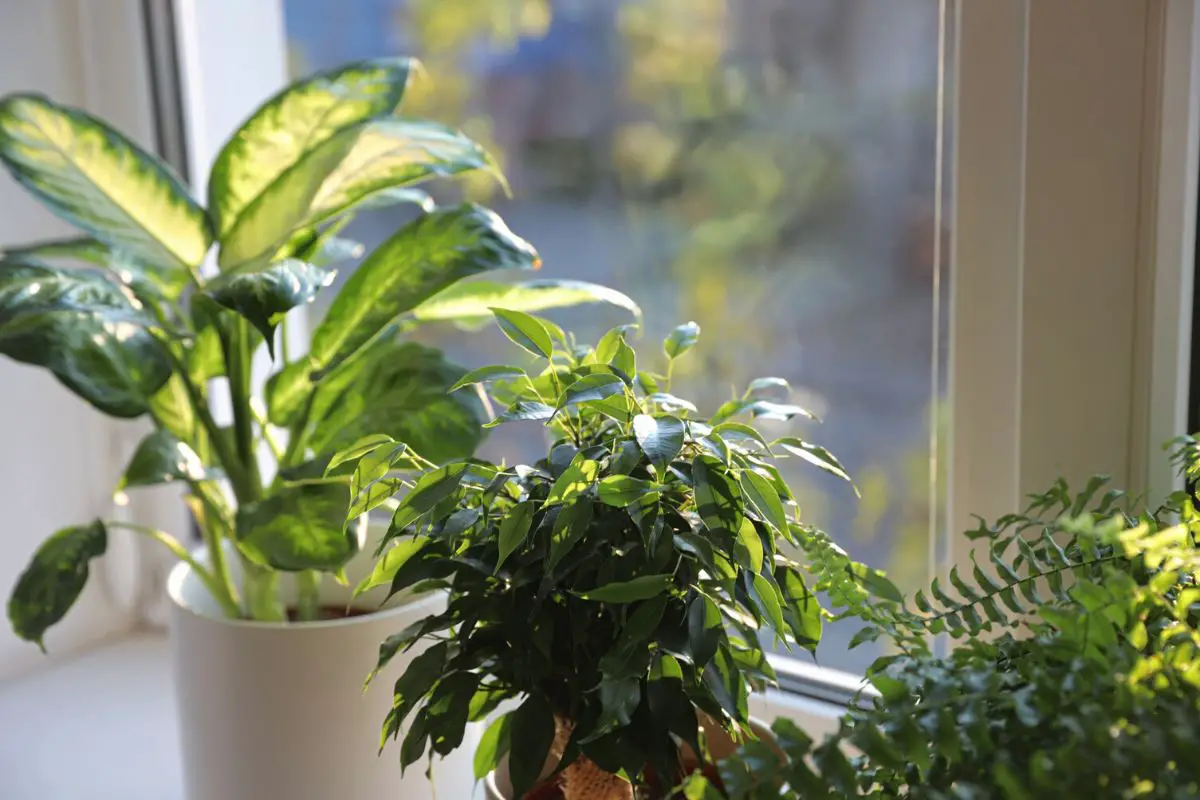
Pro Tip: If your indoor garden doesn’t have access to bright natural light, opt for low-light-tolerant houseplants, such as snake plants and ZZ plants.
Here are the different lighting conditions in indoor settings and their impact on aloe vera growth:
| Light Intensity | Position and Duration | Implications |
| High | Next to a south-facing window, around 8 hours of bright direct sunlight Next to an east-facing window, 4 hours of direct morning sun Next to a west-facing window, 4 hours of direct afternoon sun | Perfect for well-acclimated indoor aloes; can result in rapid growth, pup formation, and potential flowering Ideal for young aloes. Mature aloes will show moderate, healthy growth and pup formation Ideal for moderate, healthy growth and pup formation. Hang sheer curtains to filter light at the peak of summer. |
| Moderate | 4-8 feet (1.2-2.4 m) from a south-facing window, 8-12 hours of bright indirect light | Slow to moderate but healthy growth Slow pup formation Unlikely to flower |
| Low or Artificial (not recommended) | Next to a north-facing window, 4 hours of low-intensity morning sun 12 hours of exposure to regular indoor bulbs (LED, fluorescent, or incandescent) | Thin, floppy leaf growth (leggy) Pale, weak leaves Lack of new pups Lack of flowers |
Note: Leaf scorch may occur if young, indoor aloes are exposed to intense sunlight without proper acclimatization. The leaves may develop irreversible reddish brown surfaces or tips after prolonged exposure to intense sunlight.
The risk of leaf scorch increases with the following issues:
- Underwatering
- High temperatures (over 85 °F or 29 °C)
- Low humidity (<30%)
Here are essential tips to optimize natural indoor lighting for aloe veras:
- Acclimatize young plants (1-2 years old) to more intense sunlight by moving the pot closer to the sunny window by about 1-2 feet (0.6 m) every month.
- Rotate the pot by 90-180° every time you water the plant to promote balanced and upright growth.
- Filter the light as needed during hot, sunny days by drawing sheer curtains. Alternatively, pull the pot 2-4 feet (0.6-1.2 m) away from sunny windows.
- Water your plant more often at the peak of summer when the sun is hot and bright.
Acclimatization to Outdoor Lighting
Aloe veras receiving a few hours of direct sunlight indoors can more readily adapt to outdoor exposure to more intense sunlight.
Follow the proper acclimatization tips below if you want to bring your potted aloe vera plant outdoors for brighter natural light in mid-spring until summer:
- Wait until all threats of frost have ended and daytime temperatures remain steadily above 65 °F (18 °C).
- Select a spot that receives direct morning sun and shade from mid-day and afternoon sun.
- Bring the pot outdoors for one hour of morning sun and bring it back indoors to a spot with bright indirect light.
- Increase the duration of exposure by an hour every 3-5 days. In about 3-4 weeks, you should be able to keep the plant safely outdoors until summer.
- Keep the pot off the ground and other outdoor plants to prevent pests like slugs and snails. You may also sprinkle diatomaceous earth (DE) around the base of the pot to deter the crawlers.
- Bring the pot back indoors when nighttime temperatures are expected to fall below 55 °F (13 °C) in early fall.
Pay attention to the potting soil’s moisture level as it can dry out more quickly under direct sunlight and warmer temperatures. I’ll discuss this further below.
Watering
Aloe veras have minimal watering needs and will flourish with the following watering routine:
- Use a porous potting mix that’s easy to re-wet. Aloe veras require infrequent watering, so it’s crucial to use a soil mix with low risk of becoming hydrophobic from long periods of dryness. Mixing equal parts high-quality compost and perlite is perfect for aloe veras.
- Pour the water directly into the soil, outside the base of the plant. Avoid pouring water at the center of the rosette because stagnant water can cause crown rot. About 15 minutes after watering, tilt the pot to pour out any water that got into the middle of the plant.
- Water the plant deeply and evenly. Aloe veras prefer infrequent but deep watering so they can soak up enough moisture to keep them hydrated for several weeks.
- Pro Tip: Pour one cup of water at a time and wait 5-10 minutes before pouring another so the roots can absorb the moisture. Stop watering when the excess water drips from the drainage holes. You can record the number of cups and use it as a reference for future waterings.
- Water the plant every 2-3 weeks in spring and summer. Aloe veras receiving direct sunlight will naturally require more frequent watering to prevent leaf scorch. Check the soil moisture every 10 days and water the plant when the soil is dry 2 knuckles deep or halfway down. When using a moisture meter, water your plant when the reading shows 1-2.
- Reduce the watering frequency to every 4-6 weeks in winter. If the room temperature drops to 50-60 °F (10-15.6 °C), aloe veras naturally grow more slowly or become semi-dormant. As a result, they consume less water. Water the plant when the soil moisture meter shows a reading of 1-2.
- Use the soak-and-dry method after 4-5 times of regular top watering. Simply place the bottom half of the pot in a tub of water for 10-30 minutes until the soil surface feels moist. This method evenly rehydrates the soil mix and prevents hydrophobic conditions.
Note: Aloe veras are salt-tolerant and don’t mind receiving chlorinated tap water regularly—another benefit of growing a hardy succulent. Just be sure to use tepid water (around 68 °F or 20 °C) to prevent cold shock to the roots that can slow growth.
Underwatering Vs. Overwatering
Due to the structure of their leaves, aloe veras have a high tolerance to drought. I can attest that a healthy aloe vera plant can go well over 3 months without water, even during the growing season, when placed in a warm, bright room with moderate humidity.
In contrast, overwatering is the most common problem that can kill an aloe vera plant in as quickly as 2 weeks.
Wet, compact soil can promote fungal growth that can cause root rot. Due to the shortness of the stem, the rot-causing pathogens can quickly spread to the fleshy leaves and kill the plant completely.
Here’s a brief guide to distinguish between overwatering and underwatering symptoms in aloe veras:
| Overwatering | Underwatering |
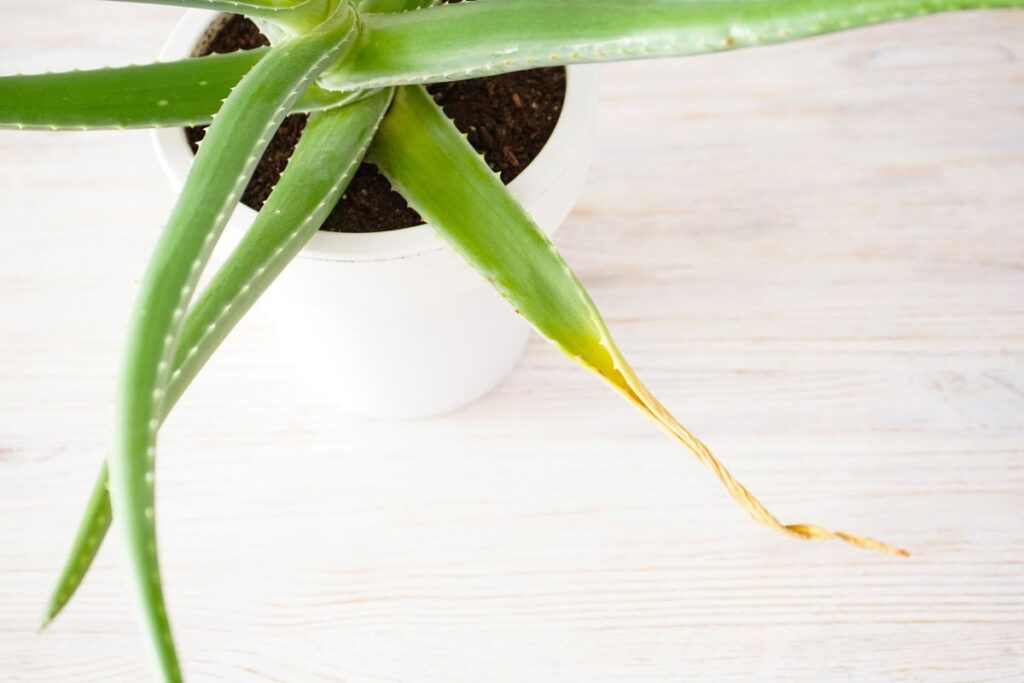
| Wet, soggy soil several days after watering Dark green or brown mushy spots on the leaves Yellowing leaves Floppy leaves with a mushy base Foul odor coming from the soil Black or dark, mushy stems and roots Plant death within 1-2 weeks after rot symptoms appear if left untreated Treated plants can take several months to recover (further discussed below) | Crusty soil surface that repels water Water running down the pot’s edges or through cracks directly to the drainage holes Wrinkled leaves Yellow to reddish-brown, dry leaf tips; the discoloration gradually spreads downward Thin, floppy leaves Plant can appear lifeless or limp, but can be revived when replanted and rehydrated, as long as the rhizome appears white outside and yellow inside |
Temperature & Humidity
Aloe veras are native to hot, dry regions and naturally prefer similar conditions when grown outside their native habitat. As such, you can grow aloe veras outdoors in frost-free USDA zones 10-12.
In colder climates, you can bring your potted aloe veras outdoors in late spring until summer and bring them back indoors when nighttime temperatures in early fall are expected to fall below 55 °F (13 °C).
Low temperatures can cause the following problems for aloe veras:
- Cold Shock: Freezing winters (<32 °F or 0 °C) that freeze the soil can damage the frost-sensitive aloe leaves and roots. Aloe leaves are sensitive to the freeze-and-thaw cycles in winter due to their high water content. The ice crystals can break plant cells, and as they thaw, the water escapes, leaving the aloe leaves and roots with mushy brown spots and subsequent death.
- Chill Injury: Aloe veras may develop chill injury when exposed to temperatures below 55 °F (13 °C). The leaves may become limp and fall over or develop soft, brown, mushy spots. The plant may recover after pruning all the damaged leaves if the rhizome and roots survive. However, it can take 6-12 months before the underground stem develops enough roots to grow new pups.
- Lack of flowers: Cold temperatures (<55 °F or 13 °C) can inhibit flower bud development in aloe veras. For higher chances of flowering, maintain warm temperatures (65-85 °F or 18-29 °C) all year round. Ensure that nighttime temperatures are only 10-15 °F (6-10 °C) lower than daytime temperatures.
Here’s a guide to the native and recommended indoor conditions for aloe veras:
| Environment Conditions | Native or Outdoors | Indoor Garden |
| Temperature | 55-95 °F (13-35 °C) | Ideal year-round range for flower development: 65-85 °F (18-29 °C) Spring to Fall Day: Around 75 °F (24 °C) Night: Around 65 °F (18 °C) Winter Day: 65-75 °F (18-24 °C) Night: Above 55 °F (13 °C) Note: Aloe veras are sensitive to draft and may exhibit chill injury symptoms. Keep indoor aloes away from drafty doors or windows and the path of cold or hot air from the HVAC system to prevent leaf damage. |
| Humidity | 10-80% Aloe veras typically don’t mind higher humidity levels (common in tropical countries) as long as the topsoil remains relatively dry and free from rot-causing pathogens. | 30-50% all year round Note: Although aloe veras can adapt to various humidity levels, the EPA recommends maintaining indoor humidity at 30-50% for human health. This range is also suitable for houseplants as it inhibits bacterial or fungal growth on the foliage. |
Fertilizing and Nutrient Requirements
Aloe veras don’t require frequent fertilization. They can generate sufficient food from plenty of sunlight and occasional deep watering to support their growth.
I have once given an aloe vera pup to a non-gardener friend, and she still hasn’t fertilized the plant in the 4 years since she received it. Still, the aloe vera thrived and has even started producing new pups in its third year.
Two generations of gardening enthusiasts in my family have proven just how fuss-free aloe veras are when it comes to the lack of supplemental fertilization. In fact, aloe veras are more likely to show stress symptoms from over-fertilization.
Here are the differences and corresponding signs of nutrient imbalance in aloe veras:
| Features | Nutrient Deficiency | Over-Fertilization |
| Probability | Rarely happens unless the plant has been in the same pot for over 3 years without supplemental feeding | Symptoms appear about 2-4 weeks after fertilizer application |
| Symptoms | Pale or yellow leaves (rule out over- or underwatering) Slow or stunted growth even during the growing season Lack of new pups from plants over 3 years old Absence of flowers from an otherwise prolific bloomer | High-nitrogen fertilizers can cause rapid growth with weak and skinny leaves Crusty, white soil surface from undissolved fertilizer salts Desiccated roots close to the surface because the salts draw moisture out of the roots Yellow or brown leaf tips (typically occur if the plant is over-fertilized yet underwatered) |
| Treatment | Feed the plant with a half-strength 10-10-10 liquid fertilizer for faster absorption. Dilute and incorporate the liquid into the watering can and pour it into the soil gradually. Repeat after 2 months if it’s still within the growing season. | Scrape the top ¼ inch (0.6 cm) of the soil with a spoon to remove the white salt crust. Flush the soil with filtered water until the excess drips from the drainage holes. Aloe veras are salt-tolerant, so removing the visible crust and leaching/flushing once should be enough to remove excess fertilizer salts and encourage the plant to recover. |
Nutrient-Rich Potting Mix
Using a nutrient-rich potting mix when repotting aloe veras often cancels out the need for an extra dose of nutrients until the next repotting session.
- High-quality cactus or succulent mixes are typically infused with nutrients, which are usually sufficient for about 6-12 months for regular houseplants. Interestingly, the nutrients can last over 2 years for aloe veras—just in time for the next repotting.
- A homemade compost-perlite mix with a 50:50 ratio can also keep aloe veras nourished for about 2 years or so. You may top up the mix with a handful of compost in spring when the soil volume appears to shrink.
Note: Aloe veras will remain vibrant and put out new leaves under these potting conditions. However, they may be less likely to put out offshoots or flowers as the nutrients in the potting mix can become depleted over time.
Supplemental Feeding
Here are some fertilizing options I’ve found effective at maximizing an aloe vera’s lifespan and promoting more pup formation:
- 10-10-10 granular fertilizer: Spread a thin layer of the granules over the soil in spring or early summer 1-2 years after repotting for a slow release of nutrients throughout the growing season. Be sure to water your plant regularly after fertilizer application because the granules need water to release the nutrients.
- 10-20-10 granular fertilizer: A low-nitrogen, high-phosphorus fertilizer can promote healthy root growth and increase the chances of flower development, especially for mature plants growing in direct sunlight. You can apply the fertilizer in early spring for potential flowering in summer.
- Liquid fertilizer: If the aloe vera is growing slowly and not putting out new leaves even during the growing season, apply a half-strength 10-10-10 liquid fertilizer. You can add the liquid to the watering can to dilute it. Reapply at a 2-month interval during spring and summer.
- Compost: Work a handful of compost into the top inch (2.5 cm) of the soil in spring or early summer to gently nourish the plant.
Pruning and Maintenance
Aloe veras receiving direct sunlight grow fast and require regular pruning to prevent overcrowding.
Here are some tips to manage your plant’s size and appearance:
- Aging outer leaves: In spring or summer, new growth occurs from the center of the rosette, so the outermost, older leaves naturally fade first. Hold a yellowing outer leaf firmly and pull to the side. It’ll easily detach from the stem. This will give the new leaves from the middle enough space to grow and keep the stem from growing too tall, too quickly.
- Gel collection: Wait until the aloe vera has at least ten leaves and the older ones are about 6-8 inches (15-20 cm) tall to prevent stunted plant growth. Once the plant is large enough, you can prune aloe veras anytime throughout the year for gel collection, but remove only one leaf at a time. Choose a plump, green outer leaf and use a sharp, sterile knife to make a clean cut close to the base of the plant.
- Unbalanced or leggy growth: I noticed that it’s best to prune an overgrown aloe vera in the fall when it is semi-dormant so it won’t quickly put out new leaves to replace those that were removed. Thin the foliage by removing the older or noticeably leggy leaves. Focus on removing the thick, outer leaves first and keep the younger, healthy leaves in the middle.
- Fading flowers: Aloe vera flowers typically come out in summer and last over 3 weeks, sometimes until early fall. Cut the base of the flower stalk using sterile scissors to preserve the plant’s energy for the cold season. Discard the flowers into a garbage bag or compost bin.
Note: You don’t have to apply cinnamon powder to the wound after pruning because aloe vera gel has natural antibacterial and antifungal properties. Just be sure to use sterile pruning shears or knives to avoid introducing plant pathogens directly into open plant tissue.
Routine Cleaning

Aloe veras may collect dust over time, requiring routine cleaning. Other sources may recommend commercial leaf cleaning products or DIY oil- or soap-based leaf cleaners to keep aloe vera leaves shiny.
However, I don’t recommend such products as they can damage aloe leaves by:
- Washing off the leaves’ natural waxy coating that should help prevent moisture loss.
- Increasing the risk of sunburn or leaf scorch after exposure to direct sunlight.
To safely and properly clean your aloe veras, follow the tips below:
- Wipe the leaves with a slightly moist, lint-free cloth to remove the dust.
- Pro Tip: If the plant has narrow leaves or sharp teeth on the margins, wrap the cloth around a wooden chopstick to reach between the stiff, upright leaves.
Propagation Techniques
Many popular but false bits of information are circulating online about how you can propagate aloe vera through terminal leaf cuttings. However, leaf cuttings without stem tissue won’t develop roots and will likely rot or dry out over time.
In addition, aloe vera cuttings or pups do not root in water. They will most likely rot.
You may successfully propagate indoor aloe veras through the following:
- Pups or offshoots
- Stem cuttings
- Leaf cuttings (with a piece of stem attached)
Let’s explore the methods below:
Pup or Offshoot Division
Here are important reminders when collecting and propagating aloe vera pups:
- Schedule propagation in spring or early summer for faster growth.
- The pups or offshoots must be at least 4 inches (10 cm) tall for a higher probability of a sufficient root system.
- Pro Tip: If the plant doesn’t appear too crowded in the pot, wait until the next repotting schedule to divide the pups from the mother plant. Unpotting the plant can make it easier to locate the separation points and safely detach the pups with sufficient roots.
Follow the steps below to collect the pups:
- Use your fingers to locate the base of the pup and the separation point from the mother plant.
- Firmly detach the pup from the mother plant, keeping as many fibrous roots as possible.
- Leave the pup on a dry towel in a warm room with bright indirect light and moderate humidity for 3-7 days to form a callus on the cuts.
- Prepare a 4-inch (10 cm) pot with a drainage hole and fill ¾ with moist aloe vera soil. If you want to plant multiple pups in one container, use a wide but shallow pot. For instance, choose a pot 6-8 inches (15-20 cm) wide and 4 inches (10 cm) deep to plant 2-3 pups 2 inches (5 cm) apart.
- Position the pup over the soil and place pebbles or rocks around the base of the leaves to keep it upright. Note: Don’t bury the crown of the pup. The roots will eventually grow into the soil, and you can remove the rocks or pebbles after 2 weeks or so.
- Avoid watering for the next 2 weeks. The young pups should have enough moisture in the leaves to develop roots. Wetting the soil will likely lead to root rot.
- Once the pup develops roots, water the soil deeply every 2 weeks.
Pups typically root within 2-3 weeks when placed on moist soil. Gently tug the pup sideways or upward to check for resistance, which indicates root growth. You may remove the pebbles when the pup can stand on its own.
Stem Propagation
Aloe veras typically have inconspicuous stems buried in the soil. Over time, the stems can grow above the soil as new leaves grow at the center of the plant. The tall stem can cause the plant to grow sideways, making it look unappealing.
Pro Tip: If the white, leafless stem is only about 2-3 inches (5-7.6 cm) long, you can bury it in the soil during repotting to anchor the plant firmly and safely keep the leaves above soil level. On the other hand, you can cut a longer stem across to grow two separate plants.
You can divide the stem with the following steps:
- Prepare a sharp, sterile knife and cut the aloe vera stem about half an inch (1.3 cm) above the soil level. The center of the stump should appear yellowish, indicating good health.
- Let the stump dry out for 2-3 weeks before watering. After about a month or so, new pups will emerge from the sides of the stump.
- Peel off the aging leaves from the upper/terminal stem cutting. Use a knife to ensure some healthy leaves have yellow stem tissue attached. You can set these leaves aside for propagation.
- Slice the stem until it’s only about 1-2 inches (2.5-5 cm) long with young, healthy leaves.
- Place the stem cutting in a warm room with moderate humidity and bright indirect light for 10-14 days. You might notice new pups emerging from the base of the stem, which is another proof of an aloe vera’s ability to keep growing with only its stored water and nutrients.
- Prepare a 4-6-inch (10-15 cm) pot with drainage holes and fill ¾ of the way with aloe vera soil mix.
- Bury the short stem into the soil while keeping the leaves above the surface. Place a few rocks around the base of the leaves to keep the plant upright.
- Water the soil every 2 weeks.
It typically takes at least a month during the warm season before the stem cutting develops enough roots to stand on its own. You can keep the rocks in place for 2-3 months while waiting for the plant to grow enough roots.
Note: Other sources recommend applying a rooting hormone on aloe cuttings to encourage faster rooting, but it’s not necessary. Aloe vera gel contains enzymes and vitamins, so it’s sometimes used as an alternative to rooting hormones to induce rooting in other plants.
That said, aloe vera cuttings will readily root even without supplemental rooting hormones.
Leaf Propagation
Using the leaf cuttings set aside from step 3 above, follow the propagation method below:
- Leave the cuttings on a dry paper plate or towel in a warm room with bright indirect light and moderate humidity for 10-14 days.
- After 2 weeks, the callused stem tissue should produce new pups with or without roots.
- Prepare a 4-inch (10 cm) pot with moist aloe vera soil mix.
- Position the leaf cutting over the soil and secure it with a few rocks. Be sure not to squish the pups with rocks and that there’s enough space for growth.
- Wait about 2 weeks before watering the soil deeply.
- Routinely check the leaf for resistance as a sign of root growth and remove the rocks when the cutting can stand on its own.
Keep the young plant in moderate lighting for a year. Transplant into a bigger container (6-8 inches or 15-20 cm wide) when the foliage spreads to the edges of the pot.
Repotting

When giving pups away as gifts, I advise my family and friends that the repotting frequency typically varies depending on light intensity.
Here’s my usual tip:
- High (at least 4 hours of direct sunlight daily): Divide and repot every 2-3 years
- Moderate (8-12 hours of bright indirect light): Divide and repot every 3-5 years
Since indoor environment and care routines can vary across households, you can determine if your plant needs repotting with the following signs:
- Overflowing pups
- Crowded roots growing out of the soil surface or through the drainage holes
- Stunted or slowed growth
- Cracks in clay pots
- Bulging in plastic pots due to overgrown roots
- Pale and degraded soil due to nutrient depletion or hydrophobicity
The best time for repotting aloe veras is in spring until early summer for faster recovery. If your plant exhibits the signs listed above during the fall or winter, wait until the following spring before repotting because aloe veras are resilient and don’t mind being rootbound.
You may need the following tools for repotting:
- Old newspaper
- Water hose
- Small and large sterile pots for the pups and mother plant, ideally 2 inches (5 cm) wider and deeper than the root ball
- Aloe vera soil mix
- Clean tray, towel, or paper plates
- A spatula
- A knife
- Pruning shears
- Alcohol spray
- Cotton balls or aclean cloth
- Garbage bag
Here are the steps to properly repot an aloe vera:
- Water the plant deeply 2 days before repotting so the soil is easier to work with and the plant is properly hydrated.
- Bring the plant to the bathtub or an outdoor working space with a water hose.
- Spread a newspaper on the working space to contain the old potting soil.
- Check the bottom of the pot and disentangle or cut any roots that poke out of the drainage holes to remove resistance.
- Hold the base of the plant firmly and carefully unpot the plant. Alternatively, run a spatula along the pot’s edges to slide out the plant more easily.
- Remove as much old soil as possible from the roots using your fingers. You may pour some water over the roots to reveal the natural separation points of the pups.
- Use a sharp knife to slice the pup with a portion of the rhizome and roots from the mother plant. Sterilize the blade with alcohol and cotton balls between cuts to prevent infection.
- Prune any mushy or desiccated roots using sterile shears or scissors. Healthy aloe vera roots are plump and white (or brown from soil stain).
- Set the mother plant and the pups aside on a tray, paper plate, or towel for 3-7 days in a warm room with bright indirect light. Allow the cuts to heal before transplanting.
- Fill the bottom 2 inches (5 cm) of the new pot with moist aloe vera soil.
- Spread the roots over the soil and cover the rhizome or underground stem with soil. Avoid covering the leaves or plant crown with soil to prevent crown or root rot.
- Position some rocks or pebbles around the plant as needed to keep it upright.
- Wait 7-10 days before watering the plant deeply.
Note: If the plant is showing signs of root rot, such as mushy leaves and black, smelly roots, you must repot immediately for better chances of recovery. I’ll discuss this further below.
Pest and Disease Management
Aloe veras have few pest and disease problems in their native habitat. However, existing infestations or infections in indoor gardens may affect even the sturdiest succulents.
Common Pests
The following indoor plant pests may be drawn to the fluid-rich sap of aloe veras:
- Mealybugs: Fluffy white masses of sap-feeding pests about 1/16-⅛ inches (1.6-3.2 mm) in diameter. They may be found along the aloe blades or in the gaps between the rosettes. Damage from severe infestations may appear as yellow spots on the leaves. Mealybugs excrete sugary honeydew that can attract sooty mold and ants.
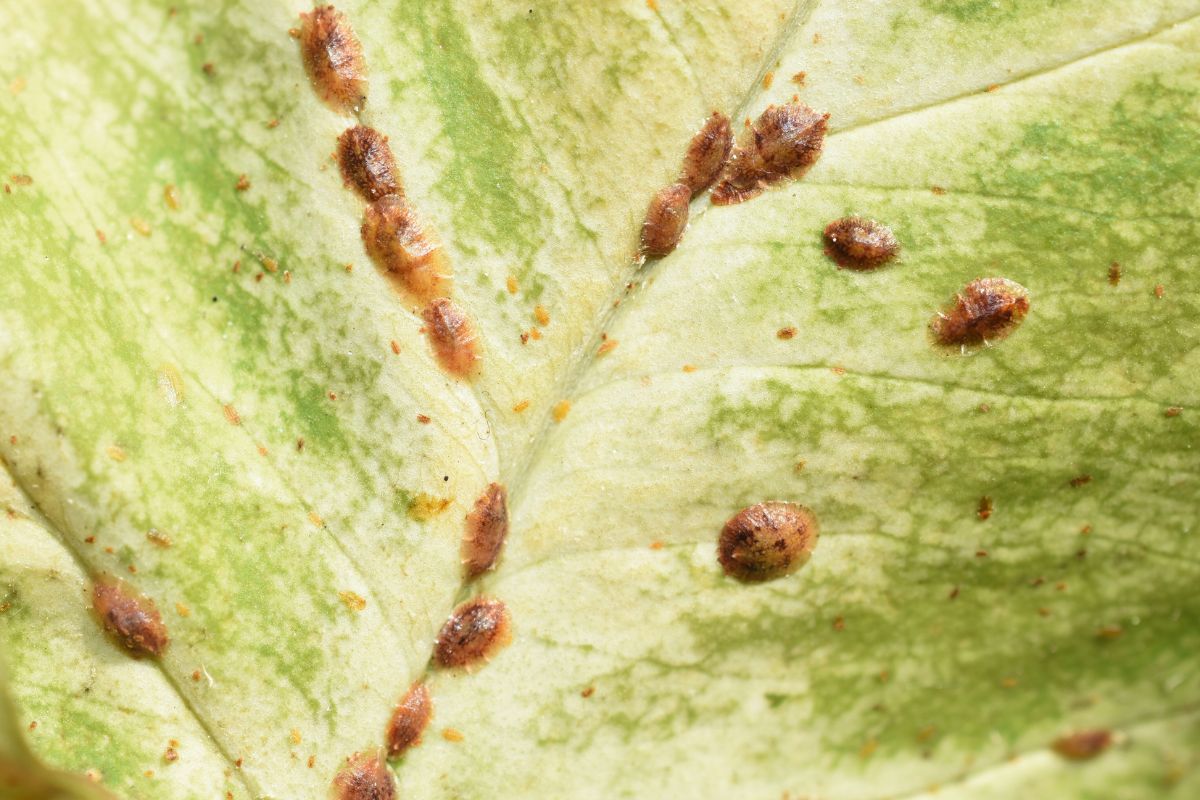
- Scale Insects: Tiny brown tortoise- or oyster-like bumps about 1/16-⅛ inches (1.6-3.2 mm) in diameter. These immobile pests draw sap from the leaves, causing localized yellowing. Honeydew, sooty mold, and ants are also common signs of scale infestations.
- Spider Mites: Microscopic, spider-like mites about 1/25 inches (1 mm) long. They release fine webs and cause tiny red or yellow spots on aloe leaves from feeding. The flowers, if any, may also appear distorted.
- Aphids: Translucent yellow, green, pink, orange, or black, pear-shaped pests about 1/16-⅛ inches (1.6-3.2 mm) long. Aphids rarely feed on aloe veras but when they do, they’re found at the center of the rosette where new growth occurs. Severe infestations can result in distorted new leaves, honeydew, and sooty mold.
Note: The notorious white aloe scales (Duplachionaspis exalbida) are a common scale problem in all aloe species in South Africa but are rarely observed in the U.S. or U.K. They can coat entire aloe leaves and appear as fuzzy white or gray, immobile clusters.
Aloe vera plants infested with white aloe scales require prompt disposal (or burning, if permitted by law) to prevent the spread of the invasive pest.
Here are the methods to treat a pest infestation in aloe veras:
- Isolation: Identify and isolate all infested plants in the indoor garden. Keep aloe veras in a room with bright indirect light during treatment because most organic pesticides can cause leaf scorch when exposed to direct sunlight.
- Rinsing: Bring your potted aloe to the sink or bathtub, tilt the pot, and run a shower spray to dislodge the pests and remove honeydew, sooty mold, or webs. Pat the leaves dry with a clean towel to avoid secondary problems like root or crown rot.
- Pruning: Using a sharp knife or pruning shears, cut severely infested or deformed leaves down to the base.
- Alcohol swab: Use an alcohol swab with a long handle to reach into the gaps between the leaves in the rosette and scrape the remaining pests. Mature scale insects are firmly attached to leaf tissue, so they don’t fall off during rinsing. Use the alcohol swab to remove them and drop them in a cup of soapy water.
- Neem oil spray or insecticidal soap: Use high-quality, lab-formulated sprays to avoid foliar damage. Spray neem oil or insecticidal soap once a week at night for up to 8 weeks until there are no more signs of pests. Ensure the room has good air circulation (i.e., a fan) to allow the foliage to dry quickly after treatment application.
- Prevention: Continue applying neem oil spray every 2 weeks to prevent re-infestations. Keep the plant out of direct sunlight for 24-48 hours after application to prevent leaf scorch.
Common Diseases
Indoor aloes may occasionally succumb to the following diseases:
Root Rot
As succulents, aloe veras are sensitive to excess moisture. The fibrous roots can lose access to oxygen if the soil is compact or constantly wet. The weakened roots will also be easily attacked by rot-causing fungi like Fusarium oxysporum and Pythium spp.
Rot-causing pathogens can remain dormant in plant tissue, contaminated pots, potting soil, and other gardening tools.
Warm and constantly wet conditions can activate the fungi and cause leaf and root rot symptoms, including the following:
- Black, mushy, smelly roots
- Pale, water-soaked spots on the leaves that gradually turn brown or black
- Mushy leaf base leading to floppy leaves
Prompt diagnosis is crucial to save an aloe vera from root rot. Here are the steps to see if your plant can still be saved:
- Lay out some newspapers in your working space.
- Carefully unpot the plant and remove all the old soil. Discard the contaminated soil in a garbage bag.
- Rinse the roots to remove the remaining soil and inspect the extent of the damage.
- Prune all the black, mushy roots. If all the roots are rotten, cut off the rhizome where all the roots are attached and separate the pups.
- Peel off all the outer leaves with signs of rot.
- Check the inside of the stem. A healthy aloe stem should appear white outside and yellowish inside. If there’s any browning, slice off about a quarter inch (0.6 cm) at a time. Sterilize the knife with rubbing alcohol between cuts. Note: If the entire stem is rotten, it’s best to discard the plant because the disease will keep recurring when the remaining fungi in the plant tissue are activated.
- If the stems appear healthy, soak them in a 1% hydrogen peroxide solution for 5 minutes.
- Leave the plant unpotted in a warm room with bright indirect light and moderate humidity for about 10-14 days.
- Prepare a 4-6-inch (10-15 cm) unglazed terracotta pot with drainage holes and fill ¾ of the way with moist, porous aloe vera soil (i.e., cactus mix or compost-perlite mix).
- Position the stem over the soil and keep it in place using rocks. Keep the setup out of direct sunlight.
- Wait 7-10 days before deeply watering. Repeat watering every 1-2 weeks or as soon as the top inch (2.5 cm) of the soil is dry.
It can take about a month before the stem develops enough roots to support the plant’s weight. Be patient and consistent with your care routine.
Once the roots have developed, you can wait until the top half of the soil dries out before watering again. Avoid overwatering the plant to prevent the recurrence of root rot.
Aloe Rust
Aloe veras occasionally develop small orange spots—a condition known as aloe rust caused by the fungal pathogen Uromyces aloes.
Infection symptoms include:
- Orange spots: Non-contagious stage
- Spores forming on the spots: Contagious stage, as the spores can be dispersed through wind or water droplets
- Leaf drop: The orange spots may get darker and become necrotic until the infected leaf falls off the plant
Aloe rust causes aesthetic damage to aloe veras. In addition, pruning the symptomatic leaves doesn’t eliminate the disease completely. As such, it’s best to discard or burn the infected plant to prevent the fungi from producing spores and spreading the infection.
Fungal Leaf Spots
Wet soil and humid air can cause fungal leaf spot diseases in aloe veras. Fungi typically spread through wind-dispersed or water-dispersed spores and may remain dormant on plant tissue until the environmental conditions become suitable for fungal growth.
Aloe veras may acquire the infection from nurseries or infected new plants introduced into the indoor garden.
Here are the common leaf spot diseases in aloe veras:
- Alternaria leaf spot disease (Alternaria alternata): Dark-brown spot with grayish center, reduced gel quality
- Anthracnose (Colletotrichum boninense): Brown, water-soaked spots
- Black spot disease (Colletotrichum gloeosporioides): Black, necrotic spots
Fungal diseases cannot be completely eliminated as they may remain dormant and undetected in plant tissue.
Other sources may recommend pruning the symptomatic leaves and maintaining infrequent watering or low humidity (30-50%) to keep the pathogens dormant and the plant asymptomatic.
In contrast, I recommend burning or discarding the infected plant to prevent future problems with disease transmission. In addition, the gel from infected aloe veras are not guaranteed to be safe for use. It’s best to start fresh with a healthy aloe vera from a reputable source.
Troubleshooting Common Problems
Aloe veras are generally resilient and tolerant to minimal attention.
However, constant deviation from their recommended care and environment can cause the following issues:
Soft or Mushy Leaves
This is a common problem caused by overwatering. Remember that aloe vera is a drought-tolerant succulent that prefers to be underwatered rather than overwatered.
The first thing to do is to inspect the soil for signs of root rot and repot as recommended above.
If the roots seem fine but the leaves are mushy, you may treat the plant with the following tips:
- Prune the damaged leaves down to the base using sharp, sterile shears.
- Allow the soil to dry completely before watering again. Ensure the excess moisture is draining properly from the pot’s holes. You may need to poke the soil through the holes to remove soil plugs and facilitate proper drainage.
- Moving forward, wait until the top 2-3 inches (5-7.6 cm) or top half of the potting soil is completely dry before watering again. You can check the soil moisture using your fingers or a wooden chopstick. Alternatively, use a moisture meter and water the plant when the device reads 1-2.
Wrinkled or Thin Leaves
Although extremely drought-tolerant, aloe veras may develop wrinkly or thin leaves from severe dehydration caused by prolonged underwatering.
Mature aloe veras with thicker leaves may go over 3 months without water before showing symptoms. In contrast, younger aloes with underdeveloped leaves and roots may show stress sooner.
Dehydration symptoms can appear more quickly if the plant is also exposed to:
- Intense sunlight
- High temperatures
- Low humidity
Here are the tips to restore the leaves’ smooth and plump appearance:
- Rehydrate the soil: Soak the bottom half of the pot in a tub of water for up to 30 minutes or until the soil surface feels moist. Allow the excess moisture to drain completely. The leaves should gradually feel firmer after they absorb enough water.
- Water the plant regularly: Check the soil moisture 10-14 days after soaking and water the plant from the top when the soil is dry halfway down.
- Adjust the watering frequency during the cold season: You may reduce the watering frequency in late fall and winter when the plant is semi-dormant and the soil takes longer to dry out.
Leaf Discoloration
Young aloe vera leaves are dark green with tiny, irregular white spots. On the other hand, mature leaves are solid pea-green that occasionally appear dull due to the whitish cuticular layer. Any deviation from this usual coloring can indicate plant stress.
Here are common discolorations in aloe vera leaves and their corresponding potential causes:
- Yellow: Underwatering, overwatering, nutrient deficiency, intense sunlight
- Brown: Prolonged drought (dry), sunburn, overwatering (water-soaked), fertilizer burn, leaf spot disease
- Red: Intense sunlight and high temperatures
- White: Bleaching caused by sunburn (irreversible)
Here are some tips to correct the problem:
- Evaluate your plant’s associated symptoms to correctly identify the potential cause.
- Prune severely discolored leaves to restore your plant’s green appearance.
Address the underlying problem to encourage your plant to grow healthier leaves and prevent the discoloration from recurring.
Here are common problems and their corresponding solutions:
- Underwatering: Soak the bottom half of the pot for up to 30 minutes to rehydrate the soil, the roots, and the leaves. Make it a habit to check the soil moisture every 10-14 days to avoid underwatering the plant.
- Overwatering: Allow the top half of the soil mix to dry completely between watering sessions. If the plant is chronically overwatered due to poor soil drainage, transfer the plant to a breathable terracotta pot with drainage holes and fresh, porous cactus mix or DIY compost-perlite (1:1) mix.
- Sunburn: Draw sheer curtains to filter the light or move the plant a few feet (+ 0.6 m) away from a hot, sunny window into a spot that receives bright indirect light.
- Heat stress: Water the aloe vera regularly to restore its resistance to high temperatures. Keep the plant away from heating vents or sunny windows during summer.
- Fertilizer burn: Scrape the fertilizer granules or white salt crust from the soil surface. Flush the soil with filtered water to leach the remaining excess salts in the soil.
Seasonal Care
Aloe veras grow in frost-free regions in the wild. It’s crucial to make seasonal adjustments when growing them indoors in colder climates like the US to keep them flourishing for years.
Here are my practical seasonal care tips for aloe veras:
| Care or Environment | Spring to Early Fall | Late Fall and Winter |
| Water | Every 2-3 weeks When the soil is dry 2-3 inches (5-7.6 cm) deep | Every 4-6 weeks When the soil is dry halfway or ⅔ down |
| Light | 4-6 hours of direct morning sun from an east or south-facing window I occasionally move older aloes (over 4 years old) to an east-facing balcony in mid-spring for better chances of flowering in the summer. I move it back indoors in early fall before nighttime temperatures hit below 55 °F (13 °C). | 4-6 hours of direct morning sun from an east or south-facing window (clouds and snow may reduce light intensity) Wipe the windows regularly to remove snow and dust and maximize the plant’s light exposure |
| Temperature | Day: Around 75 °F (24 °C) Night: Around 65 °F (18 °C) | Day: around 70 °F (21 °C) Night: around 60 °F (15.6 °C) Note: This is based on the average temperatures, as the central heaters in my home don’t warm the indoor garden as well as the bedrooms. Most houseplants thrive indoors in these temperatures. |
| Humidity | 30-50% | 30-50% Humidifiers in the indoor garden remain on for 4-6 hours at night to combat the drying effect of the heaters or winter air |
Display and Design Ideas
Aloe veras and their relatives have versatile placement options in the home.
Here are some design ideas to maximize their aesthetic appeal:
- Succulent window: I have a table next to the east-facing window where various aloes like lace aloe and the classic aloe vera sit with other compact succulents like zebra haworthias and echeverias. The taller aloe veras shield the slightly light-sensitive succulents from direct sunlight.
- Mixed planters: You can plant the dwarf-type lace aloe in a mixed succulent planter with Haworthia cooperi, Sempervivum ‘Pacific Red’, and Echeveria ‘Azulita’ for an explosion of colors and textures.
- Wall decor: Young aloe veras can grace white wall shelves that receive plenty of sunlight. This location also keeps them safe from foot traffic and curious pets.
Companion Plants
Several indoor succulents share similar care and environmental requirements with aloe veras, making them excellent companions.
Here are common houseplants you can group with aloe veras:
- Echeveria (Echeveria spp): Echeverias are tiny succulents with rounded leaves growing in a rosette pattern. They come in various hues, such as blue, purple, or red, giving your succulent garden an interesting diversity.
- Jade Plant (Crassula ovata): The coin-shaped leaves of jade plants are a direct contrast to the pointy leaves of aloe veras. In Feng Shui, aloe vera is a symbol of health, while the jade plant is for wealth. Putting them together in your indoor garden can promote positive energy.
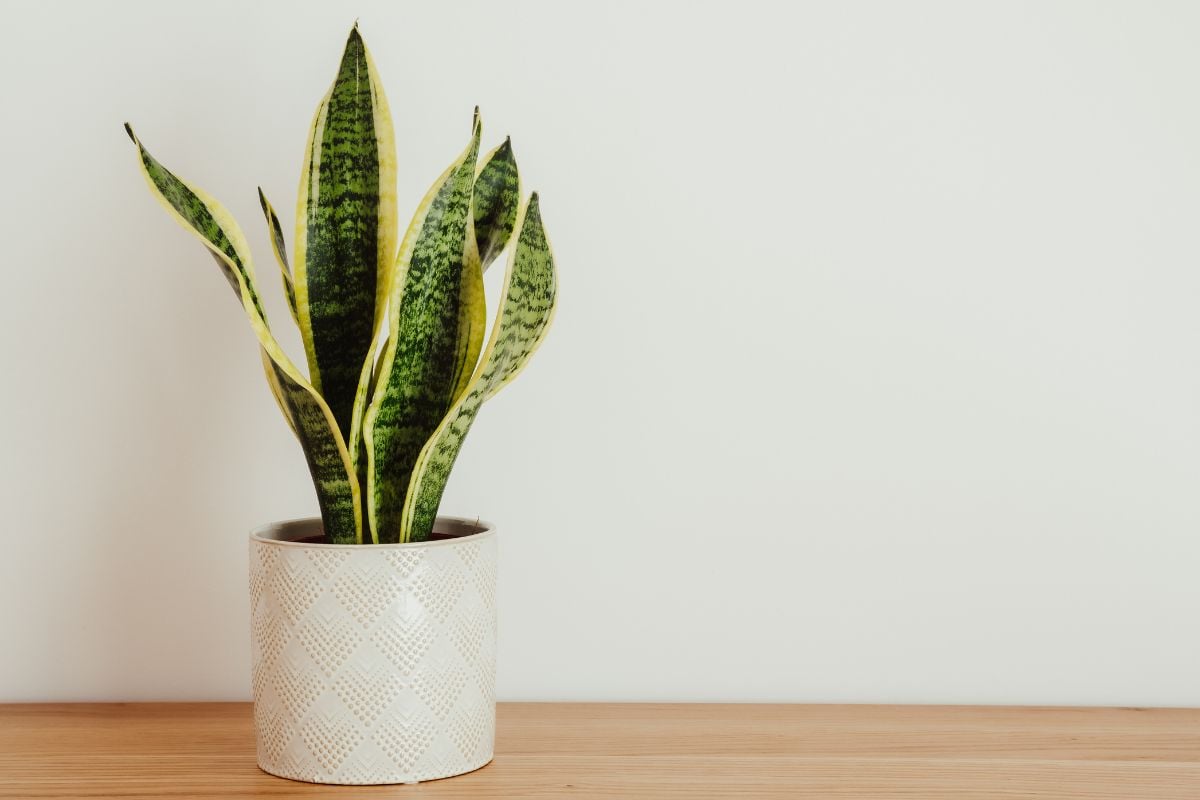
- Snake Plant (Dracaena trifasciata): Snake plants and aloe veras have similar growing habits and leaf shape. However, the yellow markings on the snake plant’s leaves can add color against the dull green aloe vera leaves.
Note: Avoid pairing aloe veras with tropical plants that require high humidity to avoid fungal diseases.
Final Thoughts
Aloe vera is a smart, stylish, and functional houseplant. It doubles as an indoor ornamental and topical home remedy for burns and dry skin.
Aloe vera is also an excellent beginner plant as it has simple care requirements, which include:
- Porous, well-draining soil
- Plenty of sunlight (4-6 hours daily)
- Infrequent watering (every 2-3 weeks in spring and summer, 4-6 weeks in winter)
- Moderate indoor temperature and humidity
- Minimal fertilization (once every 1-2 years)
In addition, aloe vera grows pretty quickly, and you’ll have new pups to share with family and friends in no time.
Please leave a comment to share questions, tips, or stories about your Aloe vera journey.