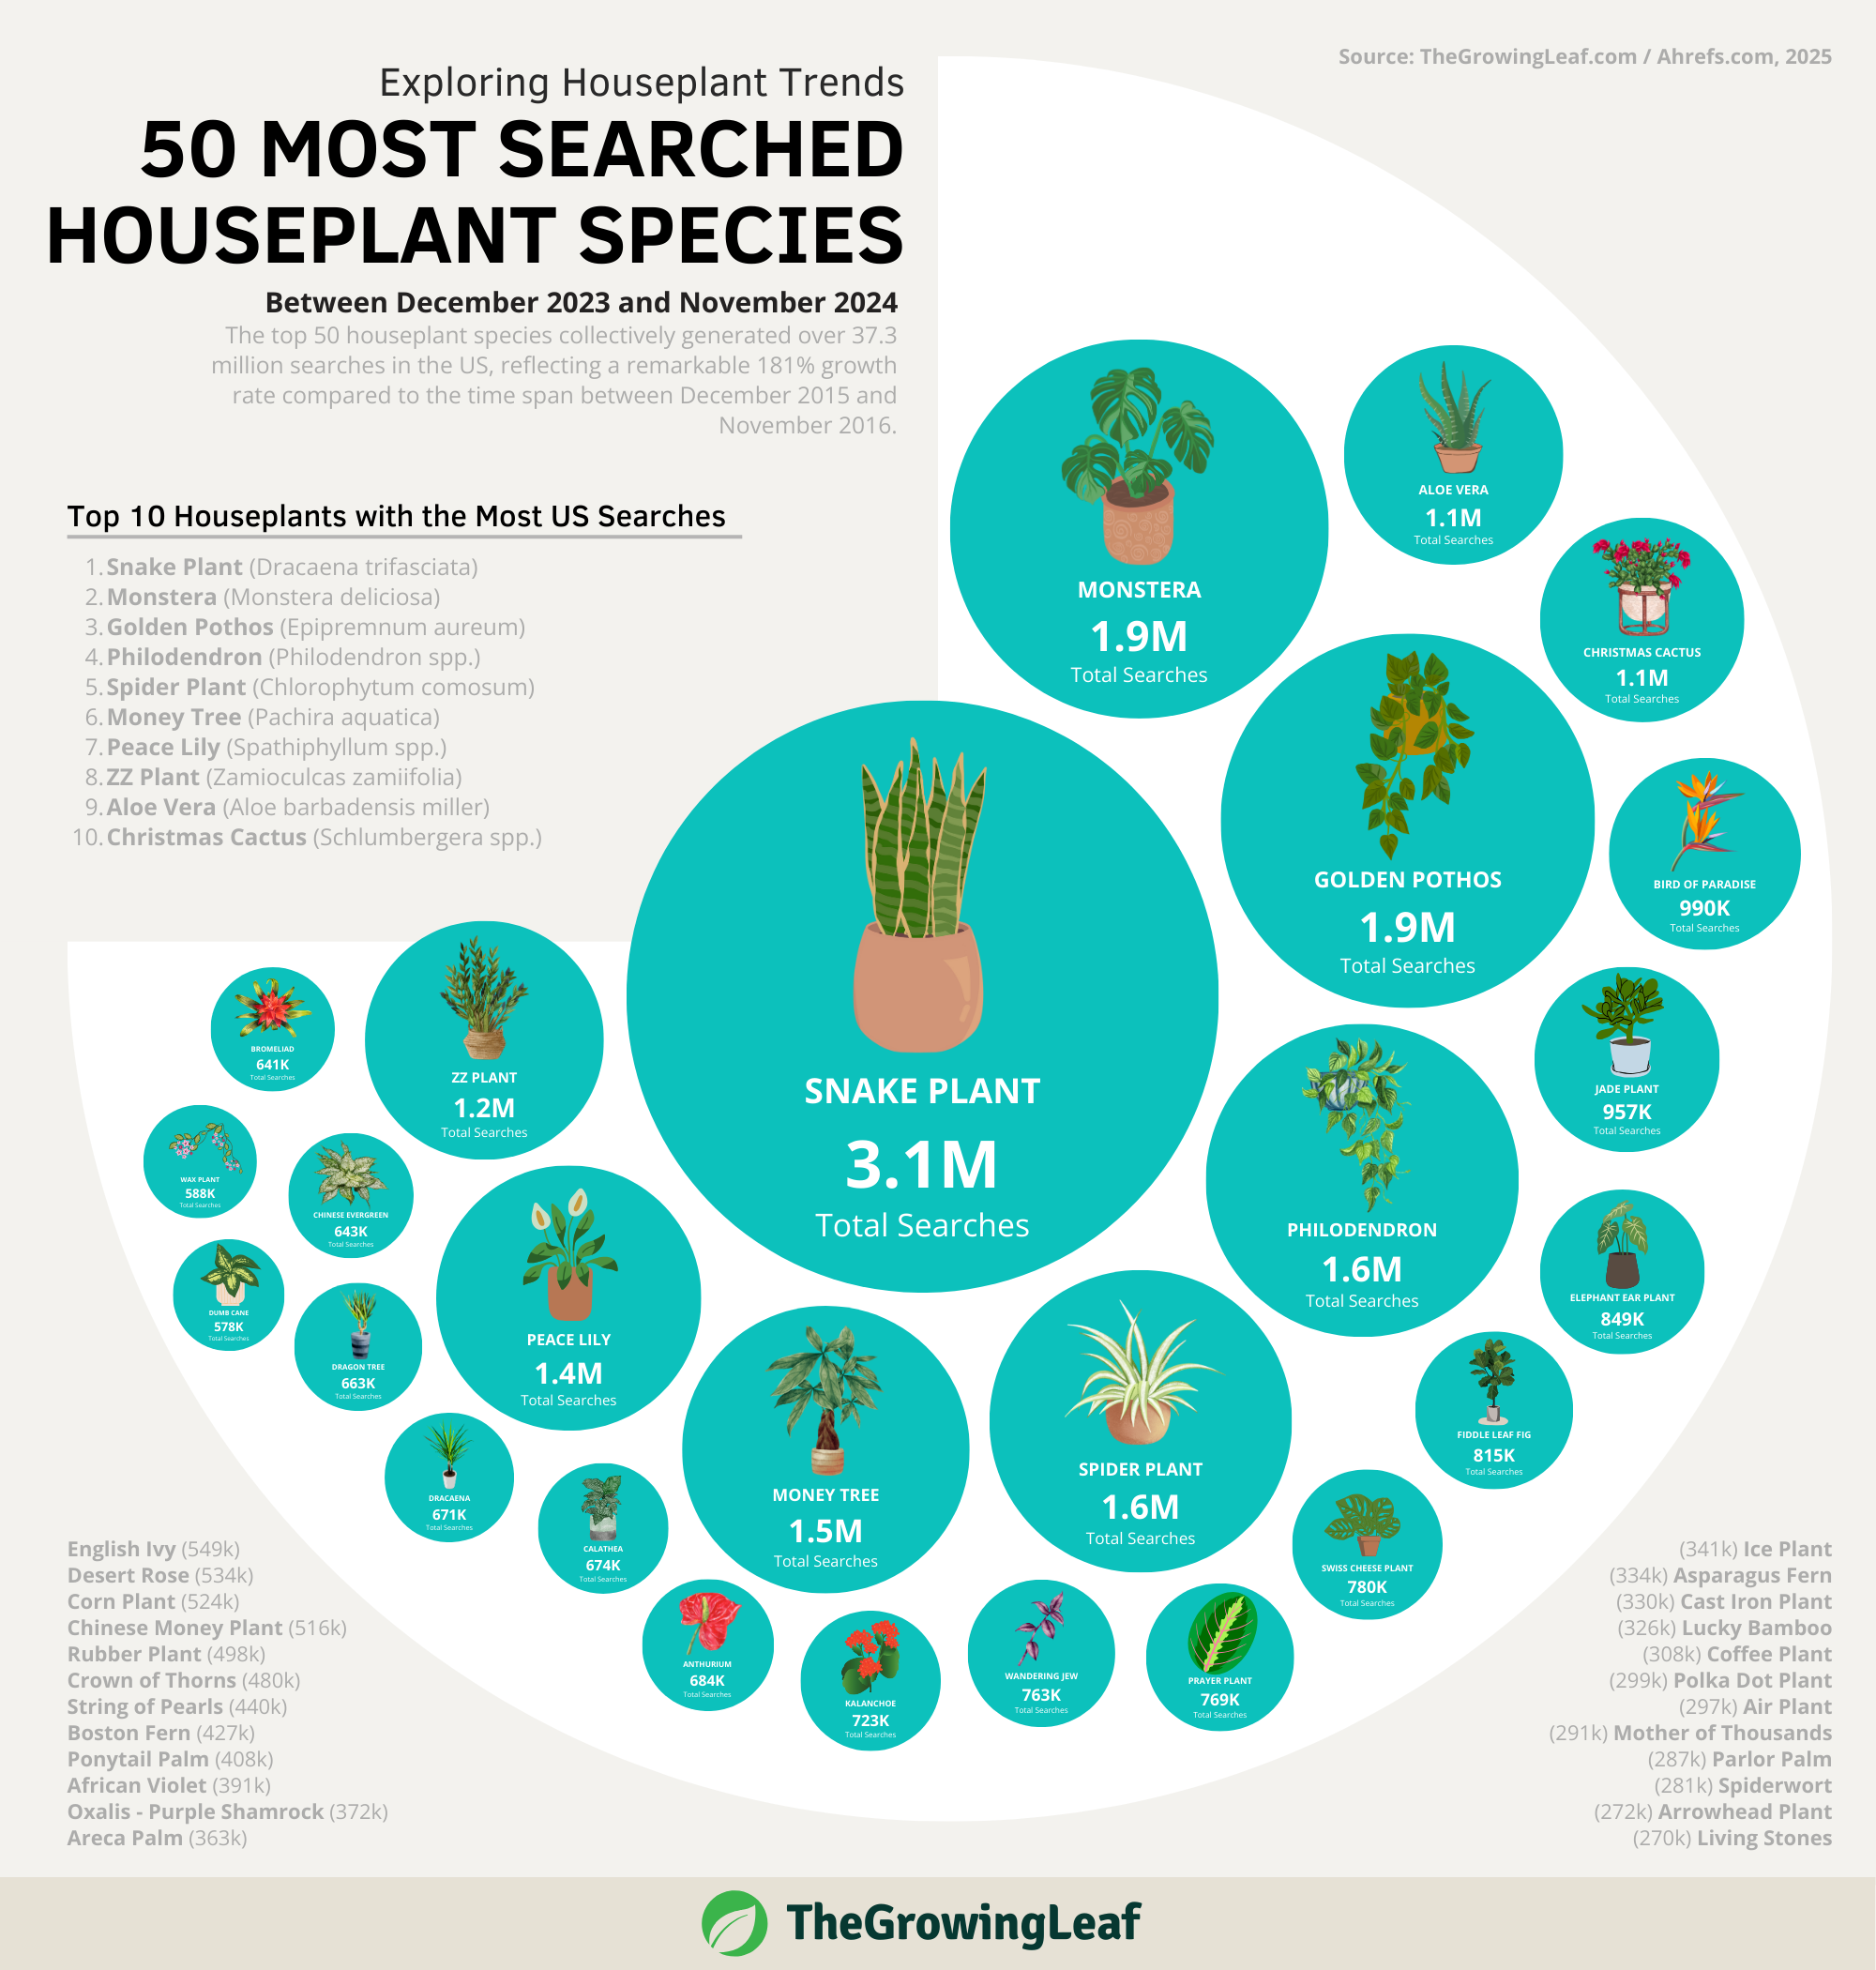
Fiddle Leaf Fig Yellowing Leaves: Symptoms, Causes, Fixes
Fiddle leaf figs are fantastic tropical trees valued for their striking, large leaves, adding a touch of elegance to any indoor setting. However, their leaves may start yellowing, which can indicate stress and potential issues for new plant owners.
Here are the common causes of yellowing in fiddle leaf figs:
- Underwatering
- Overwatering
- Poor Soil Quality
- Inadequate Light
- Aging Leaves
- Nutrient Deficiency
- Bacterial Leaf Spots
- Pest Infestation
- Low Humidity
- Temperature Stress
This article will delve into the symptoms, causes, and solutions for yellowing leaves on fiddle leaf figs, offering practical guidance to keep your plant thriving and prevent future yellowing.
Natural Habitat and Care Requirements
Fiddle leaf figs (Ficus lyrata) are tropical natives from West and Central African rainforests. In the wild, they can grow to massive sizes of around 50 feet (15 m) tall with leaves over 2 feet (+ 60 cm) long and 18 inches (45 cm) wide.
Although they’re naturally accustomed to highly humid (around 70%) and frost-free conditions in their native habitat, they’ve adapted well to indoor conditions in colder regions.
They entered the U.S. market several decades ago, but it wasn’t until the early 2010s that they gained popularity, along with the advent of the social media platforms Pinterest and Instagram.
For optimal health and luscious green leaves, fiddle leaf figs require the following indoor environment and care conditions:
- Up to 4 hours of direct morning sun or at least 8 hours of bright indirect sunlight daily
- Warm and stable temperatures of around 75 °F (24 °C)
- Stable humidity levels between 40 and 60%
- Weekly deep watering or as soon as the soil is completely dry 1-2 inches (2.5-5 cm) deep
- Regular feeding during spring and summer using a half-strength 3-1-2 liquid fertilizer (every 2 weeks) or slow-release granular fertilizer every 2 months
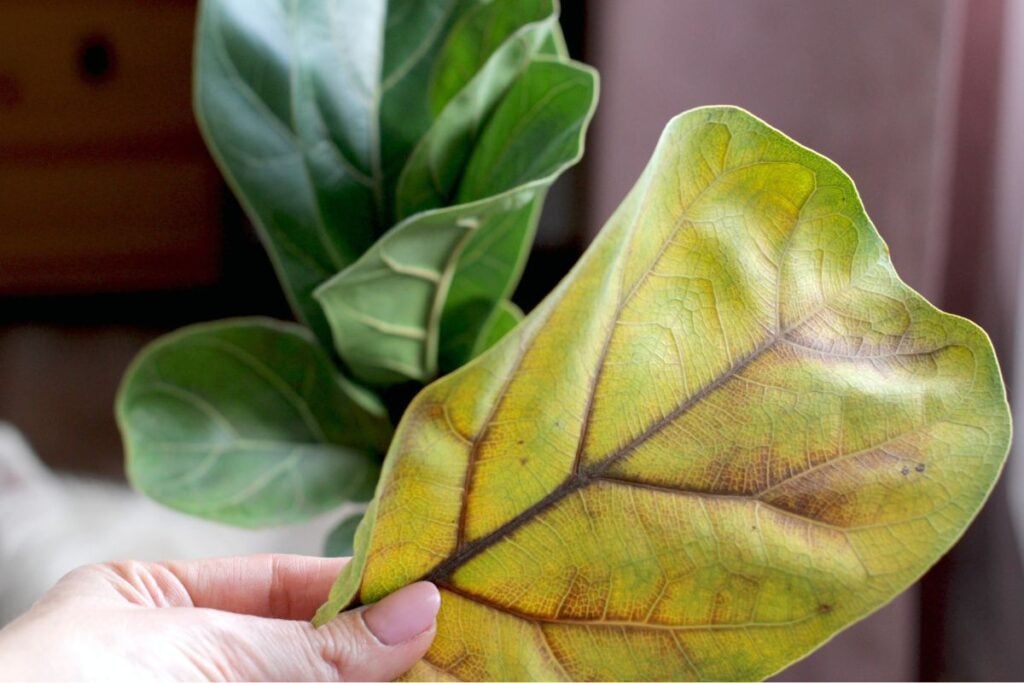
Symptoms of Yellowing Leaves
It’s worth remembering that fiddle leaf figs are sensitive to drastic deviations, which can lead to stress and consequent leaf yellowing.
The discoloration may appear in any of the following forms:
- Yellowing leaf edges that move inward
- Uniform yellowing of the leaf surface
- Yellow patches on the leaf surface
- Uniform discoloration of the bottom leaves only
- Distinct yellowing of the veins followed by interveinal chlorosis (yellowing between leaf veins)
- Speckled leaf surface
- Tiny yellow spots
You may also need to watch out for these other signs that accompany yellowing:
- Yellow edges gradually curl or turn brown
- Drooping leaves
- Edema or tiny brownish-red spots
- Yellow patches or spots that gradually turn brown or black (in the middle)
- Leaf drop
- Deformed or stunted growth in new leaves
Common Causes (& Fixes)
Pay attention to the pattern of the discoloration and its associated symptoms to correctly identify the underlying cause. Catching yellowing symptoms early allows for quick intervention to prevent more severe issues.
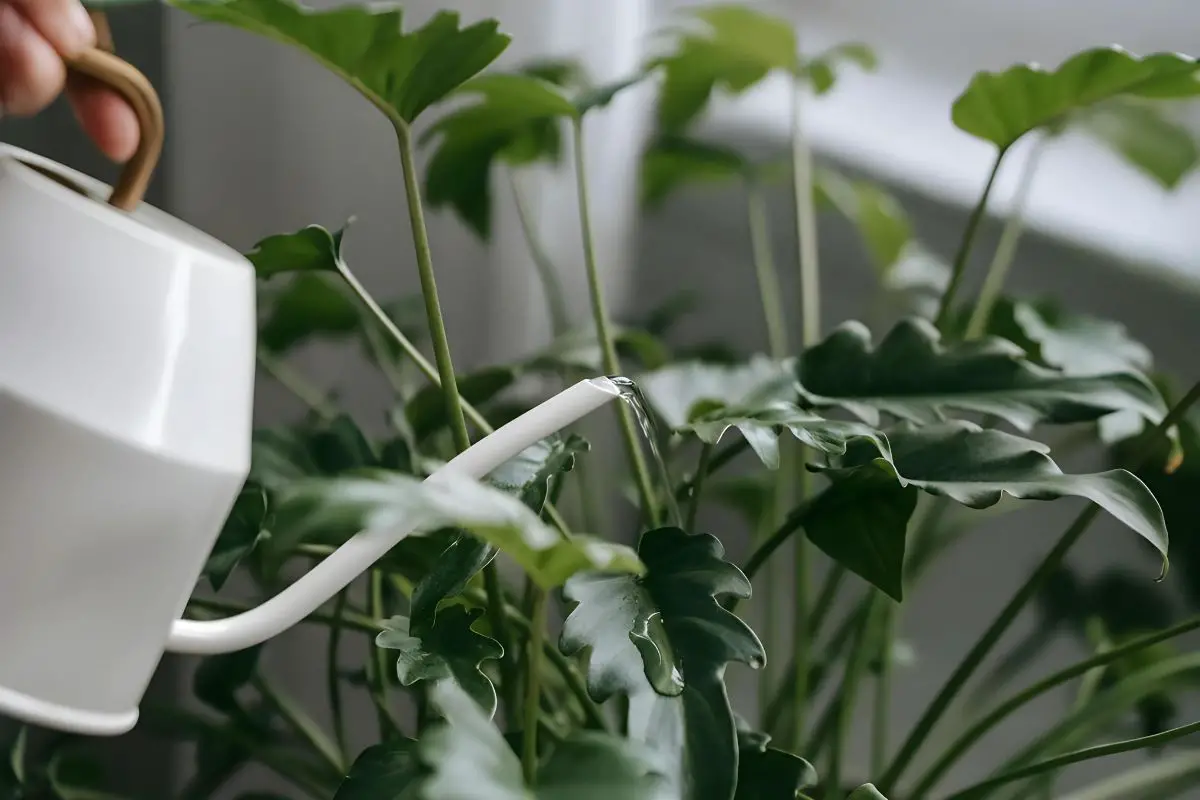
1. Underwatering
Underwatering or prolonged drought are the primary causes of leaf yellowing in fiddle leaf figs (FLFs).
When underwatered, the desiccated roots can’t send moisture or nutrients to the leaves, inhibiting chlorophyll synthesis and turning the leaves yellow.
The fiddle leaf fig may then show the following symptoms:
- Paleness or yellowing that starts from the edges and moves inward
- The leaf tips gradually curl and turn brown and crisp
- Drooping or wilting leaves
- Leaf drop
Before watering your fiddle leaf fig, you must confirm that it is underwatered and rule out other potential issues with one of the following methods:
- Check the soil surface if it feels dry and crusty.
- Use a moisture meter and insert the probe in multiple spots around the pot. A reading below 4 (on a scale of 1-10) indicates that the soil is too dry for fiddle leaf figs. Different readings can also indicate uneven soil rehydration; some spots might have become hydrophobic.
- Poke a hole through the drainage holes to see if the soil is dry all the way through. The soil at the bottom of the pot usually remains moist between watering. If it’s dry, then the plant is severely underwatered.
To prevent the issue from progressing and potentially save your plant, you may use the following tips:
- Water the plant deeply until the excess drips from the drainage holes.
- Move the pot a few feet (up to 0.6 m) away from a sunny window to prevent rapid moisture loss as the plant recovers from dehydration.
- Prune dried leaves using sterile scissors. You may snip the brown edges if the leaves are still predominantly green to allow the plant to continue photosynthesizing.
- Water the plant deeply again as soon as the soil dries out two knuckles deep.
- Avoid shallow watering, as it cannot evenly rehydrate the soil. It also causes a buildup of hydrophobic soil clumps around the roots over time.
If the soil surface is too dry and has poor water infiltration, it means the soil mix has become hydrophobic.
I recommend the following solutions:
- Submerge the pot in water for up to 30 minutes to evenly rehydrate the soil and let it drain completely.
- Bottom water the plant once a month to prevent the buildup of hydrophobic soil clumps within the root zone.
- If the pot is too large or heavy, water the plant evenly using a watering can with a narrow spout. Move the spout around the soil to properly rehydrate the root zone until the excess water drains from the pot’s holes.
2. Overwatering

Overwatering can occur in fiddle leaf figs due to the following reasons:
- Lack of proper drainage in the pot (i.e., no drainage holes)
- Poor soil drainage (too many moisture-retaining materials like clay or peat moss)
- Frequent watering without letting the soil dry out enough between watering sessions
It can lead to several symptoms in FLF leaves, which can progress in the following ways:
- Water-soaked or mushy spots develop on the leaves after absorbing excess moisture from the soil.
- Brownish-red blisters or edema form on the leaf surface as oversaturated cells burst. Prolonged wet conditions can cause the blisters to expand and become brown and tender.
- Leaf drop may then follow as the damaged leaves become weaker.
- Root rot can occur if the soil remains soggy. Rapid fungal growth in the soil can lead to mushy, black, and foul-smelling roots.
- The leaves turn yellow or brown as they become dehydrated from the lack of moisture and nutrients from the damaged roots.
- Black, mushy spots on the stems may then develop as the rot-causing pathogens climb up.
Yellowing leaves due to overwatering often indicate that the roots have rotten, and it may be challenging to save the plant.
The first step is to dig 1-2 inches (2.5-5 cm) into the soil to check the condition of the roots. Be careful not to cut the roots in the process. You can use a hand cultivator or hand rake to minimize the damage to the roots.
You may cover the roots with fresh soil and adjust your watering routine if the roots appear healthy.
Here are some tips:
- Use a wooden chopstick to check the soil moisture 3-5 days after watering. You can calibrate it with a pen and mark 2 inches (5 cm) from the tip. Alternatively, you can use your index finger (up to the second knuckle).
- Wait until the soil is dry at least 2 inches (5 cm) deep (1 inch or 2.5 cm for younger plants with underdeveloped roots) before watering your plant.
- Pour the water evenly over the soil until the excess leaks from the drainage holes.
- Let the pot sit on a drip tray until no more droplets are coming out before placing the pot back on the saucer.
- If the saucer fills up with water, empty it immediately to keep the soil and the roots from reabsorbing the excess moisture.
On the other hand, if the roots appear rotten, observe your plant’s overall condition and choose the appropriate solution below:
Repotting

If the stems feel firm without signs of rot but the roots are rotting, you may help the plant recover by repotting it in fresh soil.
Here are the steps:
- Run a spatula around the pot’s edges to slide the rootball out of the pot with minimal damage to the roots.
- Gently remove the soil around the roots and rinse with clean tepid water.
- Trim rotten roots using sterile scissors. Wipe the scissors with cotton balls soaked with alcohol between cuts.
- Optional: Soak the remaining roots in 1% hydrogen peroxide for 5-10 minutes to eliminate the remaining pathogens.
- Lay the plant carefully on the side as you prepare the new pot and soil.
- Prepare a same-sized sterile pot with drainage holes. Place a wire mesh over the holes at the bottom of the pot to prevent soil plugs from forming over time and inhibiting proper drainage.
- Fill the bottom 2-3 inches (5-7.6 cm) with fresh, moist, well-draining soil mix (i.e., 2 parts standard potting mix, 1 part perlite, and 10% compost).
- Spread the roots over the soil and bury them about an inch (2.5 cm) deep with more soil.
- Tamp the soil around the stem’s base to keep the plant upright.
- Place the plant in a warm room with moderate humidity (around 50%) and bright indirect light.
- Wait until the soil mix is dry 2 inches (5 cm) deep before the initial watering.
Propagation
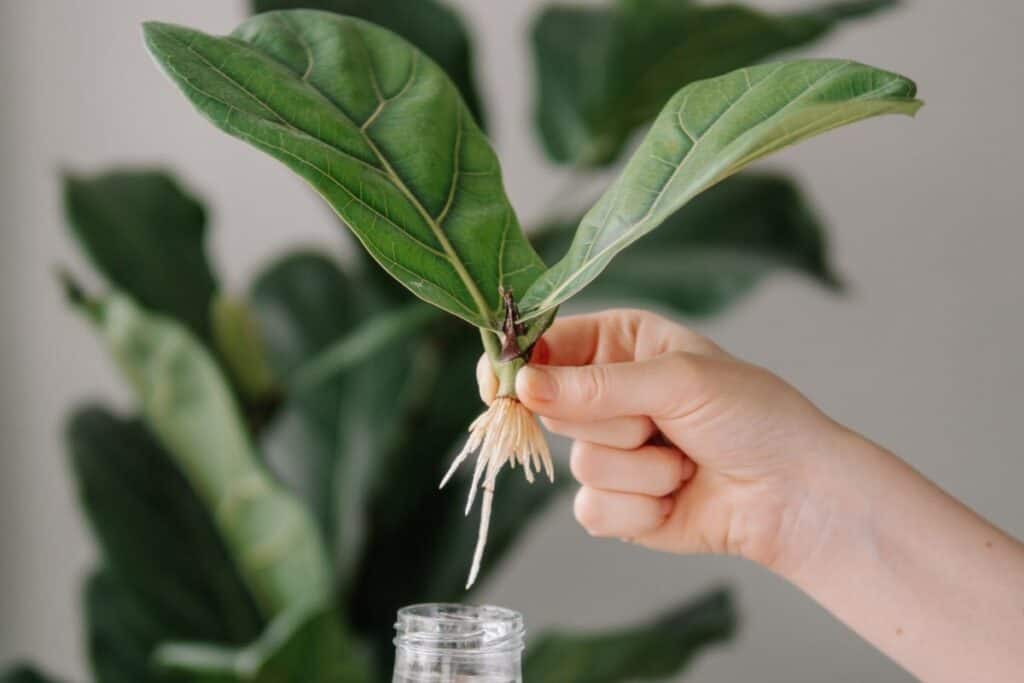
If the stems have become mushy, there’s a chance that the entire root system (or most of it) is rotten. The last resort is to propagate any remaining healthy terminal branches.
You may follow these steps:
- Look for a firm terminal branch about 4-6 inches (10-15 cm) long with at least three nodes, green leaves, and no signs of damage or discoloration.
- Cut just below the bottom node at a 45° angle using a sharp sterile knife or pruning shears.
- Wipe the dripping sap off with a clean cloth.
- Remove the leaves from the bottom node.
- Soak the bottom node in clean, filtered water in a clear glass.
- Leave the glass in a warm room (around 75 °F or 24 °C) with bright indirect light.
- Replace the water every 3-5 days.
- Plant in soil when the roots are about 2 inches (5 cm) long.
Alternatively, you can root the cutting in a 4-6-inch (10-15 cm) pot with perlite-coco peat mix or perlite-vermiculite mix.
However, I prefer to use the water method when propagating cuttings from a sick plant so I can see the progress of root development and confirm more easily if the plant has a chance of recovering. I also don’t have to worry too much about humidity and soil moisture when using the water method.
3. Poor Soil Quality
Poor soil quality is another common but rarely noticed cause of yellowing in fiddle leaf figs.
Here’s how inappropriate soil can affect fiddle leaf figs:
- Poorly draining soil can lead to overwatering or root rot.
- A soil mix with poor moisture retention can increase the risk of dehydration.
- An acidic soil with pH level below 5.5 can reduce magnesium accessibility through the roots, inhibiting chlorophyll synthesis and causing leaf yellowing. (I’ll discuss nutrient deficiency symptoms further in a later section.)
Here are some factors that can contribute to the acidity of the potting mix:
- High amounts of Canadian sphagnum peat moss, which has a pH of 3.0-4.5: Some home gardeners add peat moss to the soil mix to improve moisture retention, unknowingly reducing the soil pH in the process.
- Amending the soil mix with large amounts of acidic compost (pH as low as 5.0)
- Using homemade fertilizers like liquid coffee with a pH of around 5.0 (although the effect is short-lived). Although coffee grounds aren’t as acidic as liquid coffee, they won’t make better alternatives as they can unnecessarily raise soil moisture retention and encourage fungal growth, increasing the risk of overwatering and root rot.
- Using nitrogen-rich fertilizers like urea or ammonium nitrate in a potting mix can reduce the soil pH over time. It can eventually affect fiddle leaf figs that remain in the same pot for several years.
If the issue of under- or overwatering continues despite an improved watering routine, there is most likely a problem with the soil quality. Similarly, feeding more magnesium to the soil (i.e., Epsom salt) may not be helpful if the soil remains acidic.
The best solution is to repot your plant in appropriate soil with the following traits:
- Good moisture retention
- Well-draining and porous
- Rich in organic matter
- Close to neutral pH
With these in mind, my go-to soil mix recipe for fiddle leaf figs contains the following ingredients:
- 2 parts potting mix: Standard potting mixes typically contain peat moss and loamy soil to improve water-holding capacity. Choose a potting mix with a pH of around 6.5.
- 1 part perlite: Perlite has excellent aeration and drainage capacity. It’s also easy to re-wet, even when allowed to dry out. It’s also neutral (7.0), so it doesn’t affect soil acidity.
- 10% compost: The soil mix should have compost, which contains beneficial microorganisms that help with the breakdown and accessibility of soil nutrients. Check the pH of the compost using a soil pH meter. Around 6.0-7.0 should be safe.
Note: Some gardeners use alkaline water (pH of around 8.0) to neutralize acidic potting soil. However, this method has multiple downsides, making it an impractical solution.
Here are some issues to consider when using alkaline water:
- Although it’s easy to change the pH of the water, it has minimal and short-term effects on potting soils, especially if the current soil is too acidic (i.e., 5.5 or lower)
- Calculating how much alkaline water to use per pot volume and current soil acidity can lead to potential mistakes. The effect is also short-lived, so you must monitor the soil pH regularly.
- High water pH can precipitate or bind nutrients from fertilizers, making them inaccessible to plants.
4. Inadequate Light
Incorrect light conditions may also cause yellowing leaves in fiddle leaf figs.
Here’s how:
Insufficient Light
The large, green FLF leaves capture sunlight efficiently to generate food and synthesize important compounds like chlorophyll.
Without enough sunlight, a fiddle leaf fig may exhibit the following signs:
- The leaves appear pale or yellow due to the lack of chlorophyll. The discoloration is more apparent on the leaves facing away from the light.
- The stems may become leggy or start leaning toward the light source.
To fix the problem, you may follow the solutions below:
- Cut back the leggy stem or branches to an inch (2.5 cm) above a node. This will promote lateral branching.
- Gradually move the plant closer to a bright window. About a foot (30 cm) every 3-5 days until the plant is next to an eastern window or about 5 feet (1.5 m) from a south- or west-facing window. It’s even better if your room has light from multiple windows (i.e., east and south). Ensure the plant receives at least 8 hours of bright, indirect, natural light daily.
- Monitor the soil moisture, as brighter light conditions will prompt higher water consumption. You may need to increase the watering frequency.
- Turn the pot by 90-180° weekly or at watering to promote balanced light distribution and growth.
With improved conditions, the yellowing leaves should gradually revert to green.
Pro tip: I don’t recommend using artificial lights as the primary light source for fiddle leaf figs, but you can supplement your plant’s needs using full-spectrum grow lights for 6-10 hours daily during dark or cloudy days.
The downside, however, is that fiddle leaf figs may be too large, and the bottom leaves might not receive adequate light. You must strategically position the lights to ensure even light distribution.
For instance, you can set the lights at a 45° angle at least a foot (30 cm) away from the plant. You also need to rotate the pot or reposition the light stand regularly to ensure all sides of the plant have access to light.
Too Much Light
Interestingly, too much sunlight also breaks down chlorophyll, so plants need to synthesize the compound continuously to maintain the green leaves.
Fiddle leaf fig damage from intense sunlight may manifest in the following ways:
- Bleached or white patches on the leaf surface
- Leaf scorch or sunburn (yellow or brown patches on the sun-exposed leaves)
Here are some tips to fix the problem:
- Move the plant a few feet (+0.6 m) away from a sunny window, ensuring it receives only bright indirect light.
- If there’s limited space, hang a light curtain against the window to filter the light.
- Give the plant a quarter or a half turn weekly to promote even light exposure and give the leaves some time away from intense light.
If the discolored patches (white or yellow) don’t revert to green, the affected leaves will eventually fall off. You may also prune severely damaged leaves to encourage the plant to grow new and healthy leaves.
5. Aging Leaves
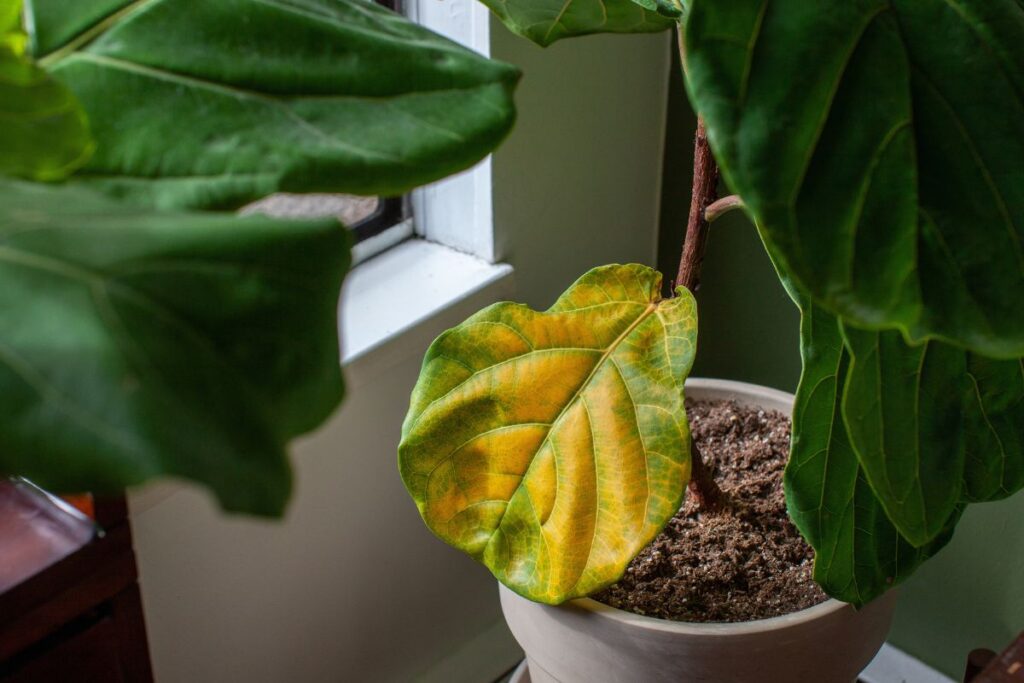
Lower leaves naturally age and turn yellow as they prepare to fall off. In my sunroom with east and south-facing windows, it usually takes around 12 months before bottom leaves fall off naturally from aging.
You’ll know the issue is due to aging if you see the following symptoms:
- The yellowing is limited to the oldest leaves at the bottom nodes.
- There’s even discoloration on the leaf surface.
Since aging is a natural process, you may gently prune yellowed leaves to improve plant appearance. However, avoid removing too many at once. You may limit removal to less than one-third of the foliage and repeat as needed at least a month later.
Pro tip: Pruning old leaves encourages new growth while helping the plant focus on healthier leaves.
6. Nutrient Deficiency
A deficiency in the four essential nutrients below may also result in yellow leaves:
| Nutrient | Function | Deficiency Symptom |
| Nitrogen | Essential for green growth Component of amino acids, enzymes, proteins | Premature yellowing of bottom leaves Even discoloration Slow or stunted growth |
| Potassium | Essential for water uptake and photosynthesis | Yellowing or browning leaf edges that gradually spread inward as interveinal chlorosis |
| Magnesium | Component of chlorophyll Helps with enzyme functions | Interveinal chlorosis starting from the bottom or older leaves |
| Iron | Component of chlorophyll Helps with enzyme functions | Interveinal chlorosis starting from terminal or younger leaves After prolonged deficiency, the leaf veins will also show a distinct yellow appearance |
It’s important to first evaluate your plant’s environment (light, temperature, humidity) and watering routine to rule out other potential causes of yellowing.
If all seems well, but the leaves are exhibiting the abovementioned symptoms, you may then assess your fertilizing routine.
Note: Using an at-home or lab test to check the nutrient concentration in the potting mix can be costly and impractical.
The following factors may cause nutrient deficiency:
- Nutrient depletion from plant consumption
- Leaching of nutrients from regular watering
- Incorrect soil pH
After confirming nutrient deficiency, the first step to fix the problem is to check the soil pH using a pH meter. Ideally, it should be between 6.0 and 7.0.
Levels below 5.5 can reduce nitrogen and magnesium availability, whereas pH levels close to or over 7.0 can inhibit iron accessibility.
If the soil pH is outside of the ideal range, you must repot your plant in an appropriate soil mix (as discussed earlier).
On the other hand, if the pH level is within optimal range, you must fertilize your plant with these tips:
- Choose a 3-1-2 liquid fertilizer with added micronutrients like iron and magnesium.
- Dilute the fertilizer to half the recommended strength and incorporate it into your watering can. Liquid fertilizers are fast-acting, and you should see an improvement in the leaves’ color within 2 weeks or so.
- Reapply the fertilizer every week until symptoms improve. Gradually increase the interval between applications until summer.
- Stop fertilizing fiddle leaf figs in the fall as they prepare for lower activity during the cold season.
- The following spring, you may proactively fertilize the plant to prevent the recurrence of symptoms. Water the soil with a half-strength liquid fertilizer when new leaf buds appear, and reapply every 2 weeks (or every other time you water your plant) until summer. Regular but conservative fertilization is an essential part of fiddle leaf fig care. You may increase the application frequency if the plant shows nutrient deficiency symptoms.
7. Bacterial Leaf Spot
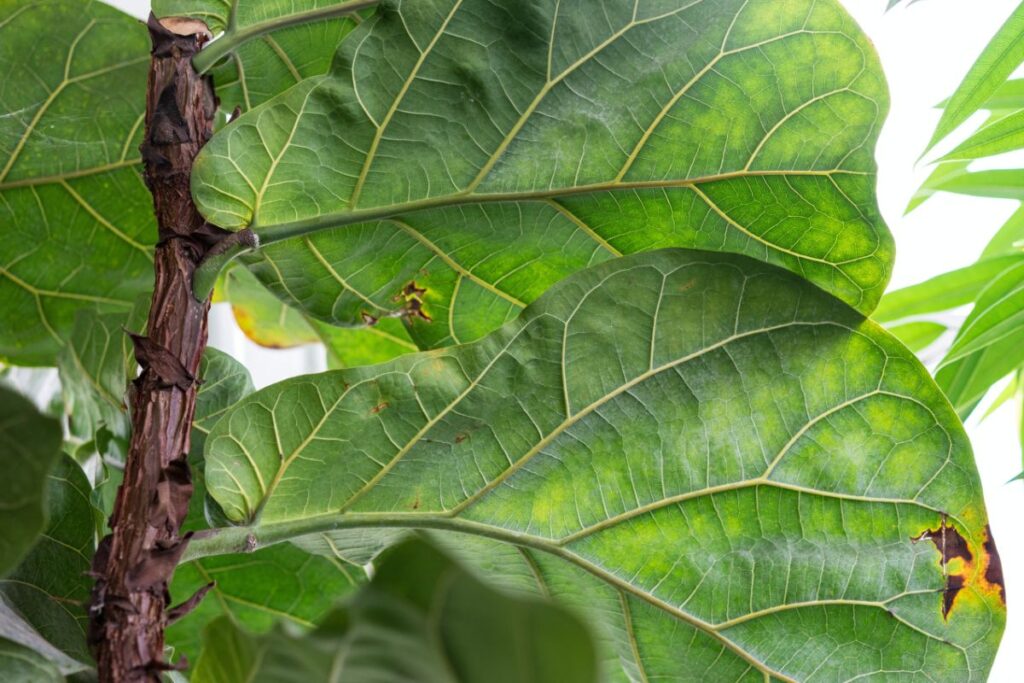
Xanthomonas campestris is a bacteria commonly affecting Ficus plants, such as Ficus lyrata or fiddle leaf fig. It thrives in warm and moist conditions, especially in summer.
Infected plants show the following symptoms:
- Tiny yellow water-soaked spots
- The spots gradually expand and turn brown or black in the middle
- Severely infected leaves fall off
Cuts, tears, or blisters on the infected leaves can release the pathogen, which can spread to other leaves or plants through water splashes and contaminated gardening tools, such as pruning shears or scissors.
There’s no effective cure for a Xanthomonas infection. However, you can help the plant recover if diagnosed at the early stage of the infection. Proper care will also help prevent the spread of the disease.
Here are some tips:
- Use sterile scissors or pruning shears to remove symptomatic leaves. Sterilize the blades with alcohol-dipped cotton balls between cuts
- Properly discard infected plant matter and cotton balls in a garbage bag.
- Wipe the sap from the cuts using a clean cloth.
- Brush the wound with cinnamon powder to prevent infection.
- Avoid overhead watering. Pour the water directly into the soil.
- Keep the large FLF leaves from touching other houseplants, especially Ficus relatives like the rubber plant.
- Observe your plant for the next several weeks, and remove leaves as they show symptoms. If most of the leaves appear infected, it’s best to discard the plant altogether to prevent the disease’s spread in your home garden.
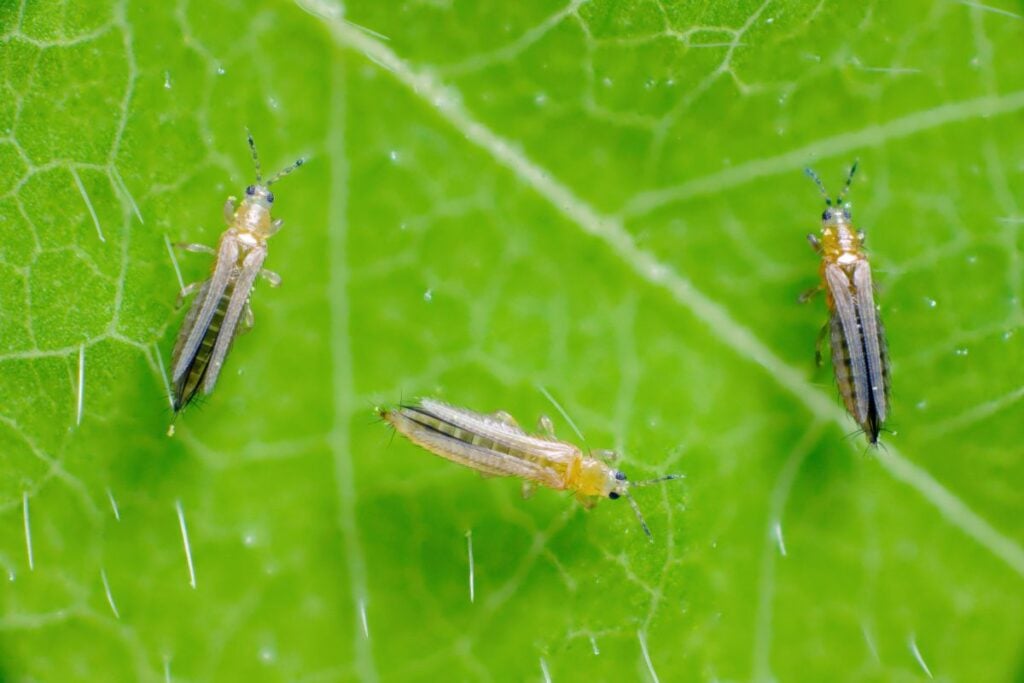
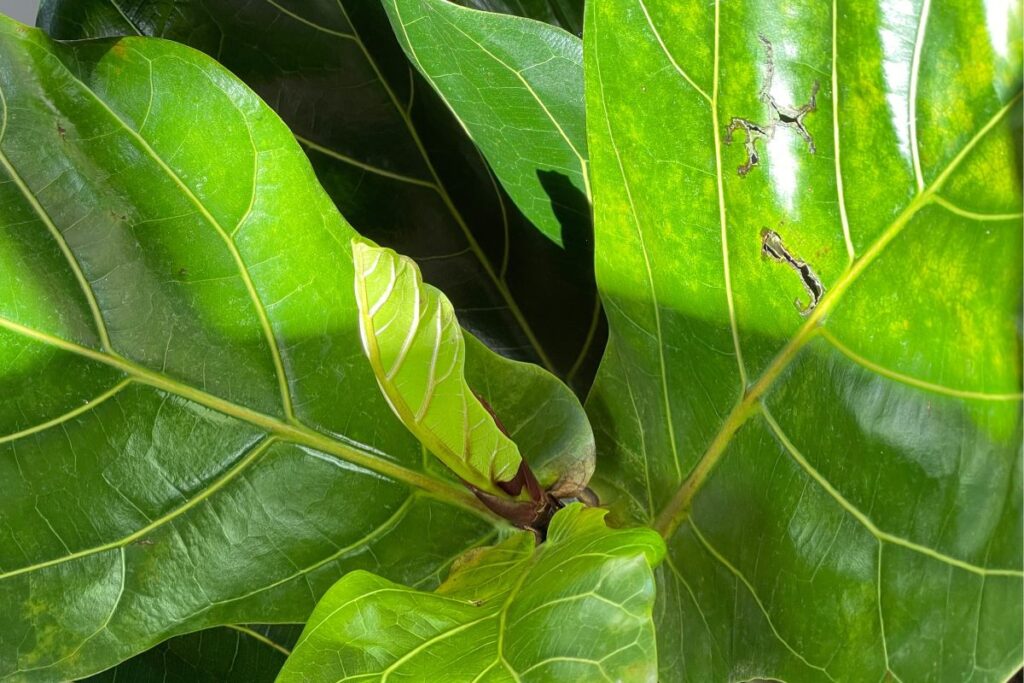
8. Pest Infestation

A spider mite infestation in fiddle leaf figs can lead to yellowing leaves. Spider mites are tiny, spider-like pests that are hard to spot.
You can confirm their presence through the following symptoms on the leaves:
- Tiny yellow or white spots or speckled patterns on the leaf surface
- Fine webs between leaves or stems, sometimes over and under the leaf surface
Under optimal conditions, healthy fiddle leaf figs contain calcium oxalate crystals in their sap, which can cause discomfort to chewing or sap-feeding pests.
That said, underwatered or nutrient-deficient fiddle leaf figs may be susceptible to other common houseplant pests that cause yellowing leaves, including the following:
- Aphids: Translucent insects about ⅛ inch (3.2 mm) long that hide below the leaf surface. They suck the sap from the leaves and excrete honeydew, which can attract sooty mold and ants. Aphids can draw sap from the leaves in large enough populations and cause tiny yellow spots.
- Mealybugs: Tiny pests about the same size as aphids but have fluffy white waxy covering. After feeding, they also gather underneath leaf surfaces or along the stems and excrete honeydew.
- Thrips: These slender, winged insects are hard to catch because they fly away when disturbed. Adults burrow into the leaf tissue, leaving behind a white or brown scar. In some cases, the scar may appear yellow. Thrips then excrete black flecks after feeding, helping confirm the cause of the damage.
Once you identify the pest responsible for the damage, you may choose the appropriate solution below:
- Manually remove pests using a cotton swab dipped in alcohol and drop them in a cup of soapy water. This method works on slow-moving crawlers like aphids and mealybugs.
- Wipe the webs or black spots (honeydew with sooty mold) off the leaf surface using a clean, damp cloth.
- Prune severely damaged leaves to improve the appearance of the plant. It’s also important to remove leaves with scars to eliminate thrips.
- Spray a neem oil solution on your plant once a week for at least 4 weeks to eliminate pests like aphids, mealybugs, and spider mites. Aim for the common hiding spots, such as leaf undersides. Spray the plant after sunset to prevent the oil from burning the leaves under intense light. Ideally, you should keep the plant in bright, indirect light during the course of treatment.
- Use a spinosad-based spray every 2 weeks to treat and prevent spider mite or thrip infestation. Ensure the room is well-ventilated, and keep pets away from the area for about 24 hours after treatment.
- For severe infestations, isolate the plant and remove affected leaves.
- Pro tip: Regularly inspect the underside of leaves where pests hide to catch infestations early.
9. Low Humidity
Dry indoor air, especially during winter, can lead to dehydration and yellowing. Low humidity levels during the warm season can also increase spider mite populations because they thrive in warm and dry conditions.
You may notice the following symptoms in stressed fiddle leaf figs:
- Yellow, dry, or crispy leaf edges
- The dehydrated leaves may turn brown and curl from the edges
- Leaf drop
- Reduced growth
- Holes on new leaves that unfurl
Here are some tips to help your plant recover and prevent further yellowing:
- Use a humidifier or group plants to maintain humidity levels between 40-60%. You can place fiddle leaf figs near succulents like jade plants, which transpire at night to boost the local humidity.
- Monitor the humidity around your plants using a portable hygrometer.
- Pro tip: For fiddle leaf figs less than 3 feet (0.9 m) tall, you can place a humidity tray with pebbles and water under the pot. Use a tray twice the pot’s diameter and ensure the drainage holes aren’t touching the water surface to prevent absorption and water-logging. This method is less effective for larger plants.
- Keep the plant away from kitchens or bathrooms because the humidity in these areas fluctuates a lot throughout the day.
10. Temperature Stress
Drastic and frequent temperature fluctuations can stress fiddle leaf figs.
Here are some situations to watch out for:
Heat Stress
Prolonged exposure to temperatures over 90 °F (32 °C) or occasional hot air from heating vents can increase the risk of dehydration and lead to the issues below:
- Yellow leaf edges that turn brown and crisp
- Curling leaf edges
- Drooping or wilting leaves
- Leaf drop
You can help your plant recover with these tips:
- Move the pot a few feet (+0.6 m) away from a hot sunny window, or hang sheer curtains at midday to prevent heat stress and sunburn.
- Maintain daytime temperatures close to 75 °F (24 °C) and around 65 °F (18 °C) at night to prevent stress.
- Keep the plant away from the path of hot air from heating vents.
Cold Shock or Chill Injury
A cold snap from exposure to drafty doors or windows and occasional cold air from cooling vents can cause chill injury to fiddle leaf figs. Affected plants may show mushy brown spots with yellow margins.
To fix the problem, you may use the following tips:
- Prune the damaged leaves using sterile shears.
- Move the plant away from drafty doors or windows. Ensure the leaves aren’t touching cold window panes.
- Keep the pot away from the path of cold air from cooling vents.
- Maintain daytime temperatures close to 75 °F (24 °C) and around 65 °F (18 °C) at night to prevent stress.
Routine Care and Maintenance
Here are some tips to ensure your fiddle leaf fig stays in tip-top shape:
- Watering Schedule: Maintain even moisture by watering when the top 1-2 inches (2.5-5 cm) of soil are dry. Be sure to check the soil moisture using the finger or chopstick test 3-5 days after watering and water your plant only when needed. You may need to adjust the frequency based on seasonal changes.
- Soil Quality: Use well-draining soil rich in organic matter and has a slightly acidic pH (6.0-7.0). Repot the plant every 2 years or so to refresh the soil or improve the quality.
- Proper Light Exposure: Ensure the plant gets at least 8 hours of bright, indirect light daily. Well-established plants will appreciate up to 4 hours of direct morning sun from an east or south-facing window. Avoid direct midday sun by drawing light curtains.
- Temperature and Humidity: Keep temperatures stable between 65-75 °F (18-24 °C) and humidity around 40-60%.
- Pest Prevention: Inspect the leaves regularly and treat any pest presence early with neem oil to prevent infestations
- Fertilization: Feed the plant with a 3-1-2 liquid fertilizer every 2 weeks during the growing season, diluted to half-strength. You may also use a slow-release granular fertilizer every 2 months from spring to summer. Make sure the plant is well-watered when fertilizing.
- Pruning: Prune aging or yellowed leaves and dead foliage to maintain plant health and aesthetics.
- Isolation: Isolate all new plants for at least 8 weeks to avoid introducing pests or pathogens to your home garden. You must also isolate sick or pest-infested plants until they’re fully recovered.
- Maintenance: Dust the leaves or wipe them with a clean damp cloth every week to keep them shiny and pest-free.
Final Thoughts
A myriad of issues can cause yellowing in fiddle leaf figs and proactive resolution is necessary to help the plant recover and prevent further damage.
Here’s a summary of the issues and solutions:
- Under- or overwatering: Water the plant when the soil’s top 1-2 inches (2.5-5 cm) is completely dry.
- Poor soil quality: Use a slightly acidic (6.0-7.0), well-draining soil mix with compost.
- Inadequate light: Move the plant to an area that receives at least 8 hours of bright indirect light, and rotate the pot weekly for even light distribution.
- Aging: Regularly prune old and yellowing leaves to keep the plant green and vibrant.
- Nutrient deficiency: Feed the plant with a half-strength 3-1-2 liquid fertilizer every 2 weeks from spring to summer.
- Bacterial leaf spot: Prune symptomatic leaves, improve watering routine, and keep an eye on the recurrence of symptoms. Discard severely infected plants.
- Pest infestation: Manually remove visible pests and treat the plant with neem oil spray or Spinosad-based spray.
- Low humidity: Maintain humidity level at 40-60% using a humidifier or pebbled tray with water.
- Temperature stress: Maintain stable temperatures at around 75 °F (24 °C) during the day and 65 °F (18 °C) at night.
Fiddle leaf figs require more attention than other houseplants due to their fast stress response to unstable environmental and care conditions. Regular, consistent care and early detection of issues will help maintain a vibrant and healthy plant.
Please leave a comment to share your experiences or tips for fiddle leaf fig care and help foster a community of plant enthusiasts.