Root Rot in ZZ Plants: Symptoms, Causes, and Fixes
The ZZ plant (Zamioculcas zamiifolia) is a popular low-maintenance indoor plant because it prefers infrequent watering and minimal care. If planted in a high-quality soil mix, it can sit in a low-light area in your home and hardly ever needs fertilization. Too much attention and excessive care, such as frequent watering, can lead to severe health issues like root rot.
Root rot in ZZ plants is caused primarily by frequent watering and poor soil drainage. Over-fertilization can also weaken the roots and make them vulnerable to fungal attack. Failure to identify and address the issue can damage the roots and rhizomes beyond repair.
In this article, I’ll explore the symptoms and potential causes of root rot. I’ll also recommend ways to fix the problem before it kills your ZZ plant.

Root Rot: An Overview
Many rot-causing plant pathogens (bacteria and fungi) naturally exist in the soil but may remain dormant in dry conditions, especially without a suitable host. In constantly wet or waterlogged soil, rot-causing pathogens can spread and kill a plant within 1-2 weeks.
The disease progresses in the following steps:
- Plant roots can’t access oxygen and become stressed.
- Plant pathogens multiply due to the availability of moisture.
- They feed on the stressed roots, causing decay and turning them black and mushy.
- The anaerobic decomposition process that occurs in wet soil can release gases that emit a foul, rotten smell.
- The rot spreads to the stems and foliage.
- The plant dies.
Some of the well-studied rot-causing fungi and bacteria genera include the following:
- Armillaria
- Erwinia
- Fusarium
- Phytophthora
- Pythium
- Rhizoctonia
- Sclerotinia
These pathogens can be transmitted from the soil to indoor potting mixes through the following:
- Contaminated soil in soil-based potting mixes
- Use of contaminated gardening tools
- Fungal spores on clothing
- Airborne spores through open doors and windows
ZZ Plant Susceptibility
ZZ plants have thick roots and underground stems (rhizomes or bulbs) that store extra moisture for long periods of drought. In their native environment, they thrive in loose, sandy soil and scarce rains.
They’re generally tolerant of occasional neglect and can last 2 months or so without water before showing distress. Even a wilted ZZ plant with wrinkled rhizomes can bounce back when properly rehydrated.
In contrast, they’re not accustomed to prolonged wet conditions. The roots and rhizomes prefer loose, well-aerated soils. Without access to oxygen, they become stressed and have less resistance to soil pathogens that cause rot.
Symptoms
Overwatered ZZ plants may sometimes show early signs of stress, making it easier to diagnose the problem before it leads to rot. However, the symptoms may come out only when the rot has already started.
Here are the symptoms to look out for:
- Soft, mushy leaves: ZZ plants naturally absorb water quickly and store it in the bulbs as a response to scarce rains and loose soils in the wild. When overwatered, the excess moisture goes up to the leaves and is lost through guttation. However, if the root pressure and low transpiration rate cancel each other out, the water stays within the leaves, turning them soft and mushy.
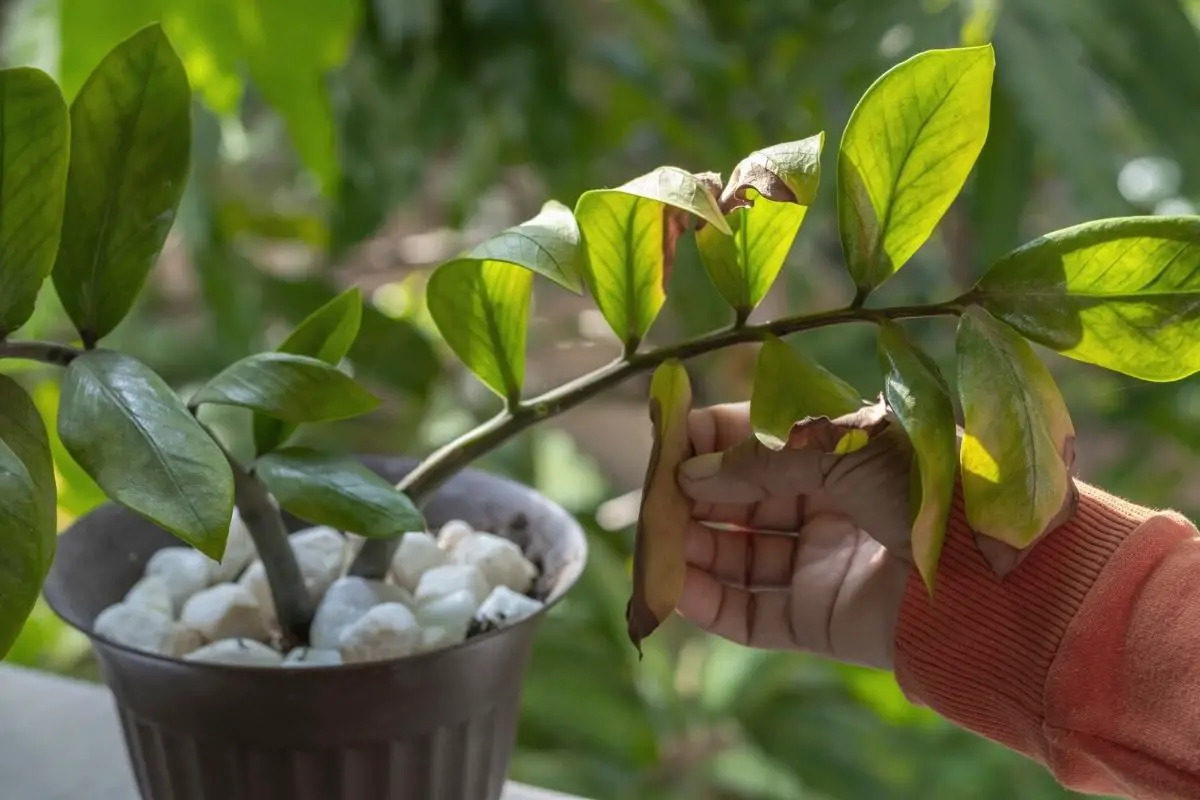
- Yellowing or brown leaves with soggy soil: The rotting roots can’t send moisture and nutrients to the shoots. So, even if the soil is visibly wet, the leaves appear nutrient-deprived or dehydrated. Lack of access to nitrogen, iron, or magnesium can turn the leaves yellow. The dehydrated leaves will also appear brown and crisp.
- Stunted growth: New growth will appear smaller and distorted as the rot progresses because there isn’t enough moisture and nutrients to go around the plant. Sometimes, you won’t even see new growth at all, even during the growing season.
- Wilting and drooping leaves: Due to dehydration, the plant cells along the stems, petioles, and leaf veins lose their rigidity. The plant wilts or droops and sometimes sheds leaves.
- Soft, mushy rhizomes or bulbs: Healthy ZZ plant bulbs are light brown and firm like potatoes. As the rot or decay progresses, they turn soft and mushy and may appear darker brown or black.
- Soft, mushy stems: Advanced stages of root rot can lead to stem rot. The stems become soft and mushy. They may also have water-soaked spots or blisters, causing them to fall over.
- Foul odor coming from the soil: The anaerobic decomposition of roots and bulbs in the soil emits foul-smelling compounds.
- Pests: Adult fungus gnats are attracted to wet, soggy soil and lay their eggs in it. The larvae feed on the roots, decaying organic matter, and fungi in the soil. The presence of adult gnats around your ZZ plant can help confirm wet conditions with a possibility of rot.

Common Causes
Here are the poor care practices that cause or increase the risk of root rot:
Overwatering
Overwatering means watering your ZZ plant too often without giving the roots and bulbs enough time to dry or breathe. It also encourages soil pathogen populations to rise rapidly and invites fungus gnats to lay eggs in the soil.
Poor Drainage
Large portions of moisture-retaining materials, such as peat or vermiculite, can keep the soil mix too wet for too long.
Improper Potting
Oversized pots or non-breathable containers can retain excess water around the roots for too long and increase the risk of root rot.
Over-Fertilization
Too much fertilizer salts in the soil can suck out the water from ZZ plant roots and bulbs to balance the concentration gradient. As a result, the roots become dehydrated, weak, and vulnerable to rot-causing pathogens.
Diagnosing Root Rot in ZZ Plants
It’s important to avoid disturbing a stressed plant too much while still identifying the problem. If you suspect root rot, follow these steps to confirm:
- Check the soil for moisture. An appropriate ZZ plant soil mix should have a dry surface (half-inch or 1.3 cm deep) 2-3 days after watering. If the surface is still damp or wet, it means there’s poor drainage and the roots are drowning.
- Scrape the soil surface to expose some bulbs. Wipe away the dirt to check if the bulbs have taken on a darker shade.
- Press them with your fingers or poke them with a wooden chopstick. Look for soft, mushy parts.
- Inspect the roots around the bulbs for mushy or black sections.
- While inspecting, you might get a whiff of a foul odor similar to vinegar or rotten eggs.
If you see the signs above after inspection, it means that root and bulb rot has set in and you must treat your plant promptly.

Immediate Actions to Take
Here are the initial preparations you need to make to save your ZZ plant:
- Carefully unpot the plant by scraping the edges of the pot with a flat knife. This will make it easier to slide the plant out and avoid further damaging the roots.
- Wear gloves and loosen the soil around the roots and bulbs.
- Use sterile scissors or pruning shears to cut off decayed roots, bulbs, stems, and damaged leaves.
- Spray or wipe the tool with alcohol between cuts to prevent the spread of infection.
- Throw the infected plant waste into a garbage bag.
Inspect the remaining bulbs and roots to determine the extent of the damage. The treatment approach can vary depending on how severe the damage is.
Pro tip: Don’t throw away the whole plant, even if more than half the roots and bulbs seem rotten. Keep some firm bulbs for planting later.
I had overwatered my first ZZ plant after planting it in a standard houseplant potting mix and watering it a bit too enthusiastically. I discarded the mushy bulbs and treated the rootless, shootless bulbs before leaving them to dry in a cardboard box until spring (about 3 months).
The bulbs became wrinkly over time but showed no signs of rot. About a month after planting in a compost-perlite mix, the bulbs put out new shoots. Many of my present-day ZZ plants came from those saved bulbs.
Treatment
ZZ plants with a few healthy bulbs left can still be repotted or replanted. On the other hand, if all bulbs are rotten, you may save the plant by propagating any healthy leaves.
Once all the damaged sections have been removed, you can treat the remaining roots and bulbs with these steps:
- Wash the roots and bulbs under room temperature (68 °F or 20 °C) running water to remove the remaining dirt.
- Soak them in a 1% hydrogen peroxide solution for 5-10 minutes to kill off any remaining pathogens.
- Let the plant dry and form callus on the cuts for 3-7 days in a cool, dry room.
- Prepare fresh soil mix containing equal parts perlite and compost.
- Prepare a breathable pot with drainage holes. It should be only 2 inches (5 cm) wider and up to 4 inches (10 cm) deeper than the rootball (including the space above the bulbs.
- Wash the pot with 10% bleach and rinse well.
- Fill the bottom of the pot with 2 inches (5 cm) of moist soil mix.
- Carefully position the roots and bulbs into the pot and fill in the gaps with more soil.
- Tamp the soil to remove air spaces and keep the plant upright.
- Make sure the bulbs are an inch (2.5 cm) below the soil and the soil surface is an inch (2.5 cm) below the rim of the pot.
- Place your plant in an area with moderate temperatures (75 °F or 24 °C) and humidity (40-50%) and bright, indirect light.
- Wait until the top half of the potting mix is dry before the first deep watering.

Leaf Propagation as an Alternative
In severe cases where all the roots and bulbs have rotten, leaf propagation may be your only option. The downside with this method is that it can take several years for the new plant to grow to your previous plant’s size.
On the bright side, you can improve your plant care and avoid root rot problems in the future.
You can propagate the leaves with these steps:
- Locate healthy leaves without signs of discoloration or damage.
- Use a sterile knife to cut a bit of the node along with each leaf.
- Let the leaves form a callus overnight.
- Prepare a shallow container about 3 inches (7.6 cm) deep and fill it with 2 inches (5 cm) of coco peat.
- Bury the bottom half-inch (1.3 cm) of the leaves in coco peat. Space the leaves an inch (2.5 cm) apart.
- Use a fine mist spray to moisten the substrate evenly without dislodging the leaves.
- Place the setup in filtered light for 10-12 hours a day and daytime temperatures of around 85-90 °F (29-32 °C) to encourage the roots to grow.
- Keep the top inch (2.5 cm) of the substrate moist until the cuttings develop a rhizome and roots within a month or so.
Pro tip: You can dip the cuttings in cinnamon powder as soon as you collect them. Some rot-causing fungi may have reached the stems but are just waiting to increase in large enough population to cause visible damage to the leaves.
The cinnamon powder can inhibit the growth of any existing pathogens in the cutting and prevent the attack from new airborne pathogens.
Recovery and Monitoring
Once done correctly, the treatments discussed above should help your ZZ plant recover. In about 2 months, you’ll see some signs that your newly treated plant is getting better, such as:
- No new discolorations, wilting, or leaf drops
- New leaf buds sprouting
- The plant getting taller
The last two signs might take longer to show if you treated your plant outside the growing season. Nevertheless, keep an eye on your care routine and avoid overwatering your ZZ plant.
General Care Tips and Preventative Measures
Here are some general care tips that can help prevent the reoccurrence of root rot:
Maintain a Suitable Environment
ZZ plants will thrive if the following parameters are observed:
- Potting Mix: Use a standard succulent mix or a compost-perlite mix for the perfect balance between drainage and moisture retention for ZZ plants.
- Pot Material: Use an unglazed terracotta pot with drainage holes for your ZZ plant to help wick away the excess moisture. It can effectively prevent waterlogging and root rot while supporting the weight of the foliage.
- Watering: Water the plant only when the upper half of the potting mix is dry (once every 2-3 weeks). Let the excess drip out of the drainage holes before putting your plant back on its saucer. Throw away any water pooling on the saucer.
- Light: Place your ZZ plant in bright indirect or filtered light to facilitate photosynthesis and transpiration. Although ZZ plants tolerate lower light conditions, they will have slower metabolic activities and the soil will take longer to dry out.
- Temperature: Keep daytime temperatures between 65 and 85 °F (18 and 29 °C) and don’t let nighttime temperatures fall below 60 °F (15.6 °C). Lower temperatures can also reduce metabolic activities.
- Humidity: Maintain humidity levels at 40-50%. ZZ plants can tolerate lower levels if well-watered, but higher levels can harm your plant. High humidity can slow down transpiration and evaporation rates and keep the plant and soil wet for too long. Lower the humidity by switching on a dehumidifier or electric fan to improve airflow.
- Fertilizer: Use high-quality compost in the potting mix during repotting. The following spring, feed the plant with a slow-release 10-10-10 fertilizer containing micronutrients like iron and magnesium.

Inspect Your Plant Regularly
Check your ZZ plant at the same time you water it to diagnose common problems before they go out of control.
Here are the tips for a thorough inspection and maintenance:
- Check the leaves for discoloration, holes, or wilting.
- Inspect the undersides of leaves for pests like aphids, scale insects, and mealybugs. Also, check for fungus gnats hovering around your ZZ plant.
- Rotate your plant by 90-180° at watering for even light distribution and facilitate even drying in the soil mix.
- Wipe the leaves with a clean, moist cloth to remove dirt accumulated during the past weeks.
- Top up the soil as needed when some bulbs start to poke out.
Adjust Care Seasonally
If you water your plant every 10-14 days in the summer to compensate for the rapid moisture loss due to high temperatures, avoid drastically switching to a monthly watering schedule in the fall to prevent dehydration.
Gradually increase the interval by 5-7 days and stabilize the watering schedule at 4-6 week intervals by mid-fall to late winter. ZZ plants are unlikely to die from a month or so of drought. They’re more likely to rot if the soil is kept moist even during a period of slow growth.
Final Thoughts
In their native habitat, ZZ plants are not used to steadily moist or wet soil, making them susceptible to root rot when kept in soggy conditions. They can survive drought for 2 months but will succumb to root rot within 2 weeks.
Therefore, it’s crucial to catch the signs of rot and treat the disease early on for better chances of saving your plant. Since root rot can inflict severe damage on ZZ plants, it’s always best to prevent it with proper care practices.
Stay vigilant and proactive in your plant care practices to enjoy healthy, thriving ZZ plants.
Feel free to reach out for any questions or suggestions. You can also subscribe to our newsletter for more updates.